How to setup USB storage sharing on your AC series VDSL/ADSL modem router
The File sharing feature allows you to share files in a USB drive to the wired or wireless users on the same network.
Note: Here take Archer VR2600 as an example.
Step 1
Insert your USB storage device into the modem router’s USB, then Wait and confirm the USB LED becomes solid on.
Step 2
Access the web-based management interface of Archer VR2600.
Please refer to How to log into the web-based interface of the VDSL/ADSL Modem Router (new designed blue UI)?
Step 3
Click Advanced > USB Settings -> Device Settings to check whether the USB device is identified by the modem router.
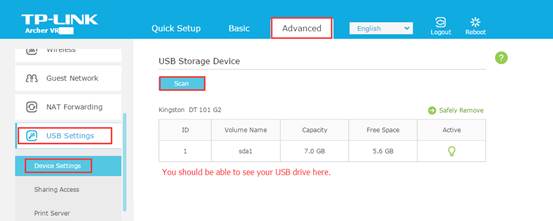
If there is no device listed on this page, please click Scan. And you can also try unplug the USB device and plug it back in.
The modem router can share eight volumes at most. You can click  on the page to detach the corresponding volume you do not need to share.
Step 4
If the USB device is identified, Share All is enabled so all content on the USB disk is shared by default, you may skip to step 7 directly if you prefer to share USB device by default.
Step 5
If you want to share specific folders only, follow the steps below:
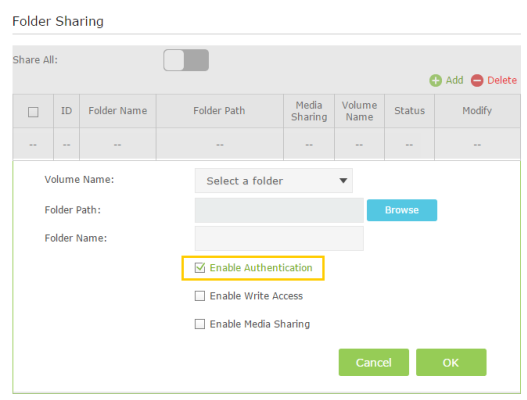
1) Switch off Share All, and click on Add to choose a new specific sharing folder. See example pictures below:
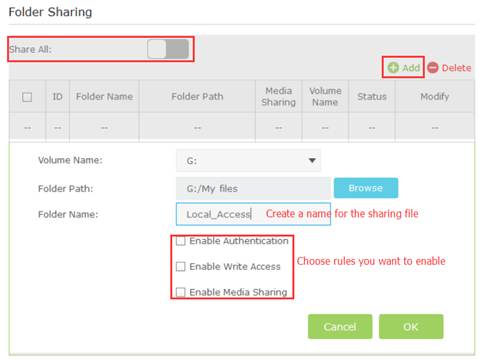
Explanations for the options:
Enable Authentication - A username and password will be required to access the Specific shared folder.
Enable Write Access - Select the check box to allow users to modify the folder content.
Enable Media Sharing - Enable media server function, you may click here to get more info.
2) Click OK to save the settings.
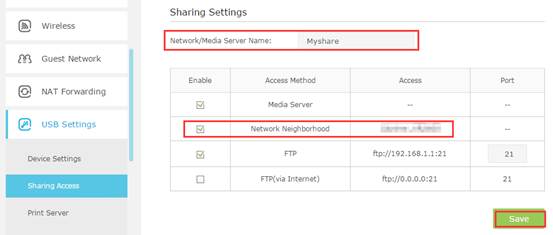
3) On the Sharing Settings part below, the Network/Media Server Name can be changed to something else. Make sure Network Neighborhood is checked, and enter a Network/Media Server Name as you like, such as Myshare, then click Save. Then you will be able to access the USB disk by visiting \\Myshare (for Windows) or smb://Myshare (for Mac).
Step 6: Authentication for sharing folder
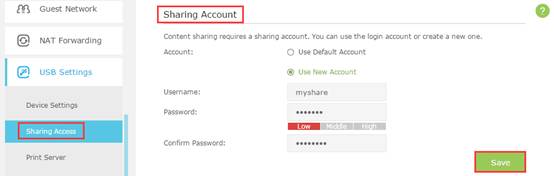
1) Go to Sharing Account on the top. If check on Use Default Account, it would be admin/admin. If you choose Use New Account, you will have a separate login account for the USB device. Click on Save.
2) Switch on Enable Authentication on the bottom. This option can only be checked when Share All is on.
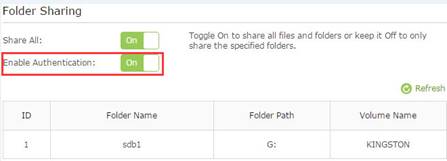
3) If Share All is disabled, enable Authentication for specific folders. Click on Modify to modify the corresponding settings.
Step 7: Access the USB Storage
1) For windows users:
Method 1: Open the Windows Explorer (or go to Computer) and type the server address \\myshare or \\tplinkmodem.net or \\192.168.1.1, then press Enter.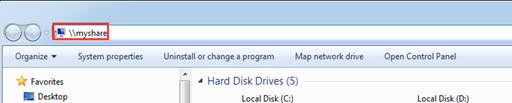
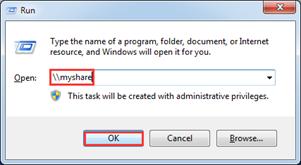
Method 2: Press Windows key and R key on the keyboard at the same time to open the Run application.
Input \\myshare or \\tplinkmodem.net or \\192.168.1.1in the dialog box.
Click OK.
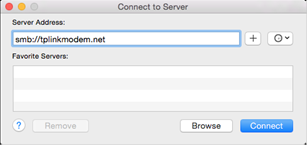
2) For MAC:
Select Go > Connect to Server.
Type the server address smb://myshare or smb://tplinkmodem.net or smb://192.168.1.1.
Click Connect.
3) For Linux Users:
On the top tray, go to Places > Connect to Server
Choose Service type: Windows share
Input Server myshare or tplinkmodem.net or 192.168.1.1
Click Connect.
NOTE: myshare is the name changed at Step 5 > 3)
Get to know more details of each function and configuration please go to Download Center to download the manual of your product.
Is this faq useful?
Your feedback helps improve this site.


TP-Link Community
Still need help? Search for answers, ask questions, and get help from TP-Link experts and other users around the world.