How to set up my modem router for TPG IPTV (TC solution)
This Article Applies to:
| Before you begin, please note:
Configuration overview: Internet Group: LAN port 1\2\3 + Wireless bind to PVC0 (8/35 PPPoE connection) IPTV Group: LAN port 4 binds to PVC1 (0/35 Bridge connection)  *You can change the IPTV Port according to your requirement. Step-by-Step Configuration: 1. Open your web browser and enter 192.168.1.1 in the address bar, then press "Enter".  2. Enter the username and password of your modem. By default it will be Username: "admin" and Password: "admin" or if you have changed this, please enter the new username and password. 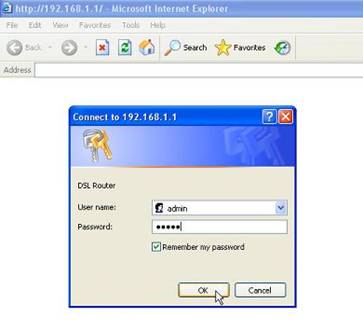 |
3. Configure PVCs and LAN settings:
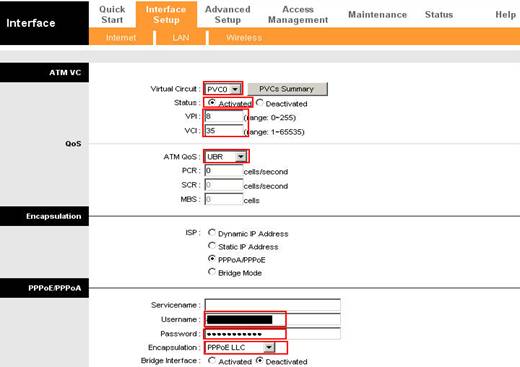
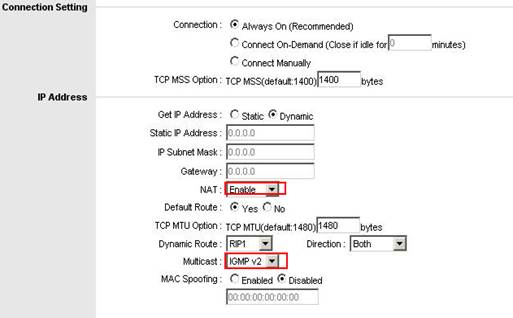
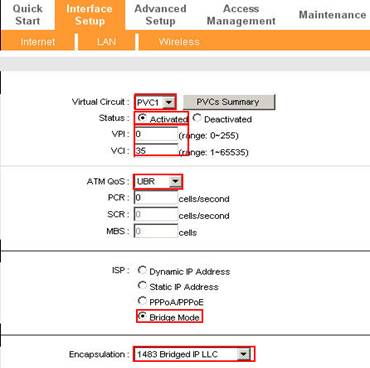
Go to Interface Setup->Internet, create two PVCs: PVC0 at PPPOE mode with “IGMP V2 ”enabled, PVC1 at Bridge mode which is for IPTV:
Go to Interface Setup->Internet, create two PVCs: PVC0 at PPPOE mode with “IGMP V2 ”enabled, PVC1 at Bridge mode which is for IPTV:
PVC0 (8/35) PPPoE with NAT for Internet: Port 1+Port 2 + Port 3+Wireless;
PVC1 (0/35) Bridge for IPTV: Port 4
PVC0 for Internet:
PVC 1 for IPTV:
Go to Status page to check the PVC Summary:

LAN Setting:
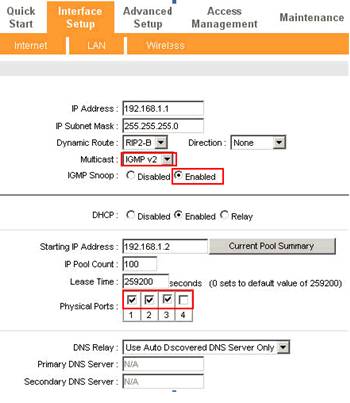
Go to “Interface Setup – LAN” page, Enable Multicast IGMP v2 and IGMP Snoop. At Physical Ports, please un-tick port 4.
Note: DHCP service will NOT be applied on port 4, so if now you’re connecting the computer with port 4, please re-connect the Ethernet cable to port1/port2/port3.
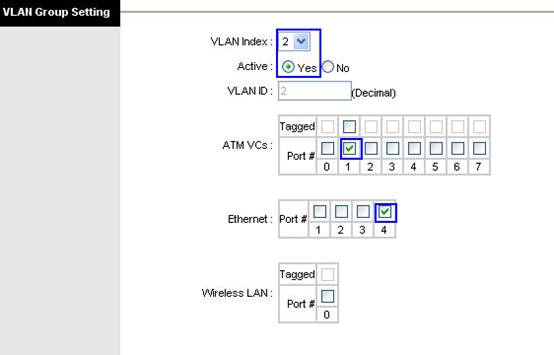
4. VLAN Setting:
VLAN1: PVC0 + LAN Port 1 + Port 2 + Port 3+Wireless LAN
VLAN2: PVC1 +Port 4
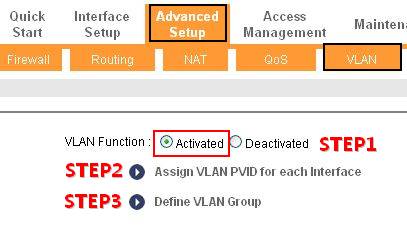
Step 1: Active VLAN Function;
Step 2: Go to “Assign VLAN PVID for each Interface”
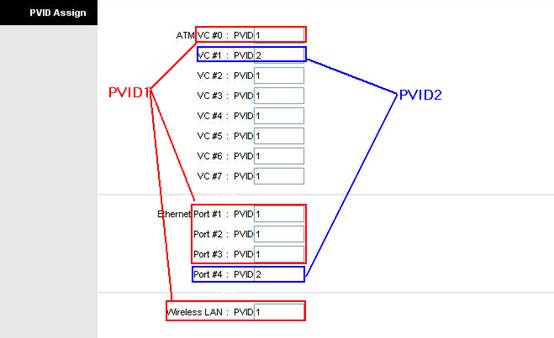
Click SAVE then NEXT

Step 3: “Define VLAN Group”
VLAN1: PVC0 + LAN Port 1 +Port 2 +Port 3+ Wireless LAN for Internet
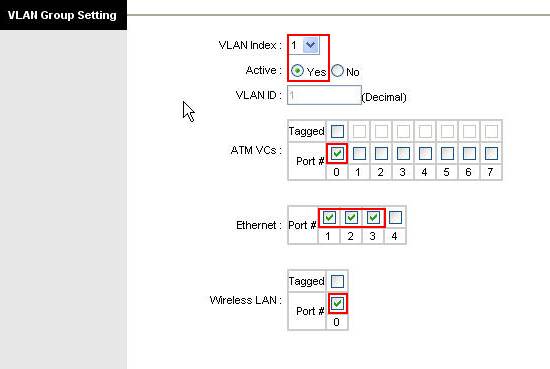
VLAN2: PVC1 + Port 4 for IPTV
Check finished VLAN Group List:

5. Go to Maintenance->SysRestart to reboot the router.

6. Register for IPTV service
After the reboot, please go to https://cyberstore.tpg.com.au/register/iptv.php to register for your Free TPG IPTV account. You must then follow the step-by-step guide to finish the on-line installation. If you require assistance with this, please contact TPG Technical Support on 1300 360 855.
NOTE:
1. The username and password are usually the same as your ADSL account;
2. You need to download and install the VLC software from http://www.tpg.com.au/iptv/download.php, this is an important step for IPTV settings;
3. In the "modem setup instruction" page, please choose "Other Modem";
7. View IPTV
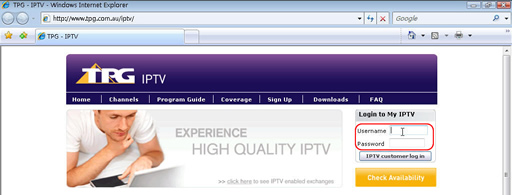
Once you have registered and configured your modem, you can begin viewing the TPG IPTV service. Please visit the TPG IPTV website at http://www.tpg.com.au/iptv , then log in with your username and password and enjoy your Free TPG IPTV service.

8. Backup the modem settings:
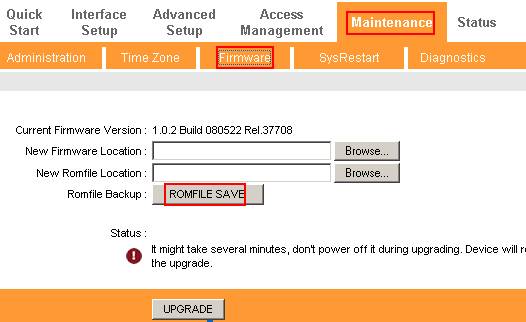
If your IPTV service works normally, you can export the current settings as a backup. Please go to Maintenance->Firmware page and click ROMFILE SAVE button. Then save the ROM-0 file in a floder as a backup configuration.
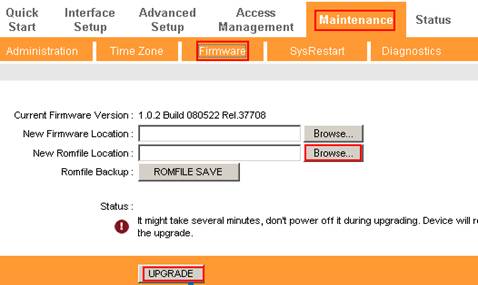
If you occasionally changed the modem setting and need recover the TPG settings, you can go to Maintenance->Firmware page and Browse the ROM-0 file then click UPGRADE button.
TP-Link Support Team
2011-3-28
Is this faq useful?
Your feedback helps improve this site.
TP-Link Community
Still need help? Search for answers, ask questions, and get help from TP-Link experts and other users around the world.
3.0-F1_1529482239075s.jpg)