How to set up the Powerline Network
What is Powerline?
Powerline products turn a home's electrical wiring into network cables and transmit signals to every room. You can form a Powerline network wherever there are power outlets, eliminating the need for expensive and complicated Ethernet cables.
To form a basic Powerline network, it must be deployed in a set of two or more and be connected to the same electrical circuit, whether wired or wireless.
Powerline adapters are simply plug-and-play devices, so please plug both Powerline units into the wall sockets in the same room. Wait 2-3 minutes; when the Powerline LED turns on, connect the Powerline adapter to your router's LAN port via an Ethernet cable, then relocate the other Powerline adapter to a new location and enjoy the new extended network.
If the Powerline adapters cannot pair automatically with each other, please follow the steps below.
Note: The models that begin with TL-WPAxxxx will broadcast the Wi-Fi signal ("W" for "Wireless"). The models that start with TL-PAxxxx only support the Ethernet connection.
Method 1: Secure Your Powerline Network by Pairing
Step 1: Power on the Powerline adapters.
Plug the Powerline extender into a wall socket near one of the existing Powerline adapters.
Note: We recommend that you plug in your Powerline devices as close to each other as possible when pairing. Then, they are relocated to where they are needed once the pairing is complete.
One Powerline adapter is required to connect to the router via an Ethernet cable.
Step 2: Pair the Powerline adapters.
a. Press and hold the Pair button for one second on the Powerline Adapter. Then, the Power light will blink quickly.
Note: If the Power light is not blinking, please press the pair button for a longer time.


b. Within 2 minutes, press and hold the Pair button on another Powerline Extender for one second. Then, the Power lights on both Powerline devices blink quickly at the same time.
c. When the Powerline LED turns on, the new device has been successfully added to your Powerline network.
Notes:
1. For TL-PA201/TL-PA211 V1/TL-PA210 V1/TL-PA251 V1, you need to hold the Pair button 3-8 seconds to start the pairing procedure.
2. If you want to add more adapters, please press the pair button on one of the existing networks, then press the Pair button on the adapter that wants to be joined in the existing network. Simply add them one by one as per the instructions above.
Step 3: Relocate the Powerline adapters.
After the powerline lights on both powerline adapters are all lit up, please connect one powerline adapter to the router via an Ethernet cable and plug another one into the desired place.
Notes:
1. If the Powerline light is red, it means the powerline adapter is experiencing poor signal strength. Try plugging it into another wall socket.
2. If you have a Powerline Extender, the default Wi-Fi name and password are printed on the Wi-Fi Info Card and the device's bottom label.
Step 4: Connect the device to the Powerline adapters and enjoy the internet.
If you want to change the Wi-Fi name of the Powerline Extender, please refer to How to Change Wireless Setting Using the tpPLC App (Smartphone).
Method 2: via tpPLC App (Smartphone)
Step 1: Connect to your Adapter via Wireless
Note: The adapter will need internet access for this to work.
Step 2: Launch the tpPLC APP
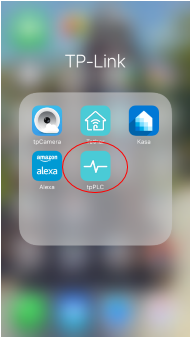
Step 3: Tap on the add button.
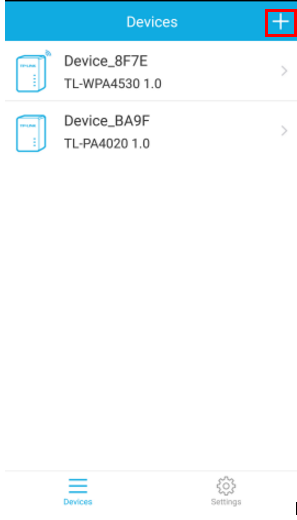
Step 4: Input the powerline key of the device.
Note: The powerline key can be found on the back of the device. Remember to plug it back in after that.
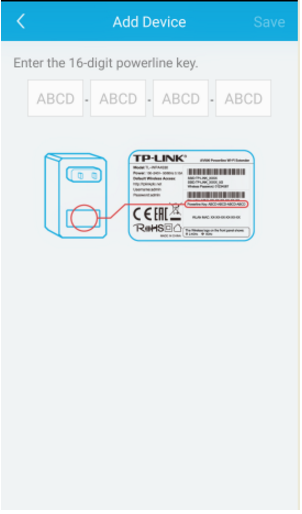
Step 5: Click Save.
Method 3: via Utility
Step 1: Write down the 16-digit powerline key printed on the device label.
Step 2: Plug the device into a wall socket and wait until its LEDs become stable.
Step 3: Open the utility and click Add Device on the left column.
Note: If the Utility hasn’t been installed yet, please refer to How to set a new powerline network name using tpPLC Utility
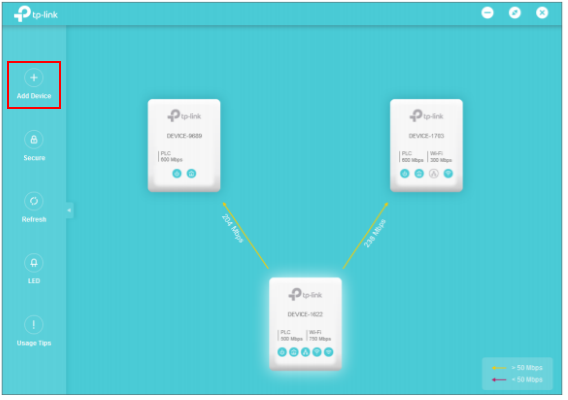
Step 4: On the Add a New Device page, enter the powerline key you wrote down, and click Save.
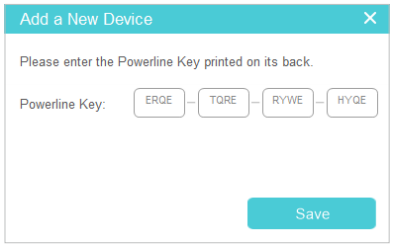
Now, the new device will appear in the utility.
To get to know more details of each function and configuration please go to Download Center to download the manual of your product.
Полезен ли беше този ЧЗВ?
Вашите отзиви помагат за подобряване на този сайт.


3.0_1532428956469j.jpg)