


How to use VIGI Cameras with Third-party NVR or NAS
Contents
Objective
Clients may sometimes choose not to use VIGI NVR but other management platform to manage VIGI Cameras when they already have a third-party storage device. VIGI Cameras support ONVIF Profile S and can be added to the third-party management device that also supports the ONVIF protocol. When ONVIF Profile S is not supported on the third-party device, VIGI Cameras can also allow for live streaming on the third-party platform via the RTSP protocol.
Requirements
- VIGI Camera
- Third-Party NVR or NAS
Introduction
It is recommended to use VIGI Cameras with VIGI NVR for easy access and management in batches. However, VIGI Cameras can also work with NVR or NAS of other brands that supports the ONVIF and RTSP protocols. This article will describe steps to use VIGI Cameras with a third-party NVR.
Configuration.
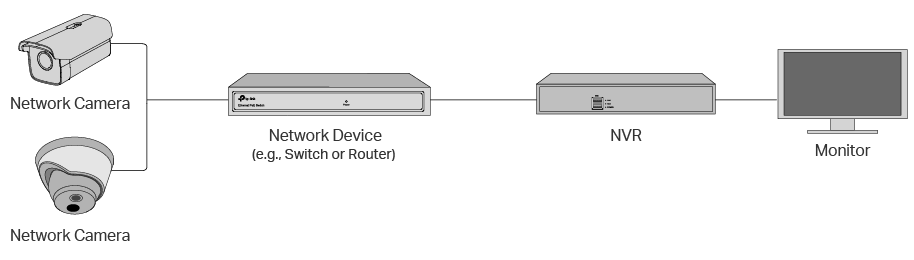
Step 1. Connect the VIGI Cameras with the third-party NVR according to the network topology below and make sure they are in the same network.
Step 2. When only a few VIGI Cameras need to be configured, log in to the Web Management Interface of each camera for initialization. When a large number of VIGI Cameras are to be initialized, configure them in batches using VIGI Config Tool.
Web Management Interface
1. Use the IP address of the VIGI Camera to access its Web Management Interface. The default IP address is 192.168.0.60.
2. Set the management password for the camera in the initialization page.
3. Go to Settings > Network Settings > Connect and mark down the current IP address.

4. To add the VIGI Camera to the third-party device, refer to FAQ-3718. Note that the ONVIF port for VIGI Cameras is 2020, and the RTSP port is 554. The username is admin by default and cannot be changed.
VIGI Config Tool
1. Go to the TP-Link website to download VIGI Config Tool. Here is the download link.
2. Install VIGI Config Tool on a Windows PC and connect the PC to the same network as the VIGI Camera.
3. Launch VIGI Config Tool and select all the VIGI Cameras to be configured.

4. Click Batch Action and choose Batch Initialize.

5. Initialize the cameras in batches and mark down their IP addresses after initialization.


6. To add the VIGI Cameras to the third-party device, refer to FAQ-3718. Note that the ONVIF port for VIGI Cameras is 2020, and the RTSP port is 554. The username is admin by default and cannot be changed.
Step 3. Log in to the third-party NVR or NAS and check if the VIGI Cameras have been under management.
Conclusion
You have now successfully added VIGI Cameras to the third party NVR or NAS.
Get to know more details of each function and configuration please go to Download Center to download the manual of your product.
Esta FAQ é útil?
Seu feedback ajuda a melhorar este site.


_normal_20231211014914g.png)