How to upgrade the firmware of TP-Link Range Extender (new designed blue UI)

RE500 , RE400 , RE505X , RE715X , RE600X , RE653BE , TL-WA860RE( V2 ) , RE350 , RE705X , RE650 , TL-WA865RE( V2 ) , RE450( V1 ) , RE603X , RE350K , RE335 , RE605X , RE355 , RE500X , RE700X , RE590T , RE1500X , RE580X , RE1750X , RE780X , RE500XD , TL-WA850RE( V2 ) , RE2700X , RE580D , TL-WA855RE , TL-WA830RE( V3 ) , RE380D , TL-WA854RE( V2 )
Recent updates may have expanded access to feature(s) discussed in this FAQ. Visit your product's support page, select the correct hardware version for your device, and check either the Datasheet or the firmware section for the latest improvements added to your product. Please note that product availability varies by region, and certain models may not be available in your region.
Notice:
1) Some models have multiple hardware versions. Please verify the hardware version of your device. It can only upgrade firmware for the same hardware version. Wrong firmware upgrading may damage your device and avoid the warranty.
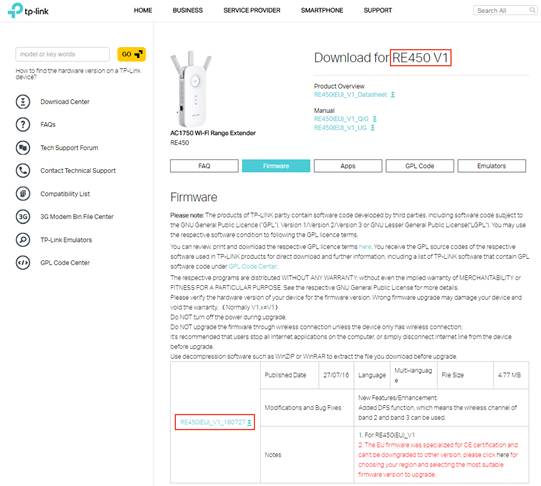
For how to check the hardware version of the device please click here.
For example, if you have a RE450 Ver:1.0 , it means its hardware is Version 1.You can only check its available firmware versions under RE450 V1.
2) Do NOT upgrade the firmware via wireless connection, unless the device only has wireless connection, like TL-WA854RE.
3) Do NOT turn off the power or cut down the Ethernet cable during upgrade process;
Step 1
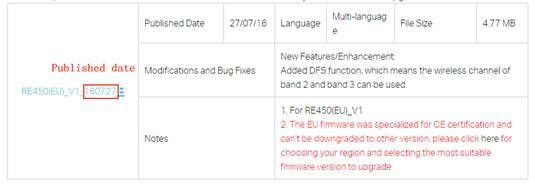
Download the latest firmware version for your device, then use unzip tools such as WinZIP or WinRAR to extract the firmware file to a folder.
The 6 digits in the firmware means the published date of the firmware.
Step 2
Login to the TP-LINK Range Extender’s web management page.
How do I log into the web-based Utility (Management Page) of TP-LINK Range Extender?
Step 3
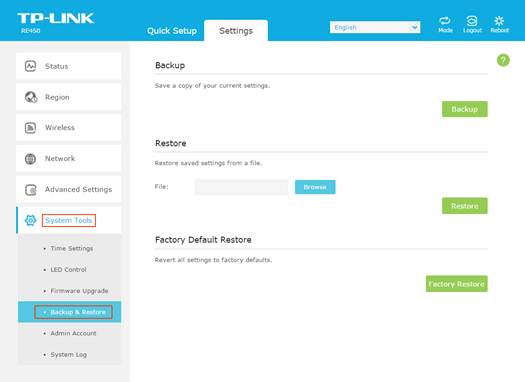
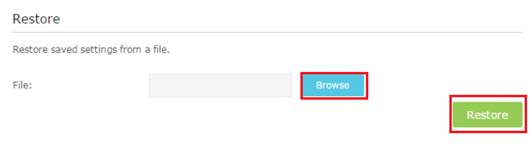
It is suggested to back up your current Settings before the upgrade, because firmware update may clear all the settings on the extender. Click System Tools--Backup & Restore, and save the current settings to a location.
Step 4
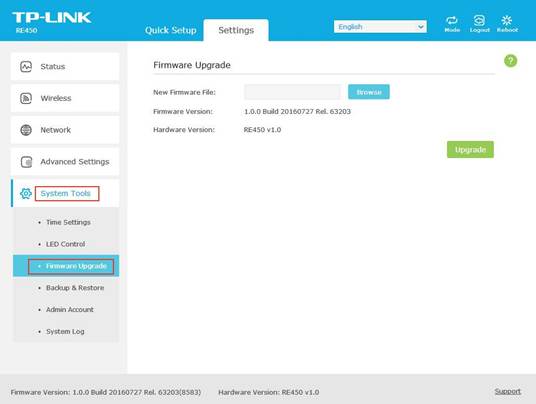
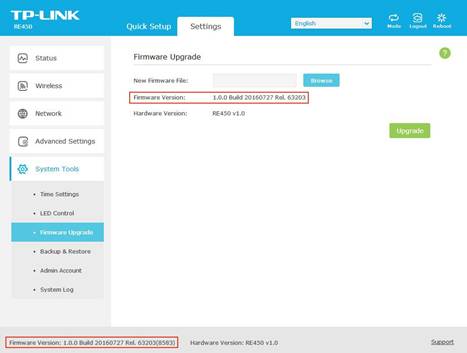
Click on System Tools--Firmware Upgrade; click the Browse button to choose the firmware file (ended with .bin).
Step 5
Click the Upgrade button. The device will reboot automatically after the upgrading has been finished. Please wait about 2 minutes.
Step 6
Check if the extender’s firmware has been upgraded.
Step 7
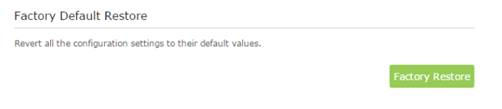
It is recommended to restore the device to factory default to make sure the new usage takes effect; Click System Tools-- Back up & Restore, Click Factory Restore Button.
Step 8
After the factory defaults, please reconfigure the router from scratch or restore the settings from the saved back up file.
Note:
Please pay attention to the Notes of the firmware you downloaded. Some firmware cannot use the backup file of the older firmware. If so, please reconfigure the router manually, instead of using the back up file from the previous firmware.
Get to know more details of each function and configuration please go to Download Center to download the manual of your product.
¿Es útil este artículo?
Tus comentarios nos ayudan a mejorar esta web.
Selecciona qué describe mejor la información:
- Insatisfech@ con el producto
- El articulo es demasiado complicado
- Título es confusa o errónea
- No es la información que estaba buscando
- El artículo es poco claro
- Otro
Gracias
Agradecemos los comentarios.
Pulsa aquí para contactar con el soporte técnico de TP-Link.
Este sitio web utiliza cookies para mejorar la navegación por el sitio web, analizar las actividades en línea y ofrecer la mejor experiencia de usuario posible en nuestro sitio web. Puedes oponerte al uso de cookies en cualquier momento. Encontrarás más información en nuestra política de privacidad .
Cookies Básicas
Estas cookies son necesarias para el funcionamiento del sitio web y no pueden desactivarse en tu sistema.
TP-Link
accepted_local_switcher, tp_privacy_base, tp_privacy_marketing, tp_smb-select-product_scence, tp_smb-select-product_scenceSimple, tp_smb-select-product_userChoice, tp_smb-select-product_userChoiceSimple, tp_smb-select-product_userInfo, tp_smb-select-product_userInfoSimple, tp_top-banner, tp_popup-bottom, tp_popup-center, tp_popup-right-middle, tp_popup-right-bottom, tp_productCategoryType
Livechat
__livechat, __lc2_cid, __lc2_cst, __lc_cid, __lc_cst, CASID
Youtube
id, VISITOR_INFO1_LIVE, LOGIN_INFO, SIDCC, SAPISID, APISID, SSID, SID, YSC, __Secure-1PSID, __Secure-1PAPISID, __Secure-1PSIDCC, __Secure-3PSID, __Secure-3PAPISID, __Secure-3PSIDCC, 1P_JAR, AEC, NID, OTZ
Cookies de Análisis y de Marketing
Las cookies de análisis nos permiten analizar tus actividades en nuestro sitio web con el fin de mejorar y adaptar la funcionalidad del mismo.
Las cookies de marketing pueden ser instaladas a través de nuestro sitio web por nuestros socios publicitarios con el fin de crear un perfil de tus intereses y mostrarte anuncios relevantes en otros sitios web.
Google Analytics & Google Tag Manager
_gid, _ga_<container-id>, _ga, _gat_gtag_<container-id>
Google Ads & DoubleClick
test_cookie, _gcl_au
Meta Pixel
_fbp
Crazy Egg
cebsp_, _ce.s, _ce.clock_data, _ce.clock_event, cebs
lidc, AnalyticsSyncHistory, UserMatchHistory, bcookie, li_sugr, ln_or