How to Configure MAC Authentication Function on TP-LINK CAP/AC Serial Products
Why do we use MAC authentication? Since the openness of wireless network, any wireless terminal in the coverage area of the CAPs can get access to the network, which is a great threaten if unexpected devices come up and connect to the wireless network. To improve the security level and allow or deny some certain clients (MAC address ID) can use WIFI, we can set up MAC authentication function by using White List or Black List. This document will introduce how to configure MAC Authentication function on TP-Link CAP/AC Serial product like AC500.
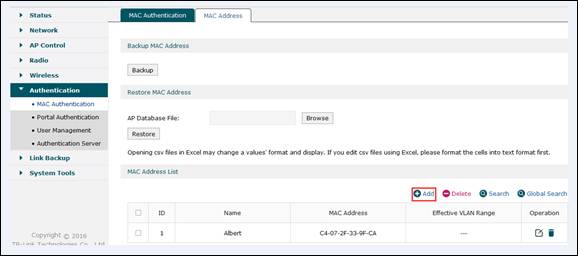
Step 1. Add the MAC address into the MAC Address List (In this instance, we add Albert’s mobile phone’s Mac address in the list).


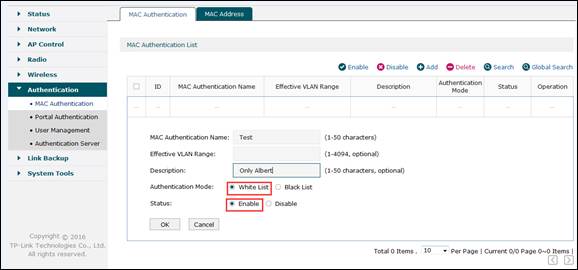
Step 2. Add the MAC Authentication entry and enable “White List” to make MAC authentication effective.


Note:
- White List: When you choose White List, devices whose MAC addresses are in the MAC Address table are allowed but all the other devices are denied.
- Black List: When you choose Black List, devices whose MAC addresses are in the MAC Address table are denied while all the other devices are allowed.
- Effective VLAN Range: when you fill this option with some certain VLAN IDs, please make sure the corresponding SSIDs are bound to the these VLANs as well; If you leave the option blank, this MAC authentication will take effect to only the SSIDs that are not bound with any VLANs.
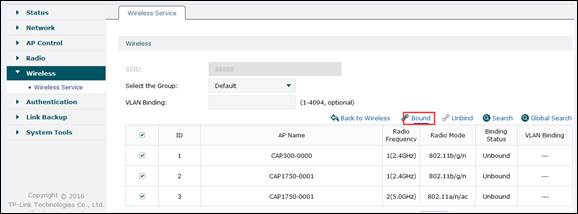
Step 3. Create wireless SSID and bound it to CAP.


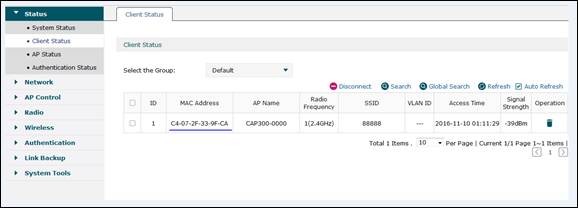
Step 4. Now we use Albert’s mobile phone to connect to Wi-Fi “88888” and we can see the wireless connection can be established successfully. But if we use other clients whose MAC address is not in the white list, wireless connection will be refused.


¿Es útil esta pregunta frecuente?
Sus comentarios nos ayudan a mejorar este sitio.


1.0_1505290145255s.jpg)
1.0_1505290425728l.jpg)
