How to Setup MAC Binding on a TP-Link Router (Blue UI)
Configuration Guide
Updated 07-08-2021 02:19:00 AM
110136
This Article Applies to:
Archer C2(EU)( V3 ) , Archer C59( V1 ) , Archer C1200( V1 ) , Archer C5400( V1 ) , Archer C58( V1 ) , Archer C25( V3 ) , Archer C3200( V1 ) , Archer C5( V2 ) , Touch P5( V1 ) , Archer C2( V3 ) , Archer C50( V2 ) , Archer C1900( V1 ) , Archer C60( V1 ) , Archer C2600( V1 ) , Archer C8( V2 ) , Archer C3150( V1 ) , Archer C9( V2 V3 ) , AD7200( V1 )
Recent updates may have expanded access to feature(s) discussed in this FAQ. Visit your product's support page, select the correct hardware version for your device and check either the Datasheet or the firmware section for the latest improvements added to your product.
Step 1: Log into the Router
How do I log into the web-based Utility (Management Page) of TP-Link wireless router?
Step 2: Click Advance
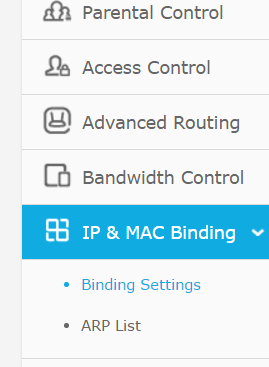
Step 3: Click on IP and MAC Binding
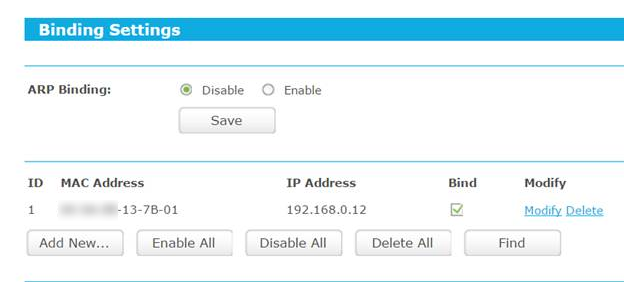
Step 4: Enable ARP Binding then click Save, then click Add new
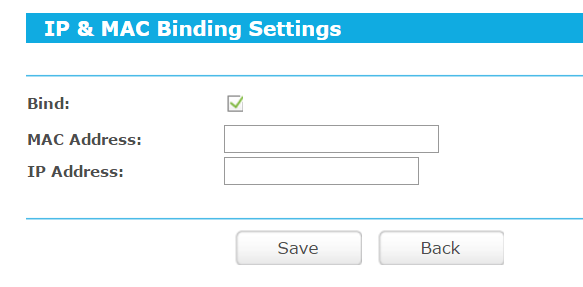
Step 5: Input the MAC and IP Address of the device you want to bind and click Save
*Ensure Bind is checked
Byla tato FAQ užitečná?
Vaše zpětná vazba nám pomůže zlepšit naše webové stránky
Ano
Ne
Co vám na tomto článku vadí?
Nespokojen s produktem
Příliš složité
Matoucí nadpis
Nevztahuje se na mě
Příliš neurčité
Jiné
Rádi bychom získali vaši zpětnou vazbu. Dejte nám prosím vědět, jak můžeme tento obsah vylepšit.
Odeslat
Děkujeme
Vážíme si vaší zpětné vazby