How do I log into the Web-based Interface of Wireless Access Point or Extender(case 1)?
This Article Applies to:
The web-based management page is a built-in internal web server that does not require internet access. It does however require your device to be connected to the TP-Link device. This connection can be wired or wireless.
Note: Low version of your web browser may cause compatibility problem with the web-based interface(management page) of your device, such as unable to log into the interface, display incomplete features etc. It is strongly recommended to use a wired connection if you are going to change the device’s wireless settings or upgrade the firmware version.
Note: For those products whose DHCP are enabled by default, which are not listed as following, please refer to this link.
This article applies to those wireless access points and extenders whose DHCP are disabled by default. (TL-WA500G,TL-WA501G,TL-WA601G,TL-WA701ND v1, TL-WA801ND v1, TL-WA901ND v1/v2,Tl-WA730RE,TL-WA5110G,TL-WA5210G,TL-WA7210N V1, TL-WA7510N, TL-WA830 v1/v2 of old version.)
Before logging in to the Web-based Interface, you need to assign static IP address on your computer.
Step 1
Connect your computer to the LAN port of TP-Link with an Ethernet cable.
Step 2
Assign a static IP address manually on your computer.
If you don’t know how to assign a static IP for your computer, you can refer to this FAQ:
Here taking Windows 7 as an example:
1. Left click on Start- Control Panel- Network and Internet- Network and Sharing Center- Change Adapter Settings (on the left side menu).
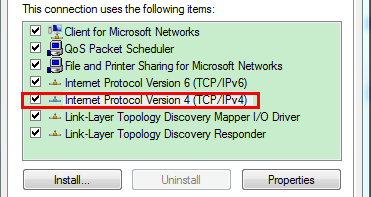
2. Right click on Local Area Connection and go to Properties. Then please double click on Internet Protocol Version 4(TCP/IPv4).

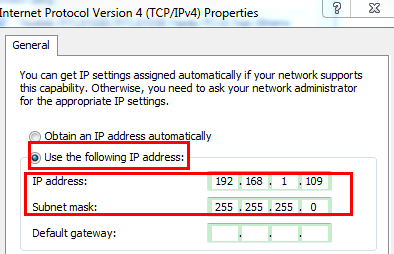
3. Please set a static IP address as 192.168.1.x as an example. If your AP is 192.168.0.254 please set a static IP address like 192.168.0.X.

Note:
The LAN IP changes by model. Please find it on the bottom label of the product.
Step 3
Open the web browser and type the IP address of the access point/extender (Default is 192.168.1.1/192.168.1.254/192.168.0.254) into the address bar and then Press Enter.

Step 4
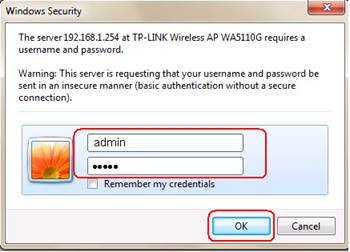
Type the username and password into the boxes of the login page, and the default username and password both are admin, then click on OK.

NOTE:
1. The above IP settings are for login to the Web-based Interface of TP-Link for configuration.
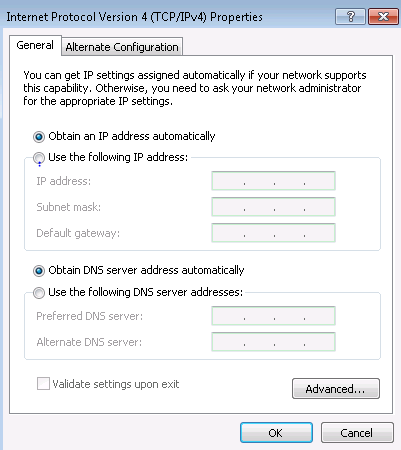
2. If you have a broadband router that provide you Internet connection, please re-configure the IP settings of your computer to Obtain an IP address automatically & Obtain DNS Server address automatically.

Get to know more details of each function and configuration please go to Download Center to download the manual of your product.
Byla tato FAQ užitečná?
Vaše zpětná vazba nám pomůže zlepšit naše webové stránky


