How to Configure Guest Network on Archer C2 and Archer C20i routers
This Article Applies to:
Guest Network provides secure Wi-Fi access for guests to share your home or office network. When you have visitors in your house, apartment, or workplace, you can enable the guest network for them. You can set different access options for Guest Network users, which is very effective to ensure the security and privacy of your main network.
Step 1
Please refer to the following link to access the management page.
Step 2
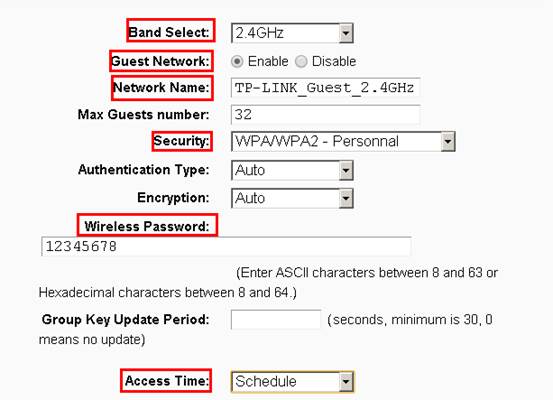
Please go to Guest Network page on the left hand side menu and Check Enable.
You can Enable either the Wireless 2.4Ghz or the Wireless 5GHz network as your guest network on the Band Select .
Then you can set up the Network Name and Wireless Security and Access Time that the guests are allowed to connect.
There are only two security types available, Disable Wireless Security & WPA/WPA2-Personnal. It is recommended to select WPA/WPA2_Personal as the security type. Then please type in a Wireless Password as you like.

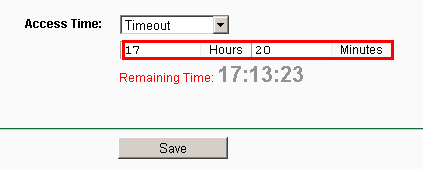
There are two options for you to set up the access time, Timeout and Schedule. Timeout is to set connection timeout count value and Schedule is to set the available time and date for all of the visitors.
Timeout-- After this time the Guest Network will close.

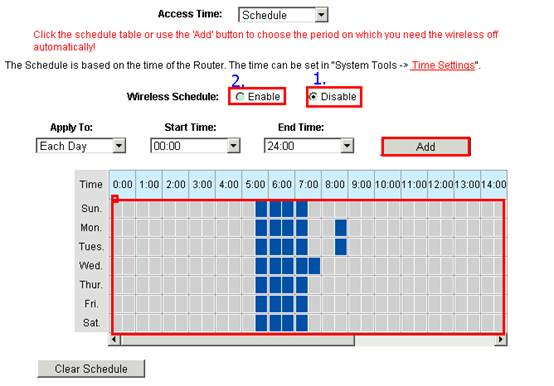
Schedule--You can specify the time frame when the Guest Network would be activated.
1. The Wireless Schedule is Disable by default, which means that the Guest Network is active all the time.
2. Enable the Wireless Schedule then you can choose the time frame when the Guest Network is off automatically. Click the schedule table or use the ‘Add’ button to choose the period which you need the wireless to be off automatically.

Please click Save to make the settings take effect.
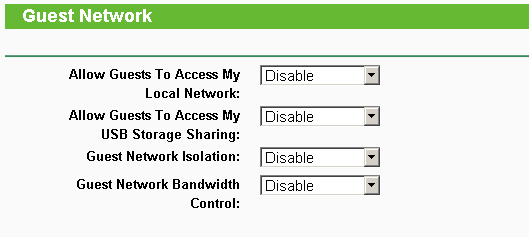
Note Advanced setting: If you want to configure some advanced settings, please see below. Enable the options you need, by default, they are all disabled.

The explanation of the above 4 options:
1. Allow Guest to access my Local Network:
If you want to allow the clients in the guest network to access the clients in your Local Network, please select Enable. If not, please keep it disabled.
2. Allow Guest to access my USB Storage Sharing:
If you want to allow the clients in the guest network to access the USB Storage Sharing, please select Enable. If not, please keep it disabled.
3. Guest Network Isolation:
If you select Enable, the clients in the guest network will not be able to communicate with each other.
4. Guest Network Bandwidth Control:
With this feature, you can limit the Bandwidth of the guest network.
Get to know more details of each function and configuration please go to Download Center to download the manual of your product.
هل تجد هذه الأسئلة مفيدة؟
مشاركتك تساعدنا في تحسين الموقع
TP-Link Community
Still need help? Search for answers, ask questions, and get help from TP-Link experts and other users around the world.