How to share your USB storage device with TL-WR902AC (new logo)
Share your USB storage device with different users on the network.
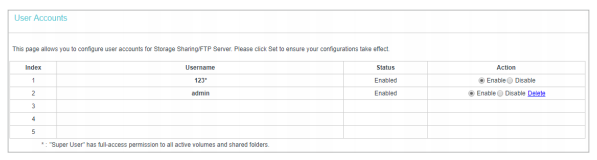
To set user accounts:
1. Visit http://tplinkwifi.net, and log in with the username and password you set for the router.
2. Go to USB Settings > User Accounts.
3. Choose the Index for the account and specify a new username and password in the New Username and New Password fields, and reenter the password for confirmation.
Note: For an account with Index 1, it is the Super User with full access to all active volumes and shared folders.

4. Click Set.
5. You can check the newly added account and also edit or delete the account.
To access the USB disk:
1. Connect Your USB Disk
Insert your USB storage device into the router’s USB port directly or using a USB cable. Wait several seconds until the USB LED becomes solid on.
Tips:
• If you use USB hubs, make sure no more than 2 devices are connected to the router.
• If the USB storage device requires using bundled external power, make sure the external power has been connected.
• If you use a USB hard drive, make sure its file system is FAT32 or NTFS.
• Before you physically disconnect a USB device from the router, safely remove it to avoid data damage: Go to USB Settings > USB Mass Storage and click Disconnect.
2. Access Your USB Disk
By default, all the network clients can access your USB disk. Refer to the following table for access instructions.
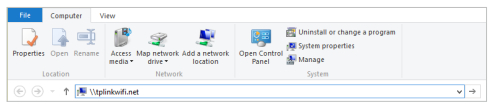
For Windows:
Open the Windows Explorer (or go to Computer), type the server address \\tplinkwifi.net in the address bar, enter a username and password if required and then press [Enter].
Note: Here we take Windows 8 as an example.
For Mac:
1) Click Go in the top left corner of the desktop and go to Connect to Server.
2) Type the server address smb://tplinkwifi.net/volume1.
3) Click Connect.
Note: Here we take volume1 (share name of the folder) for example.
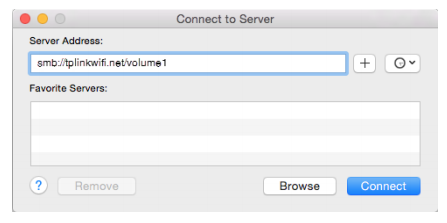
4) When prompted, select the Guest radio box (If you have set up a username and password to deny anonymous access to the USB disk, you should select the Registered User radio box.
To customize your settings:
1. Visit http://tplinkwifi.net, and log in with the username and password you set for the router.
2. Go to USB Settings > Storage Sharing.
1) Enable Server Status.
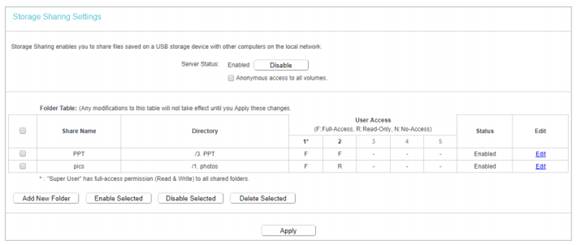
2) Anonymous access to all volumes - This function is enabled by default, so users can access all activated volumes of Storage Sharing without accounts. If you want to add a shared folder which does not allow anonymous login, uncheck the box to disable this function. And Folder Table will be displayed as shown below.
• User Access - The authorization of the user is displayed. * users mean Super Users who have the full-access permission to all activated volumes and share folders. Grey users mean the users who have no right to use this function. Others are common users.
3) Click Add New Folder to add in a folder here. Browser and add the folder and create a Share Name. And set authorization access for the user accounts. Directory shows the real full path of the specified folder.
Get to know more details of each function and configuration please go to Download Center to download the manual of your product.
Is this faq useful?
Your feedback helps improve this site.
-3.0-package_normal_1584497266805j.png)
TP-Link Community
Still need help? Search for answers, ask questions, and get help from TP-Link experts and other users around the world.