How to configure TCP/IP properties on Windows 7 to connect to TP-Link modem & router
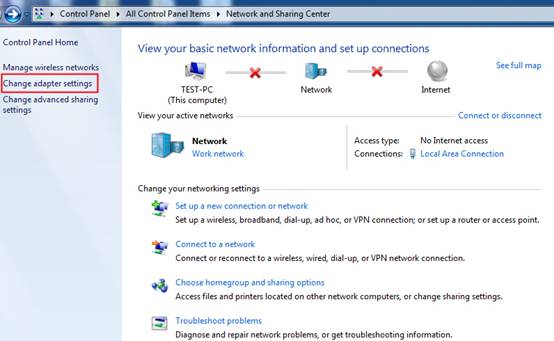
Step 1
Click Start->Control Panel-> Network and Internet->View network status and tasks or Network and Sharing Center, click on change adapter settings.
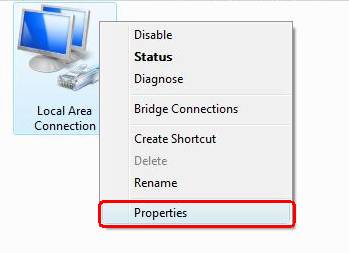
Step 2
Select the connection, right click it and select Properties.
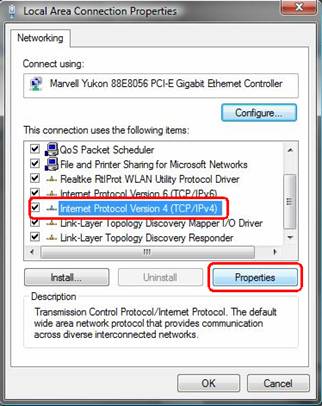
Step 3
Select Internet Protocol Version 4(TCP/IPv4), double click it or click Properties.
Step 4
There are two ways to configure the TCP/IP Properties, Assigned by DHCP server automatically or manually.
1. Assigned by DHCP server
Select Obtain an IP address automatically and Obtain DNS server address automatically, if necessary, then click OK to save the settings.

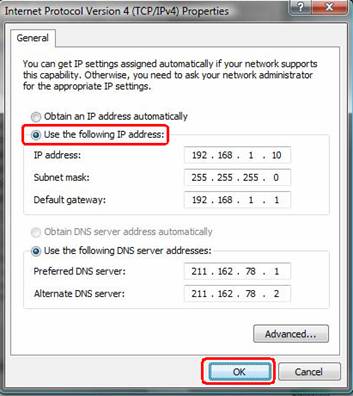
2. Assigned manually
Select Use the following IP address, type IP address, subnet mask and default gateway IP address into it.
Select Use the following DNS server addresses, type your local area DNS server IP addresses into it, if necessary, then click OK to save the settings.
Step 5
Click OK to save and apply your settings.
Note:
1. If the modem/router’s LAN IP address is 192.168.1.1, type IP address is 192.168.1.x ( x is from 2 to 253 ) , subnet mask is 255.255.255.0, and default gateway is 192.168.1.1.
2. If the modem/router’s LAN IP address is 192.168.0.1, type IP address is 192.168.0.x ( x is from 2 to 253 ) , subnet mask is 255.255.255.0, and default gateway is 192.168.0.1.
3. In most cases, Preferred DNS server is same to default gateway. For Secondary DNS server, you could leave it blank or type in 8.8.8.8.
In some cases, the DNS server addresses are provided by your ISP. Please contact with your ISP to check them.
¿Es útil este artículo?
Tus comentarios nos ayudan a mejorar esta web.