


How do I configure TL-WA5110G/TL-WA5210G to wireless AP Client Router mode?
Ce document concerne les modèles suivants :
Step 1
Connect your computer to TL-WA5110G/TL-WA5210G with a LAN cable and log into the Web-based Utility by entering the IP address192.168.1.254 into Web Browser.
If you cannot log into the Web-based Utility, please refer to the instruction:
Step 2
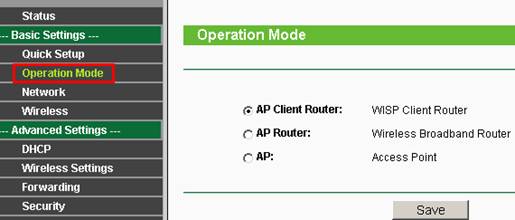
Configure the operation mode to AP Client Router and connect to the wireless network.
1. Click on Operation mode on the left, select AP Client Router, then click on Save.
2. Click on Wireless -> Wireless Mode on the left side, select Client.(In that page, only Client mode is available)
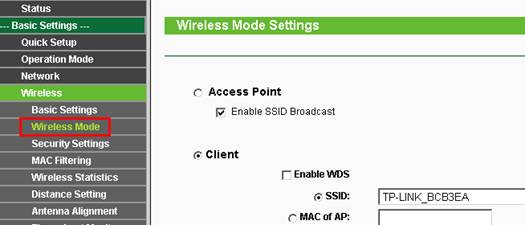
3. Click on Survey/Search button to view the available wireless networks.

Connect to the root WIFI Network.
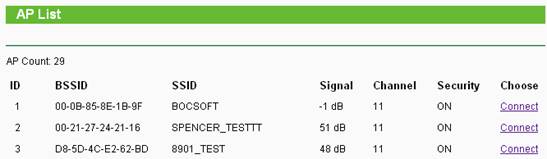
After click on Connect button, the SSID and the MAC address of the root router/AP will be shown in the Client mode box automatically.
Or if you know the SSID or the MAC address of the root router/AP, you can type them in the SSID or MAC of AP box manually, and then Click on Save to save the settings
3. Click on Save.
Step 3
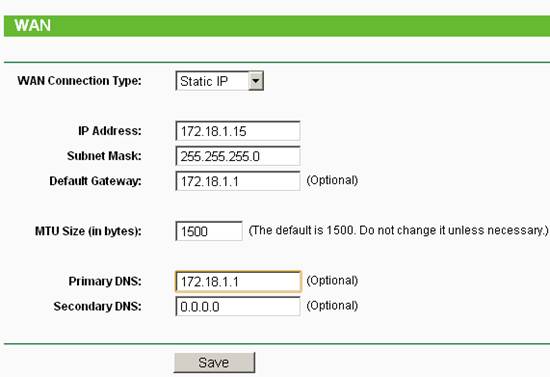
Click Network->WAN. Then select the correct type for WAN Connection Type. If you are not sure about the WAN Connection type, please contact your service provider about this.
For Dynamic IP: You just need to select Dynamic IP from the drop-down menu and then click on Save.
For Static IP: Please select Static IP from the drop-down menu, and input the correct parameters in the boxes. The parameters are given by your internet service provider (ISP). Then click on Save.
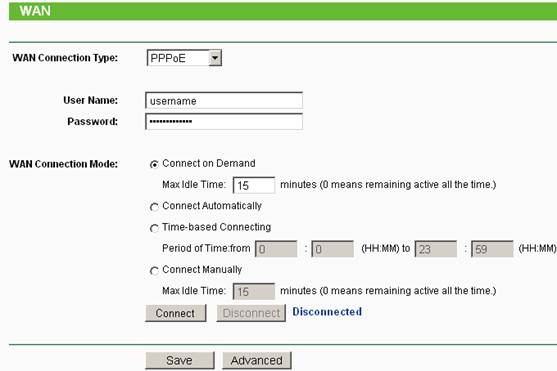
For PPPOE: Please select PPPOE from the drop-down menu, and input the correct parameters (Username and Password) in the boxes. The parameters are given by your service provider. Then click Save.
Step 4
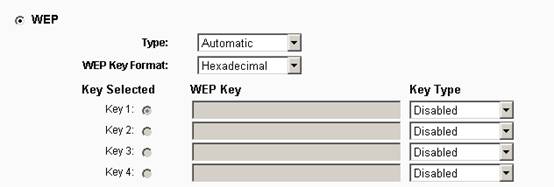
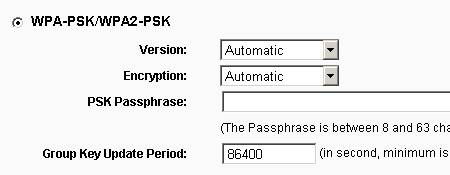
Click Security settings. Select the same security settings as the network you want to connect. Click Save and reboot the device.
WEP.
Or WPA-PSK/WPA2-PSK
Step 5
After the configuration, please refer to the link in Step 1 again to change the IP address of your computer back to Obtain IP address automatically.
NOTE: Just in case, if the IP address of the root router/AP is 192.168.1.254 as well, you will need to change the IP address of TP-Link device to avoid IP conflict. You can do it as follows:
1. Click Network->LAN on the left side.
2. Change the IP Address to 192.168.2.254.
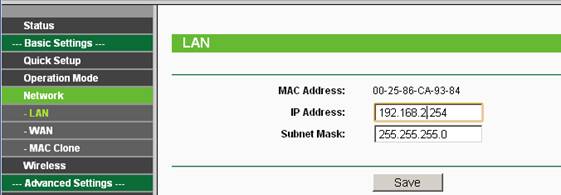
3. Click on save, and reboot your device.
Get to know more details of each function and configuration please go to Download Center to download the manual of your product.
Est-ce que ce FAQ a été utile ?
Vos commentaires nous aideront à améliorer ce site.
