Comment configurer Deco X20-DSL et Deco X73-DSL
Deco X20-DSL , Deco X50-DSL ou Deco X73-DSL est une solution composée d'un modem et d'un routeur WiFi. Ils doivent travailler en mode routeur modem DSL si le service Internet fourni au modem TP-Link se fait via une ligne DSL comme la photo 1 , ou ils doivent travailler en mode routeur sans fil si le service Internet fourni au mode DSL TP-Link se fait via Câble Ethernet comme la photo 2 .
|
Photo 1
|
Photo 2
|
Ici, nous prenons par exemple le Deco X73-DSL.
Note:
Les fonctionnalités disponibles dans Deco peuvent varier selon le modèle et la version du logiciel. Toutes les étapes et images décrites ici ne sont que des exemples et peuvent ne pas refléter votre expérience déco réelle.
1. Accédez à Google Play ou à l'App Store pour télécharger l'application Deco. Installez l'application Déco sur votre smartphone ou tablette Android ou iOS.

2. Ouvrez l'application Déco. Connectez-vous ou inscrivez-vous pour configurer un identifiant TP-Link.
Remarque : si vous disposez déjà d'un compte TP-Link Cloud, vous pouvez vous connecter avec votre compte.

3. Appuyez sur Commençons .

4. Sélectionnez votre modèle Déco.

5. Sélectionnez Utiliser comme modem-routeur DSL .

6. Déballez le contenu de la boîte. Une fois que vous avez vérifié que vous avez tout, passez à l'étape suivante.

7. Connectez la ligne DSL au port DSL de Deco.


8. Allumez votre Deco et attendez que la LED clignote en bleu.

9. Connectez le téléphone analogique au port fxs de votre Deco.
Remarque : le port Fxs n'est pris en charge que sur certains modèles Deco.

10. Connectez votre téléphone au SSID par défaut du Deco (Deco_XXXX) imprimé sur l'étiquette inférieure.
Remarque : Certains téléphones peuvent se connecter automatiquement au SSID par défaut. L'application Deco vous informera qu'elle a trouvé la Deco.

11. Affectez votre Déco connectée à une pièce. L'emplacement sera également utilisé comme nom de cette déco.

12. Choisissez votre région actuelle et votre FAI (fournisseur d'accès Internet). Si vous ne trouvez pas votre FAI dans la liste, sélectionnez « Autre » .

13. Sélectionnez votre type de connexion DSL.

14. Sélectionnez le type de connexion tel que PPPoE, IP dynamique et IP statique, et remplissez l'ID VLAN si le FAI est requis, qui est généralement fourni par le FAI. Les types de connexion courants des FAI classiques que nous avons collectés sont uniquement à titre de référence.

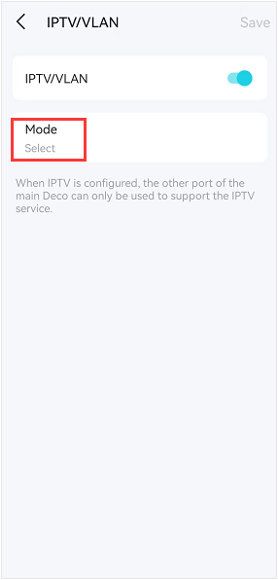
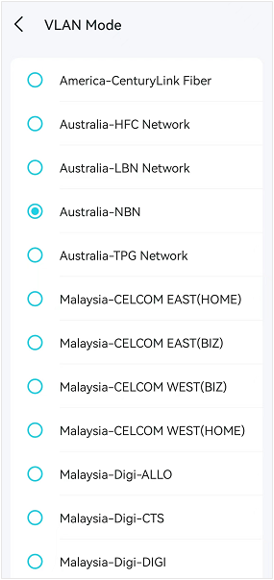
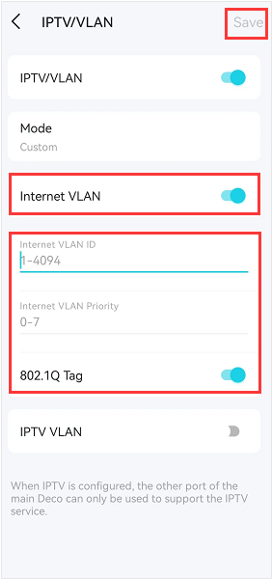
- Cliquez sur Paramètres IPTV/VLAN , activez IPTV/VLAN et cliquez sur Mode . Si votre FAI est dans la liste, appuyez sur le nom de votre FAI et l'ID VLAN entrera automatiquement sur la page VLAN. Ici, nous prenons par exemple « Australie-NBN ».
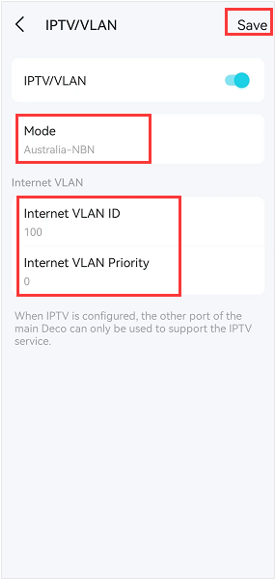
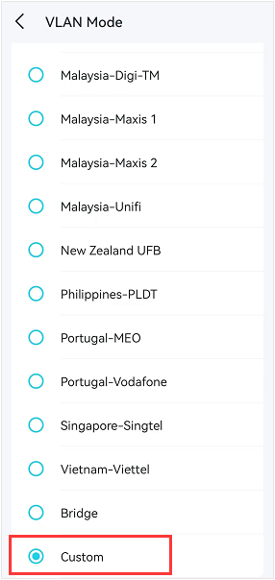
- If your ISP is not in the list, please select Custom, then enter the Internet VLAN ID and Internet VLAN Priority according to the information provided by your ISP, and click on Save to finish the setup process.
If your ISP does not provide Internet VLAN Priority, you can enter 0.
15. Create your Wi-Fi network name and password.

16. Connect your phone/tablet to the Deco’s Wi-Fi.

17. Set VoIP. Add your telephone accounts to the Deco and start making phone calls over the internet.
Note: VoIP feature is only supported for some Deco models.

18. Setup complete. Now you can connect all your devices to the Deco network. If you have other Deco units in the same package, just plug in these Decos and they will be added to the network within 2 minutes.

When working in Wireless Router mode, Deco connects to the internet via an Ethernet cable. If you already have a modem or your internet comes via an Ethernet cable from the wall, you can set the Deco as a regular wireless router to share the internet.
1. Go to Google Play or the App Store to download the Deco app. Install the Deco app on your Android or iOS smartphone or tablet.

2. Open Deco app. Log in or sign up to set up a TP-Link ID.
Note: If you already have a TP-Link Cloud account, you can log in with your account.

3. Tap Let’s begin.

4. Select your Deco model.

5. Select Use as a Wi-Fi Router.

Connect Ethernet cable to your Deco’s one of the 4 WAN/LAN ports from the modem/modem router like Pic 1 or the Ethernet port on the wall like Pic 2.
Pic 1

Pic 2

6. Unpack the contents of the box. Once you verify you have everything, go to the next step.

7. Power off your modem and remove the backup battery if it has one.

8. Connect one of your Deco units to your modem via Ethernet cable and power on both devices.

9. Wait for the ‘Internet’ light to be stable on your modem.

10. Wait until Deco’s LED light pulses blue.
Note: If the LED is not pulsing blue, press the RESET on Deco for one second, the LED will turn to yellow. Just wait for about 2 minutes until the LED turn to pulsing blue and go on.

11. Connect the analog phone to the fxs port of your Deco.
Note: Fxs port is only supported on some Deco models.

12. Connect your phone to the Deco’s default SSID printed on the bottom label (such as Deco_XXXX).
Note: Some phones may connect to the default SSID automatically. The Deco app will notify it found the Deco.

13. Assign your connected Deco to a room. The location will be also used as this Deco’s name.

14. Sélectionnez le type de connexion tel que PPPoE, IP dynamique et IP statique, et remplissez l'ID VLAN si le FAI est requis, qui est généralement fourni par le FAI. Les types de connexion courants des FAI classiques que nous avons collectés sont uniquement à titre de référence.
Pour le type de connexion : vous pouvez choisir Dynamic IP lorsque le Deco est connecté à un routeur principal/modem-routeur comme la photo 1, ou il vous est suggéré de confirmer auprès du FAI si votre modem TP-Link est câblé directement au FAI/à un modem pont comme la photo 2.
Photo 1

Photo 2


- Cliquez sur Paramètres IPTV/VLAN , activez IPTV/VLAN et cliquez sur Mode . Si votre FAI est dans la liste, appuyez sur le nom de votre FAI et l'ID VLAN entrera automatiquement sur la page VLAN. Ici, nous prenons par exemple « Australie-NBN ».


- Si votre FAI ne figure pas dans la liste, veuillez sélectionner Personnalisé , puis entrez l' ID du VLAN Internet et la priorité du VLAN Internet en fonction des informations fournies par votre FAI, et cliquez sur Enregistrer pour terminer le processus de configuration.
Si votre FAI ne fournit pas la priorité Internet VLAN, vous pouvez saisir 0.


15. Créez le nom et le mot de passe de votre réseau Wi-Fi.

16. Connectez votre téléphone/tablette au Wi-Fi du Deco.

17. Définissez la VoIP. Ajoutez vos comptes téléphoniques au Deco et commencez à passer des appels téléphoniques sur Internet.
Remarque : la fonctionnalité VoIP n'est prise en charge que pour certains modèles Deco.

18. Configuration terminée. Vous pouvez désormais connecter tous vos appareils au réseau Deco. Si vous avez d'autres unités Deco dans le même package, branchez simplement ces Decos et elles seront ajoutées au réseau dans les 2 minutes.

Est-ce que ce FAQ a été utile ?
Vos commentaires nous aideront à améliorer ce site.

