How to Configure AP Mode on TL-WR702N
Ce document concerne les modèles suivants :
Note: This FAQ is only suitable for TL-WR702N with firmware version 130314 or older; it is NOT suitable for 130528 or later version.

Definition:The TL-WR702N is connected to a wired network and transforms the wired Internet access into wireless so that multiple devices can share the Internet.
Application:
1. Office, hotel and places where only wired network is available.
2. LAN gaming party, small meeting and other situations where a temporary wireless network is needed.
Physical Connection
Step 1:
Connect the TL-WR702N directly to your computer’s Ethernet port by an Ethernet cable;
Step 2:
Power on the TL-WR702N.
.jpg)
Initial Computer Setup– For Windows 7, Vista & XP (For Mac OS X, please go to page3)
Step 1:
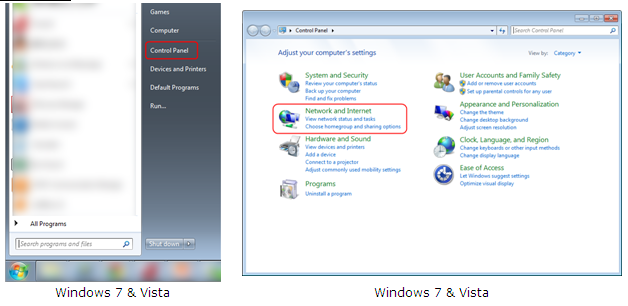
Windows 7&Windows Vista: Go to Start->Control Panel ->Network and Sharing Center
Windows XP: Go to Start->Control Panel->Network Connections
.jpg)
.JPG)
Step 2:
Windows 7: Go to Network andSharing Center>Change Adapter settings
Windows Vista: Go to Network andSharing Center>Manage Network Connections
Windows XP: (Go to Next Step)
.png)
Step 3:
Windows 7, Vista and XP: Right Click Local Area Connection >Select Properties > Double Click Internet Protocol Version 4 (TCP/IPv4) or Internet Protocol (TCP/IP) forWindows XP.
.png)
Step 4:
Windows 7, Vista and XP: Select “Use the Following IP address:”
Type the following information:
1. IP address: 192.168.0.10
2. Subnet mask: 255.255.255.0
Click OK to exit.
Click OK again to apply the settings.
.png) Windows 7, Vista & XP
|
Initial Computer Setup– For Mac OS X
Go to the Apple>System Preferences>Network> Highlight Ethernet >Configure IPv4: Using DHCP with manual address
Input the IPv4 Address: 192.168.0.10
Click Apply
.png)
Access the Management Page
Open a Web Browser > Type 192.168.0.254 in the address bar > Press Enter
.png)
Enter the default User Name: admin
Enter the default Password: admin
Click OK
.png)
Run Quick Setup
Step 1:
Go to Quick Setup-> Click Next
.png)
Step 2:
Select AP-> Click Next
.png)
Step 3:
Customize your wireless name (SSID) and password
|
Wireless Radio: Enable
SSID: (Rename Your Wireless Name)
Region:(Select Your Current Location)
Channel: Auto
Mode: 11bgn mixed
Channel Width: Auto
Security Options: WPA-PSK/WPA2-PSK
PSK Password: (Create a Private Password)
Click Next
|
.png)
Step 4:
Click: Reboot, and wait until it goes to 100%
Relocate the WR702N
You may now connect the WR702N directly into your Wired Ethernet Network Connection as displayed on the picture below.
Congratulations! All your Wi-Fi enabled devices can connect to the customized wireless network.
Final Computer Reversion– For Windows 7, Vista & XP (For Mac OS X, please go to page 8)
Step 1:
Windows 7&Windows Vista: Go to Start>Control Panel >Network and Sharing Center
Windows XP: Go to Start>Control Panel>Network Connections
.png)
Step 2:
Windows 7: Go to Network andSharing Center>Change Adapter settings
Windows Vista: Go to Network andSharing Center>Manage Network Connections
Windows XP: (Go to Next Step)
.png)
Step 3:
Windows 7, Vista and XP: Right Click Local Area Connection >Select Properties > Double Click Internet Protocol Version 4 (TCP/IPv4) or Internet Protocol (TCP/IP) forWindows XP.
.png)
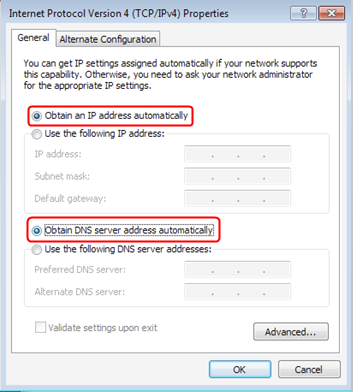
Step 4:
Windows 7, Vista and XP: Select “Obtainan IP address automatically” and “Obtain DNS server address automatically”
Click OK to exit
Click OK again to apply the settings.
 Windows 7, Vista & XP
|
Final Computer Reversion (For Mac OS X)
Go to the Apple->System Preferences->Network-> Highlight Ethernet ->Configure IPv4: Using DHCP.
Click Apply.
.png)
If it doesn't work, please feel free to contact us(support@tp-link.com).
Get to know more details of each function and configuration please go to Download Center to download the manual of your product.
Est-ce que ce FAQ a été utile ?
Vos commentaires nous aideront à améliorer ce site.