How to access TP-Link JetStream Managed Switch via the Console port
TL-SG3424 , TL-SG5428 , SX3008F , SG3428MP , SG3428X , T2600G-52TS , SG3452P , SX3016F , T2600G-28TS , T2500-28TC , T2700G-28TQ , T2500G-10TS , TL-SG5412F , T2600G-28MPS , TL-SX3008F , TL-SG3424P , TL-SG3428 , TL-SX3016F , SG3428 , TL-SL3428 , TL-SG3452P , TL-SG3428X , S5500-8MHP2XF , TL-SL3452 , TL-SG3428MP , TL-SG3216 , TL-SL5428E , T3700G-52TQ , T2600G-18TS , TL-SG3210 , TL-SG3452 , T2500G-10MPS , SG3210 , SG3452 , TL-SG3210XHP-M2 , S5500-24GP4XF , SG3428XMP , TL-SG3428XMP , T3700G-28TQ
Οι πρόσφατες ενημερώσεις ενδέχεται να έχουν διευρυμένη πρόσβαση σε λειτουργίες που αναφέρονται σε αυτό το FAQ. Επισκεφτείτε τη σελίδα υποστήριξης του προϊόντος σας, επιλέξτε το σωστό hardware version για τη συσκευή σας και ελέγξτε είτε το datasheet είτε την ενότητα firmware για τις πιο πρόσφατες βελτιώσεις που προστέθηκαν στο προϊόν σας.
You can use the console cable to connect your PC to the console port of the TP-Link JetStream managed Switch and then manage the switch with the CLI.
Follow the steps below to manage the switch via the console port:
Step 1. Connect your computer to the switch.
If your computer has a serial port (COM), connect it to the console port (RJ45) of the switch, with the RJ45 console cable.
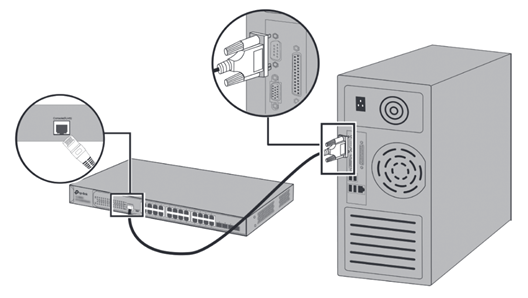
If you only have USB ports on your computer, you can get a USB-to-RS232 cable. You need to install the RS232 driver for the cable, which is provided by your cable vendor.
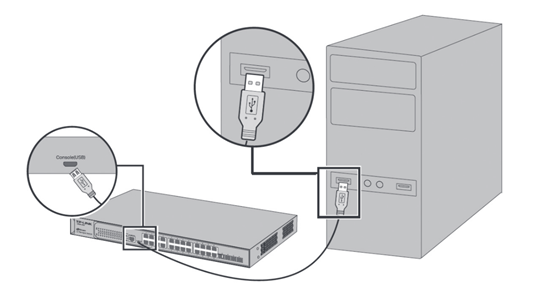
You can also choose a Micro-USB cable that supports data transfer to connect your computer to the switch. Then for Windows computers, click here to download and install the TP-Link USB Console Driver then continue. For Mac, please follow FAQ 3177.
Note: If you need to enter the BootUtil menu to reset the switch or recover the password, please refer to FAQ 3146. We recommend an RJ45 Console cable or USB-to-RS232 cable, as it might be more difficult to enter the BootUtil menu with a Micro-USB cable. If you still cannot enter the BootUtil after several attempts, you may get a USB-to-RS232 cable.
Step 2. Install a Terminal Emulator.
For Windows computers, you need to install a terminal emulator, such as Putty, Tera Term. Go to the official website to download the installer and follow the prompts to install the terminal emulator.
Note: If you use the Micro-USB cable, we recommend “Tera Term”, which you can download and install from the official website.
Step 3. Launch and Configure the Terminal Emulator.
Run your terminal emulator with the following serial parameters
- Baud Rate: 38400bps
- Data Bits: 8
- Parity: None
- Stop Bits: 1
- Flow Control: None
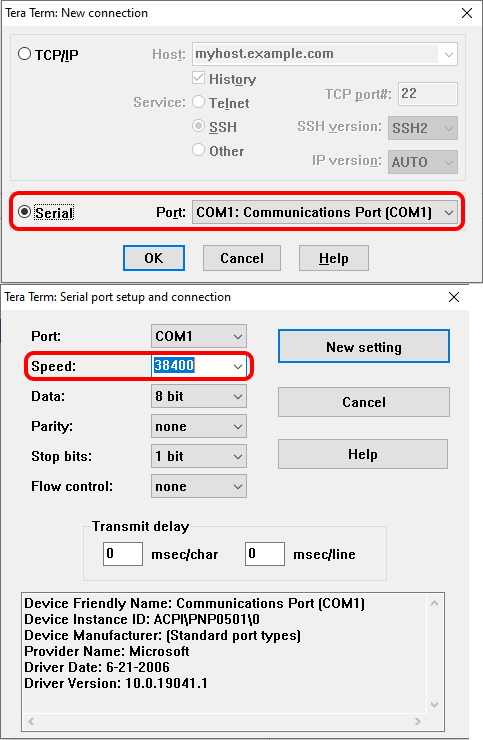
For Tera Term, choose the serial port, then go to Setup – Serial Port, set the speed to 38400, then click “New setting”.
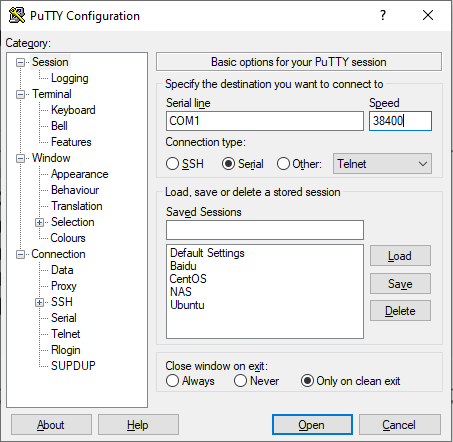
For Putty, select Serial, change the Speed to 38400, and then click “Open”.
Step 4 Launching the CLI
Enter the username and password, then you can manage the switch. Please refer to the User Guide, and CLI Reference Guide, which can be found on the support page for your switch model.
Related FAQs
Looking for More
Είναι χρήσιμο αυτό το FAQ;
Τα σχόλιά σας συμβάλλουν στη βελτίωση αυτού του ιστότοπου.
What’s your concern with this article?
- Dissatisfied with product
- Too Complicated
- Confusing Title
- Does not apply to me
- Too Vague
- Other
Πώς μπορούμε να το βελτιώσουμε;
Σας Ευχαριστούμε
Εκτιμούμε τα σχόλιά σας.
Κάντε κλικεδώ για να επικοινωνήσετε με την τεχνική υποστήριξη TP-Link.
Αυτός ο ιστότοπος χρησιμοποιεί cookies. Συνεχίζοντας την περιήγηση στον ιστότοπο, αποδέχεστε τις χρήσεις των cookies από εμάς. Μάθε περισσότερα.
Βασικά Cookies
Αυτά τα cookie είναι απαραίτητα για τη λειτουργία του ιστότοπου και δεν μπορούν να απενεργοποιηθούν στα συστήματά σας.
TP-Link
SESSION, JSESSIONID, accepted_local_switcher, tp_privacy_base, tp_privacy_marketing, tp_smb-select-product_scence, tp_smb-select-product_scenceSimple, tp_smb-select-product_userChoice, tp_smb-select-product_userChoiceSimple, tp_smb-select-product_userInfo, tp_smb-select-product_userInfoSimple, tp_top-banner, tp_popup-bottom, tp_popup-center, tp_popup-right-middle, tp_popup-right-bottom, tp_productCategoryType
Youtube
id, VISITOR_INFO1_LIVE, LOGIN_INFO, SIDCC, SAPISID, APISID, SSID, SID, YSC, __Secure-1PSID, __Secure-1PAPISID, __Secure-1PSIDCC, __Secure-3PSID, __Secure-3PAPISID, __Secure-3PSIDCC, 1P_JAR, AEC, NID, OTZ
Zendesk
OptanonConsent, __cf_bm, __cfruid, _cfuvid, _help_center_session, _pendo___sg__.<container-id>, _pendo_meta.<container-id>, _pendo_visitorId.<container-id>, _zendesk_authenticated, _zendesk_cookie, _zendesk_session, _zendesk_shared_session, ajs_anonymous_id, cf_clearance
Cookies Ανάλυσης και Μάρκετινγκ
Τα cookie ανάλυσης μας δίνουν τη δυνατότητα να αναλύσουμε τις δραστηριότητές σας στον ιστότοπό μας για να βελτιώσουμε και να προσαρμόσουμε τη λειτουργικότητα του ιστότοπού μας.
Τα διαφημιστικά cookie μπορούν να ρυθμιστούν μέσω του ιστότοπού μας από τους διαφημιστικούς μας συνεργάτες, προκειμένου να δημιουργήσουν ένα προφίλ των ενδιαφερόντων σας και να σας εμφανίζει σχετικές διαφημίσεις σε άλλους ιστότοπους.
Google Analytics & Google Tag Manager
_gid, _ga_<container-id>, _ga, _gat_gtag_<container-id>
Google Ads & DoubleClick
test_cookie, _gcl_au