How to Configure Management VLAN on TP-Link Smart and Managed Switches Using the New GUI
TL-SG3452X , SG2428LP , TL-SG3452XP , SX3008F , SG3428MP , SG3428X , SX3016F , TL-SG2210P , SG2428P , SG3452XP , SG2210MP , TL-SX3008F , TL-SL2428P , TL-SG3428 , TL-SG2218 , SG2210P , TL-SX3016F , S4500-8G , SG2218 , SG3428 , TL-SG3428X , S5500-4XHPP2XF , S5500-8MHP2XF , SL2428P , TL-SG3428X-M2 , TL-SG3428MP , S4500-8GHP2F , TL-SG2008 , S4500-16G2F , TL-SG3428XF , TL-SG2210MP , TL-SG3210 , TL-SG3452 , SG3428X-M2 , SG3210 , SG3452 , SG3452X , Festa FS310GP , TL-SX3206HPP , TL-SG3210XHP-M2 , S5500-24GP4XF , SG3428XMP , TL-SG2428P , TL-SG3428XMP , SX3206HPP , T3700G-28TQ , SG3428XF
Pembaruan terkini mungkin telah memperluas akses ke fitur yang dibahas dalam FAQ ini. Kunjungi halaman dukungan produk Anda, pilih versi perangkat keras yang benar untuk perangkat Anda dan periksa bagian Lembar Data (Datasheet) atau firmware untuk mengetahui peningkatan terbaru yang ditambahkan ke produk Anda.
Introduction
Management VLAN provides a safer method to manage the switch. With management VLAN configured, only the hosts in the management VLAN can access switches’ GUI.
Network Requirements
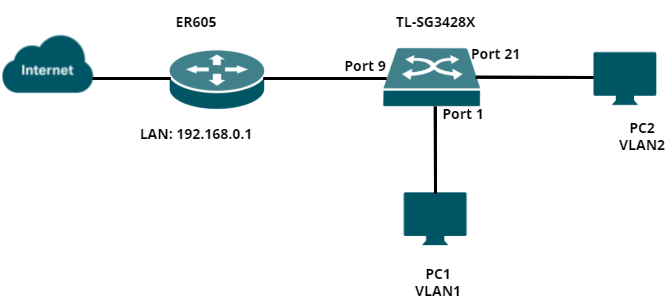
As the following topology shows, PC1 and PC2 are connected to port 1 and port 21 of the switch. The switch (TL-SG3428X) is connected to the internet via a router through port 9. The IP address of the switch is 192.168.0.100, which is assigned by the router (ER605). In this example, we will configure management VLAN to only allow the hosts in VLAN2 to access the GUI of the switch.
Configuration Overview
1. Create a VLAN interface on the router
2. Create the corresponding VLAN on the switch
3. Create an access control rule
4. Verification
Configuration Steps
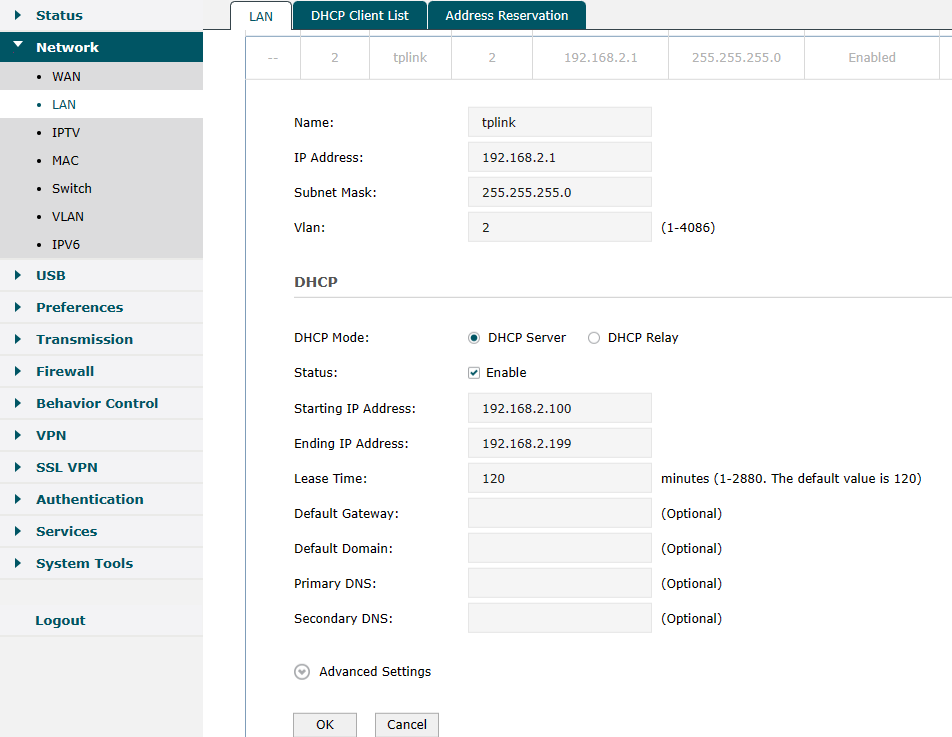
Step 1. Log in to the router’s GUI and navigate to Network → LAN to add a new VLAN interface — VLAN 2.
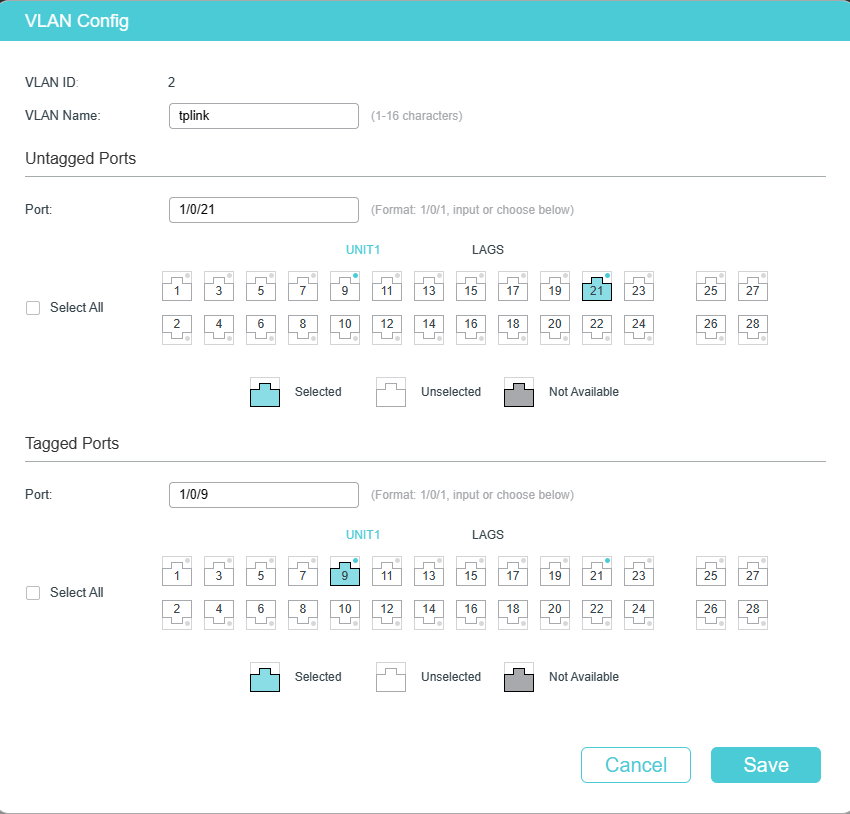
Step 2. Log in to the GUI of the switch and navigate to L2 Features → VLAN → 802.1Q VLAN → VLAN Config to add a new entry for VLAN — VLAN2. The uplink port of the switch should be tagged.
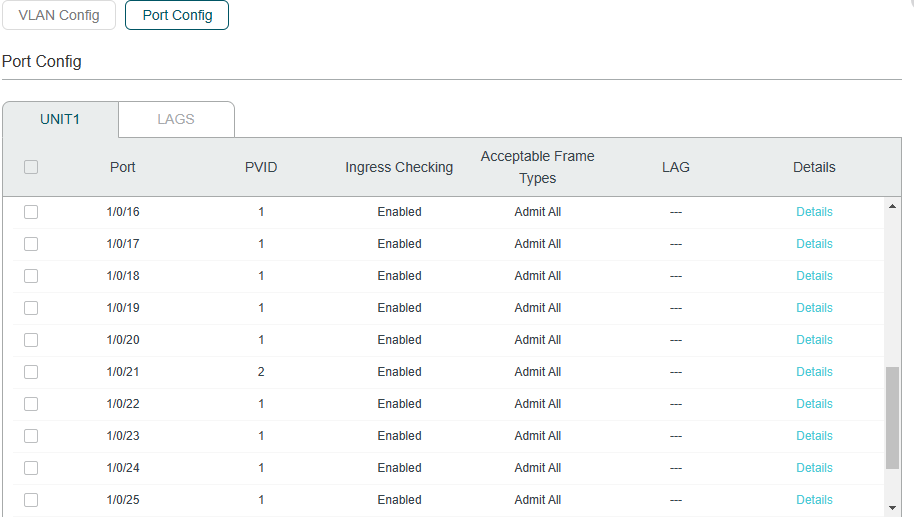
Then navigate to Port Config and change the PVID of Port 21 to 2.
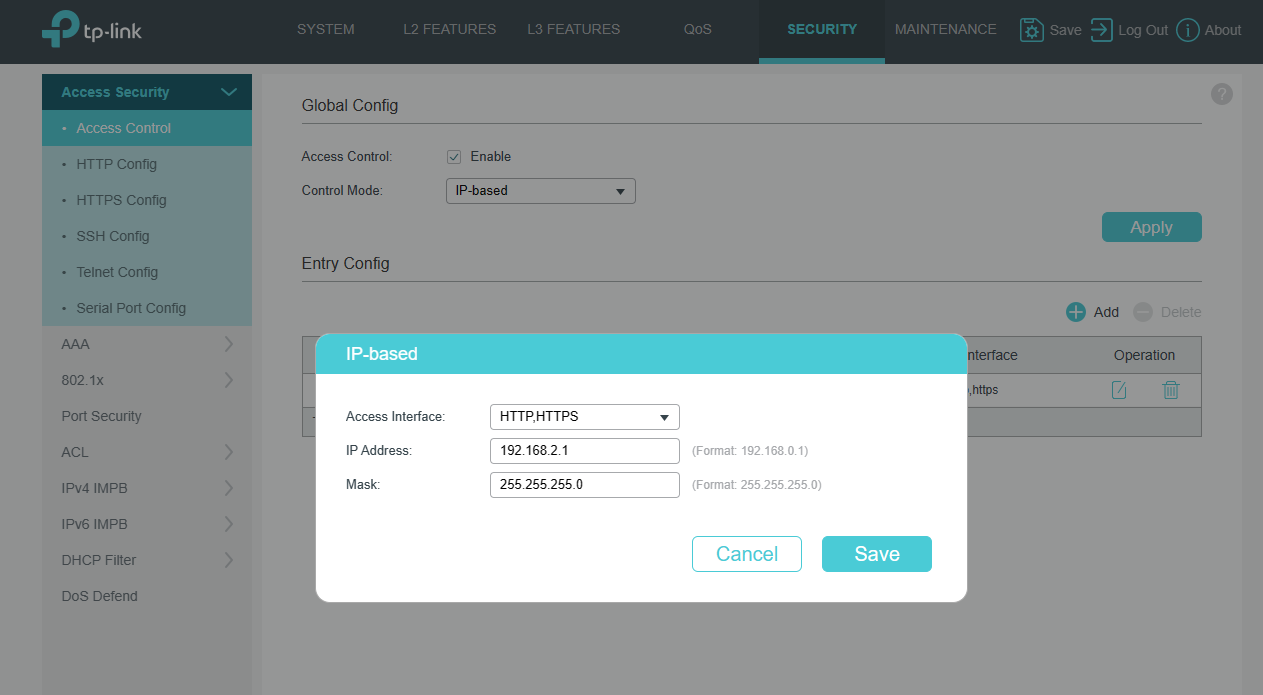
Step 3. Navigate to Security → Access Security → Access control to create an IP-based ACL (Access Control List).
Specify the Access interface as HTTP and HTTPS, and only allow devices in 192.168.2.1/24 to access the GUI of switch.
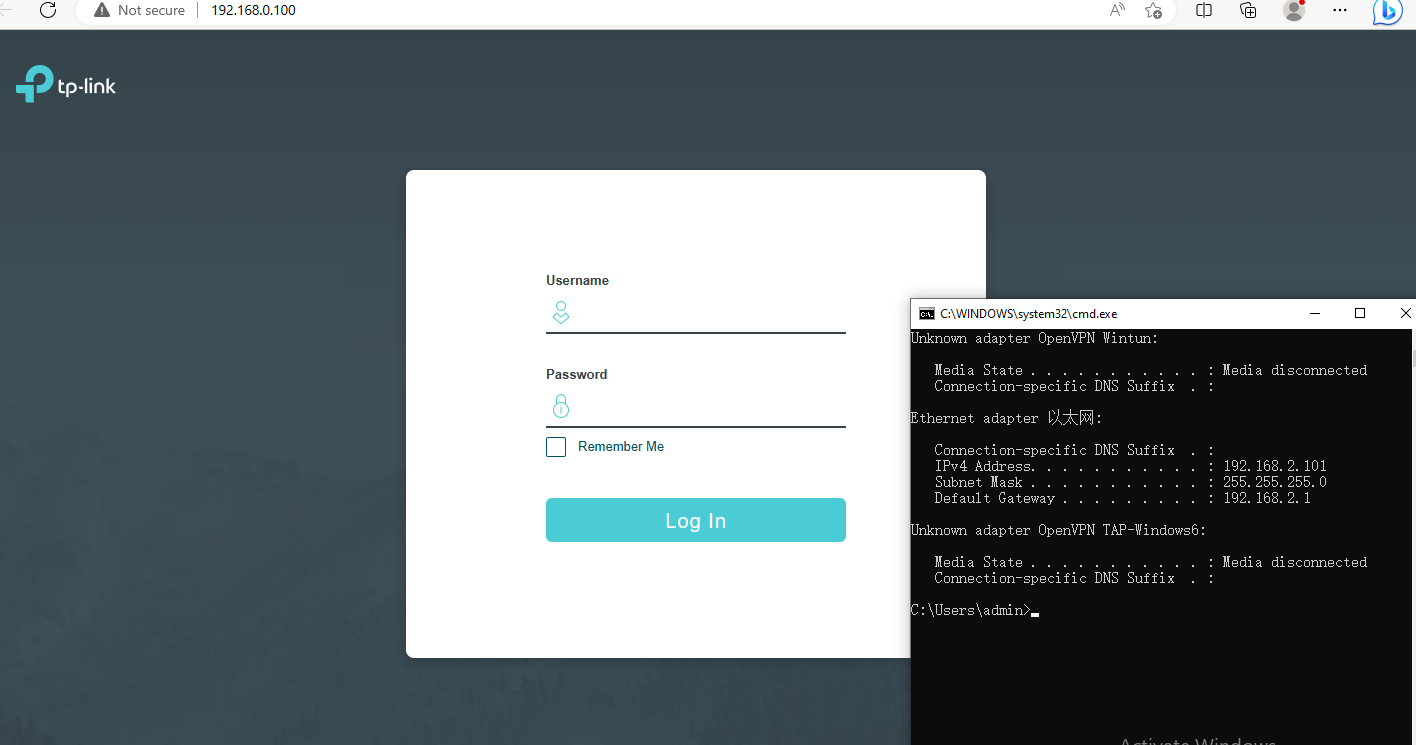
Step 4. Verification
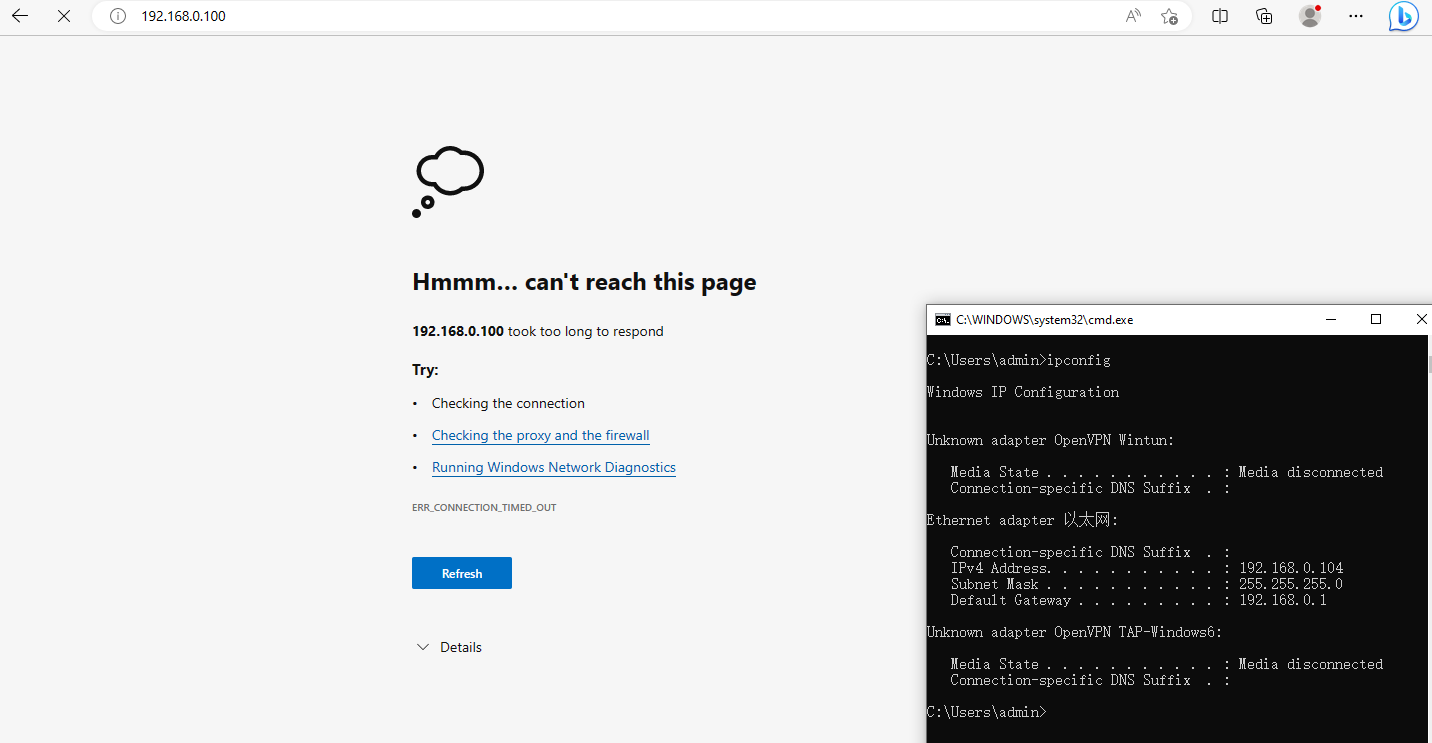
Lastly, you can verify whether the settings have been successfully applied. For example: PC2 in VLAN2 can access 192.168.0.100; however, PC1 cannot.
Is this faq useful?
Your feedback helps improve this site.
What’s your concern with this article?
- Dissatisfied with product
- Too Complicated
- Confusing Title
- Does not apply to me
- Too Vague
- Other
Thank you
We appreciate your feedback.
Click here to contact TP-Link technical support.
This website uses cookies to improve website navigation, analyze online activities and have the best possible user experience on our website. You can object to the use of cookies at any time. You can find more information in our privacy policy . Don’t show again
Basic Cookies
These cookies are necessary for the website to function and cannot be deactivated in your systems.
TP-Link
SESSION, JSESSIONID, accepted_local_switcher, tp_privacy_base, tp_privacy_marketing, tp_smb-select-product_scence, tp_smb-select-product_scenceSimple, tp_smb-select-product_userChoice, tp_smb-select-product_userChoiceSimple, tp_smb-select-product_userInfo, tp_smb-select-product_userInfoSimple, tp_top-banner, tp_popup-bottom, tp_popup-center, tp_popup-right-middle, tp_popup-right-bottom, tp_productCategoryType
Youtube
id, VISITOR_INFO1_LIVE, LOGIN_INFO, SIDCC, SAPISID, APISID, SSID, SID, YSC, __Secure-1PSID, __Secure-1PAPISID, __Secure-1PSIDCC, __Secure-3PSID, __Secure-3PAPISID, __Secure-3PSIDCC, 1P_JAR, AEC, NID, OTZ
Zendesk
OptanonConsent, __cf_bm, __cfruid, _cfuvid, _help_center_session, _pendo___sg__.<container-id>, _pendo_meta.<container-id>, _pendo_visitorId.<container-id>, _zendesk_authenticated, _zendesk_cookie, _zendesk_session, _zendesk_shared_session, ajs_anonymous_id, cf_clearance
Analysis and Marketing Cookies
Analysis cookies enable us to analyze your activities on our website in order to improve and adapt the functionality of our website.
The marketing cookies can be set through our website by our advertising partners in order to create a profile of your interests and to show you relevant advertisements on other websites.
Google Analytics & Google Tag Manager
_gid, _ga_<container-id>, _ga, _gat_gtag_<container-id>
Google Ads & DoubleClick
test_cookie, _gcl_au