How do I install TP-Link Archer router to work with a DSL Modem?

Archer C1200 , Archer C5400 , Archer A2600 , Archer AX55 , Archer C4 , Archer C5200 , Archer AX53 , Archer C5 , Archer AX10 , Archer C2 , Archer AX51 , Archer AX96 , Archer C5v , Archer A2200 , Archer C6U , Archer C80 , Archer C58HP , Archer AXE95 , Archer C8 , Archer AX10000 , Archer C3150 , Archer C9 , Archer AX50 , Archer C6 , Archer C7 , Archer AX90 , Archer AX6000 , Archer C5400X , Archer C25 , Archer C24 , Archer A20 , Archer A64 , Archer C60 , Archer C2600 , Archer A1200 , Archer C21 , Archer C20 , Archer C64 , Archer AX1800 , Archer AX206 , Archer C59 , Archer C58 , Archer AX4200 , Archer C3200 , Archer C900 , Archer A2 , Archer AX75 , Archer AX4400 , Archer C3000 , Archer AX73 , Archer C50
Recent updates may have expanded access to feature(s) discussed in this FAQ. Visit your product's support page, select the correct hardware version for your device, and check either the Datasheet or the firmware section for the latest improvements added to your product. Please note that product availability varies by region, and certain models may not be available in your region.
Note:
1. Please make sure your DSL modem is synchronized with the internet line, otherwise, contact your Internet Service Provider(ISP).
2. This article is only suitable when you have a DSL modem and the connection type is PPPoE with username and password required.
If you have a cable/fiber modem, please click How do I install TP-Link Archer router to work with a Cable Modem ?;
Advanced Preparations:
Please refer to the Quick Installation Guide in the packet to connect the hardware.
Here takes Archer C7_V5 as a demonstration.
Step 1
Log in to the router’s web-based interface, to get some help, please refer to the article How do I log into the web-based Utility (Management Page) of TP-Link wireless router?
Step 2
Follow step-by-step instructions to finish Quick Setup.
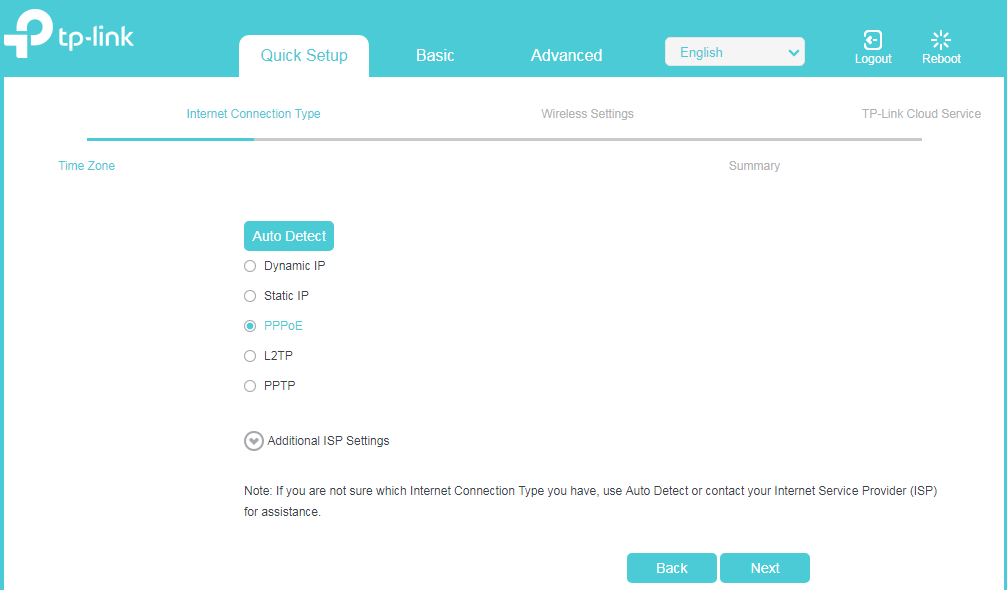
Here, we select PPPoE as the Internet Connection Type. Click Next. (If the connection type is not PPPoE, you may confirm with your Internet Service Provider first)
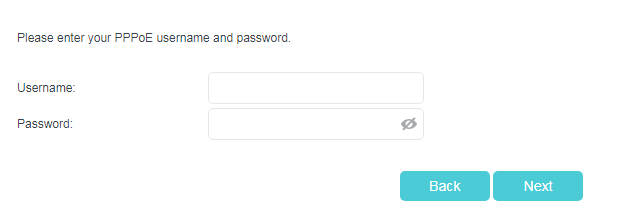
Enter the username and password provided by your ISP. Click Next to finish Quick Setup.
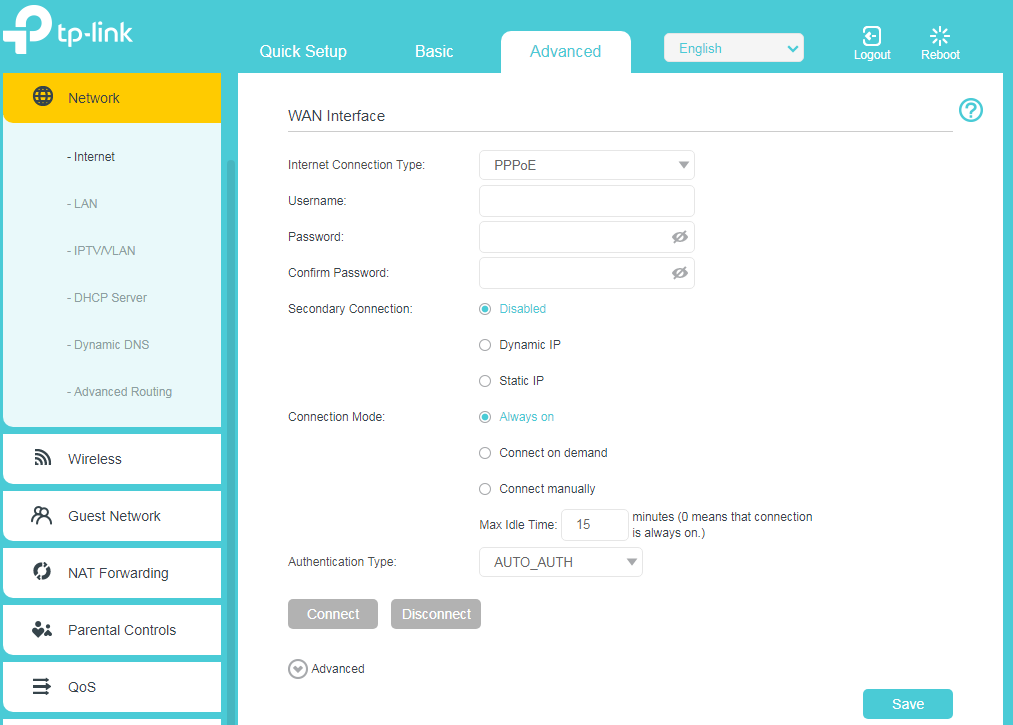
Or go to Advanced > Network > Internet. Select PPPoE as internet Connection type. Type in username and password from your ISP. Do not change other settings unless it’s necessary.
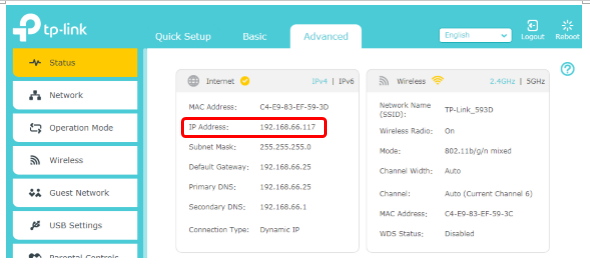
Wait a few minutes. If it shows Internet IPv4 IP address on Advanced > Status, internet is successfully setup.
To get to know more details of each function and configuration please go to Download Center to download the manual of your product.
Related FAQs
- How to configure the TP-Link wireless router as Access Point
- How to set up an IPv6 Internet connection on the TP-Link Wi-Fi Routers
- What should I do if I cannot access the internet through Wi-Fi router?
- Come configurare le impostazioni wireless di base del router TP-Link 11AC (nuovo logo)?
- How to setup TP-Link Wi-Fi Router on Tether APP
- What should I do if wireless connection cannot work on TP-Link Wi-Fi router?
Questa faq è utile?
Your feedback helps improve this site.
What’s your concern with this article?
- Dissatisfied with product
- Too Complicated
- Confusing Title
- Does not apply to me
- Too Vague
- Other
Grazie
We appreciate your feedback.
Click here to contact TP-Link technical support.
Questo sito utilizza i cookies per migliorare l'esperienza di navigazione, analizzare le attività online e offrire agli utenti una migliore user experience. Puoi disattivare o rifiutare il loro utilizzo in qualunque momento. Per maggiori informazioni consulta la nostra privacy policy .
Basic Cookies
Questi cookies sono necessari per il corretto funzionamento del sito e non possono essere disattivati nel tuo sistema.
TP-Link
accepted_local_switcher, tp_privacy_base, tp_privacy_marketing, tp_smb-select-product_scence, tp_smb-select-product_scenceSimple, tp_smb-select-product_userChoice, tp_smb-select-product_userChoiceSimple, tp_smb-select-product_userInfo, tp_smb-select-product_userInfoSimple, tp_top-banner, tp_popup-bottom, tp_popup-center, tp_popup-right-middle, tp_popup-right-bottom, tp_productCategoryType
Livechat
__livechat, __lc2_cid, __lc2_cst, __lc_cid, __lc_cst, CASID
Youtube
id, VISITOR_INFO1_LIVE, LOGIN_INFO, SIDCC, SAPISID, APISID, SSID, SID, YSC, __Secure-1PSID, __Secure-1PAPISID, __Secure-1PSIDCC, __Secure-3PSID, __Secure-3PAPISID, __Secure-3PSIDCC, 1P_JAR, AEC, NID, OTZ
Analytics e Marketing Cookies
I cookies analitici ci permettono di analizzare le tue attività sul nostro sito allo scopo di migliorarne le funzionalità.
I marketing cookies possono essere impostati sul nostro sito dai nostri partner pubblicitari allo scopo di creare un profilo di tuo interesse e proporti contenuti pubblicitari rilevanti su altri siti.
Google Analytics & Google Tag Manager
_gid, _ga_<container-id>, _ga, _gat_gtag_<container-id>
Google Ads & DoubleClick
test_cookie, _gcl_au
Meta Pixel
_fbp
Crazy Egg
cebsp_, _ce.s, _ce.clock_data, _ce.clock_event, cebs
lidc, AnalyticsSyncHistory, UserMatchHistory, bcookie, li_sugr, ln_or