How to Configure Distributed Cluster Mode on Linux Controller
Contents
Configuring an existing Controller to a distributed cluster mode via the web
Configuring a distributed cluster mode for a newly installed Controller through commands
High Availability of Distributed Cluster Mode
How to Adjust the IP of Cluster Nodes
How to Upgrade Controller Under Cluster mode.
How to troubleshoot if the Distributed cluster mode is not running?
How to troubleshoot if the node status is disconnected
How to troubleshoot node stop failures caused by high system resource utilization before upgrading?
How to troubleshoot if a node start failed caused by non-simultaneous execution of startup command?
Objective
This article presents the concept of Controller distributed nodes. It details two deployment methods. One is deploying distributed nodes via the Web interface using an existing Controller, while the other is through Terminal commands when newly installing a Controller.
Requirements
- Omada Software Controller
- Omada Devices in Omada Cluster Deployment Product List
- Ubuntu 22.04
- JAVA17
- Mongodb v7.0
Introduction
The distributed cluster mode of Omada Software Controller can meet customers' requirements for network high - availability. In this mode, multiple nodes collaborate to manage Omada devices. This collaborative approach not only significantly increases the upper limit of the number of devices that the Controller can manage, but also, through the coordinated operation of multiple nodes, ensures the high - availability of the entire network. If a node failure occurs, automatic load balancing will be triggered, and the services of the failed node will be taken over by other nodes. During the failover period, the devices under the site managed by the original failed node will be briefly offline and then automatically reconnect to other nodes. Once the devices resume the "Connected" state, all services will operate normally.
As shown in the figure below, this is a typical distributed cluster deployment topology, where multiple nodes (three nodes or more) can jointly manage Omada devices.

Prerequisites and Precautions
Before formally configuring and deploying distributed nodes, the following suggestions and matters require attention.
- The Distributed cluster mode requires at least three nodes. Prepare to deploy at least three Controllers before setting it up.
- Installing the Distributed cluster mode requires Java 17. Use sudo apt install openjdk-17-jre-headless to install Java 17.
- Modifying the handle count of the system is a prerequisite for using the Controller distributed cluster mode. Edit “/etc/security/limits.conf”, add the following parameters, save the file, log out and log back in to make the changes take effect.
* soft nofile 65535
* hard nofile 65535
Please note that the methods of modifying handle number may vary by Linux version. Please modify the handle number according to Linux version.
- Please ensure that the system time of each node is consistent, with a time difference of less than 20 seconds
- Please ensure that the JDK and MongoDB versions are consistent across all nodes.
- Node IPs only support static IPs. If you need to modify the IP/port, you will need to re-initialize. Refer to How to Adjust the IP of Cluster Nodes.
- A node that has already joined a cluster must disconnect from the original connection and be removed from the original cluster before joining a new cluster.
- It is recommended deploy all nodes within the same network segment.
Configuration
Configuring an existing Controller to a distributed cluster mode via the web
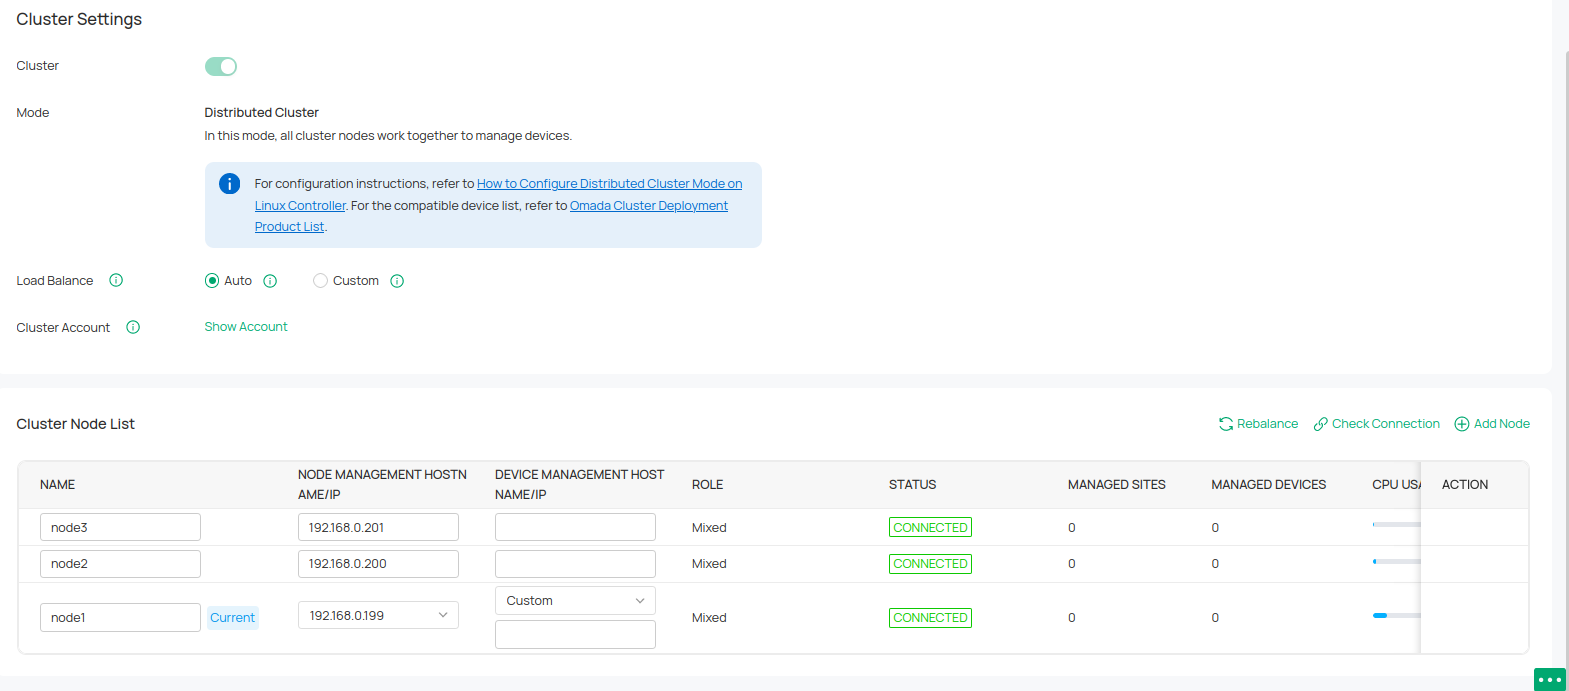
Step 1. Go to Global View >Settings > Cluster in the Global view and enable Cluster. Then select the mode as Distributed Cluster.

Step 2. Click Add Node to add at least three nodes. Input these nodes’ NAME and NODE MANAGEMENT HOSTNAME/IP. Here, IPs and hostnames should correspond to different servers. In the upcoming version, we will support nodes to jointly manage devices using the same IP or Hostname. Please specify the IP address of the management device in DEVICE MANAGEMENT HOSTNAME/IP. This IP address will be used to establish a connection and communicate with the device. If it is not specified, NODE MANAGEMENT HOSTNAME/IP will be used by default. Then click Apply.
After that, Controller will pop up a prompt window and the init properties file. Please download the init properties file. You will need to reboot the Controller for the settings to take effect. Please reboot it as soon as possible to prevent device disconnection or other problems.Nodes added offline will be considered down - state nodes, which will affect the disaster recovery capability. Please initiate them as soon as possible.


Step 3. Replace the properties file (download from Step2) at each node respectively. The path to the properties file is: /opt/tplink/EAPController/data/cluster/omada_distributed_internal_mongo_cluster.properties
Step 4. Execute the initialization command on each node respectively. When initializing nodes, set the account and password for all nodes. When initializing nodes, first initialize the primary node (the one exporting init properties). Otherwise, initialization may fail.
sudo omadacluster -config
/opt/tplink/EAPController/data/cluster/omada_distributed_internal_mongo_cluster.properties -nodeName init

- Example of terminal print during primary node initialization.

- Example of terminal print during the initialization of non-primary nodes

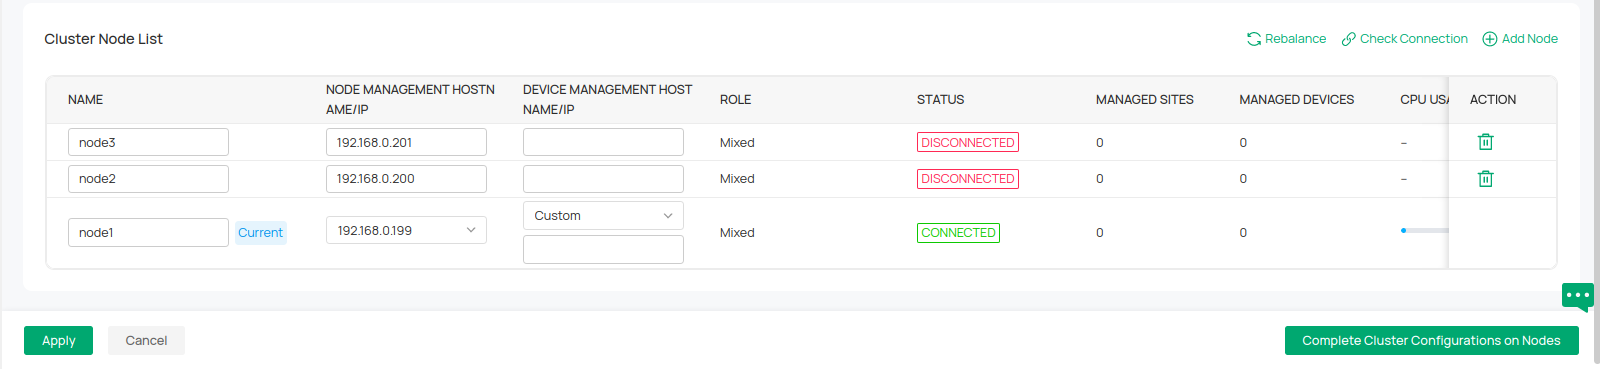
Step 5. After the deployment is successful, go to the Cluster page to confirm. And when the distributed cluster mode is running properly, you can access the Controller through any node.

Configuring a distributed cluster mode for a newly installed Controller through commands
Step 1. Select cluster mode installation (does not automatically start after installation).
- Install using deb
echo "omadac omadac/init-cluster-mode boolean true" | sudo debconf-set-selections
sudo dpkg -i /path/to/controller_installation_package

- Install using tar.gz
After decompression, deploy the cluster mode via the shell installation script. Enter ./install.sh init - cluster – mode, the system will not start automatically after installation, and relevant prompt information for setting up the cluster will be printed.

Step 2. Start installing the Controller and edit the properties file as prompted.

Modify the each node’s properties file /opt/tplink/EAPController/data/cluster/omada_distributed_internal_mongo_cluster.properties

Step 3 Execute the initialization command on each node respectively.
sudo omadacluster -config /opt/tplink/EAPController/data/cluster/omada_distributed_internal_mongo_cluster.properties -node <nodeName> init
- Example of terminal print during primary node initialization

Example of terminal print during the initialization of non-primary nodes

Step 4 After the deployment is successful, log in to the Controller and set the username and password, and other nodes will synchronize the username and password.
Then go to the Cluster page to confirm. And when the distributed cluster mode is running properly, you can access the Controller through any node.
High Availability of Distributed Cluster Mode
The high availability characteristics of distributed cluster mode is as shown in the following description. When the total number of mixed nodes is 3~4, 1 mixed member is allowed to be disconnected; when the total number of mixed nodes is 5~6, 2 mixed members are allowed to be disconnected; when the total number of mixed nodes is 7, 3 mixed members are allowed to be disconnected. That is, the number of fault - tolerant mixed nodes is less than half of the maximum number of mixed nodes.
|
Number of Mixed Nodes |
Number of Allowed Disconnected Mixed Nodes |
|
3 |
1 |
|
4 |
1 |
|
5 |
2 |
|
6 |
2 |
If the number of disconnected nodes exceeds the permitted limit, the entire cluster will malfunction. To restore the cluster, you need to bring the disconnected nodes back online so that the number of fault-tolerant nodes is less than half of the maximum number of mixed nodes.
If it is necessary to restart the cluster, please ensure that after all nodes have been stopped, more than half of the total number of nodes are started at the same time.
FAQ
How to Adjust the IP of Cluster Nodes
When controller’s distributed cluster mode is running, if you want to modify the IP of a node, you need to follow these steps:
(1)If the node to be modified status is connected:
a. Modify the network card IP of the specified node so that it binds both the old and new IPs simultaneously.
b. On the Cluster interface of any node, change the IP of the specified node to the new IP.
c. On the specified node, run the command sudo tpeap stop to shut down the node, and then modify the network card to bind only the new IP.
d. Run sudo tpeap start to start the node.
(2) If the node to be modified status is disconnected:
a. Modify the network card IP of the specified node so that it binds both the old and new IPs.
b. On the Cluster interface of any online node, change the IP of the specified node to the new IP and export the new properties file.
c. Transfer the properties file to the node to be modified.
d. On the specified node, use this properties file to run the initialization command sudo omadacluster -config <propertiesPath> -node <nodeName> init for initialization.
How to add or delete a node
(1)Add note
Step 1. Adjust the number of handles on the new node and install the Controller of the same version.
Step 2. Set up the new node on the existing node. Go to Global View > Settings > Cluster interface, click Add Node. Enter the Name and IP/Hostname of the new node, and then click Apply.
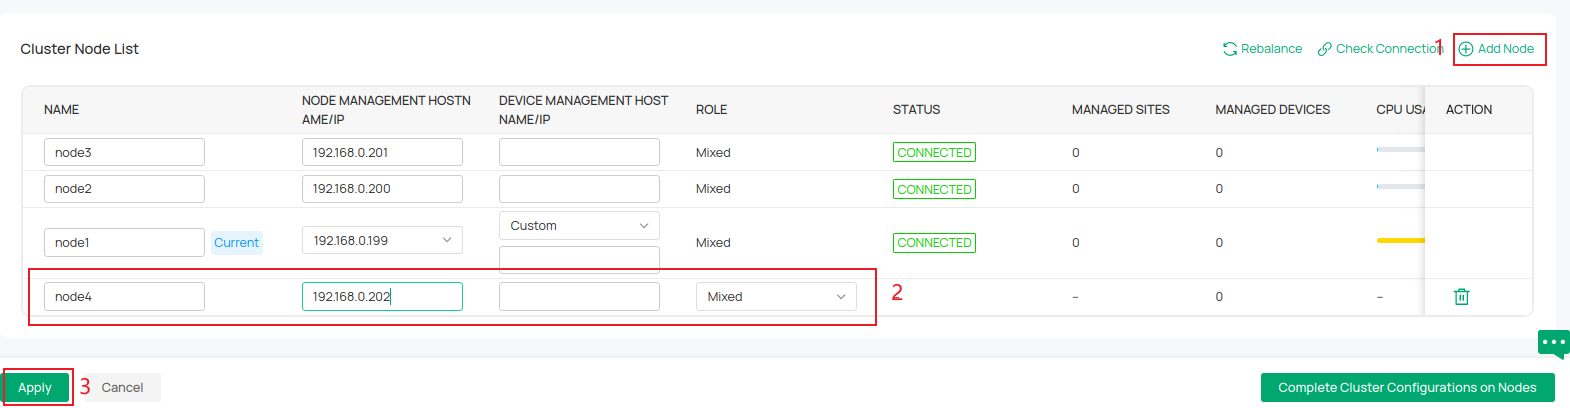
Click Confirm.

Step 3. Click Export init properties, then download the file and copy it to the /opt/tplink/EAPController/data/cluster path of the Controller on the newly added node.

Step 4. Open the terminal on the new node and execute the initialization command.
sudo omadacluster -config
/opt/tplink/EAPController/data/cluster/omada_distributed_internal_mongo_cluster.properties -nodeName init

Step 5 . After successfully adding a node, go to the Cluster page to confirm. And when the distributed cluster mode is running properly, you can access the Controller through any node.
(2) Delete Node
Step 1. Go to the node to be deleted and stop its Controller.
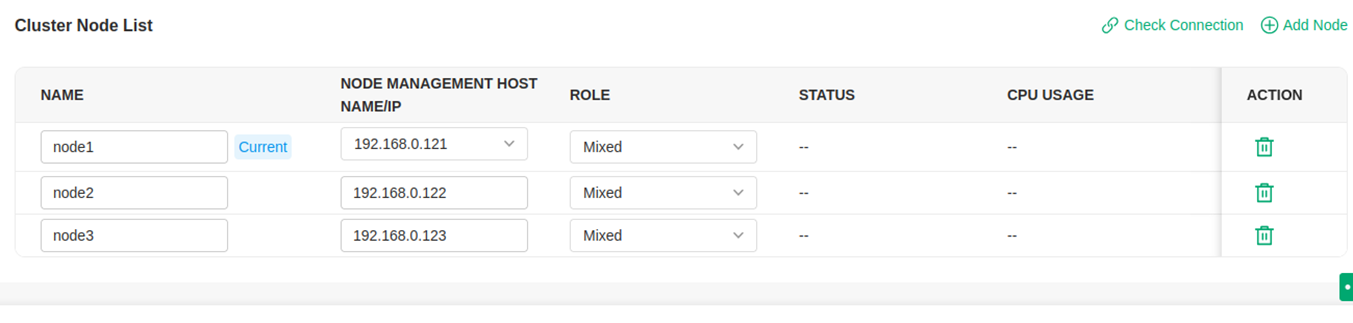
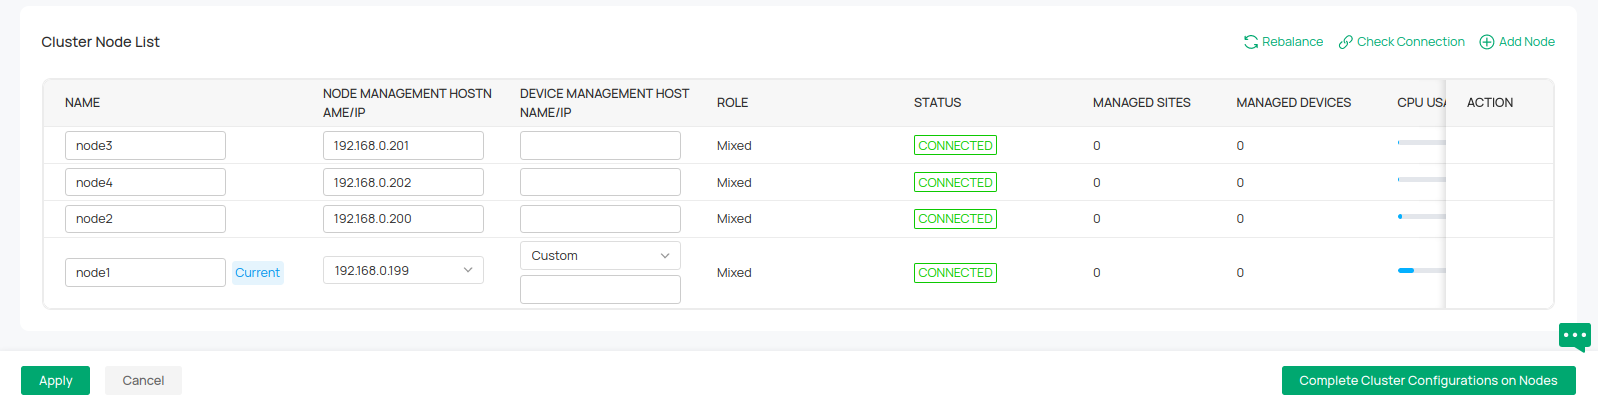
Step 2. Check the status of nodes from any node.
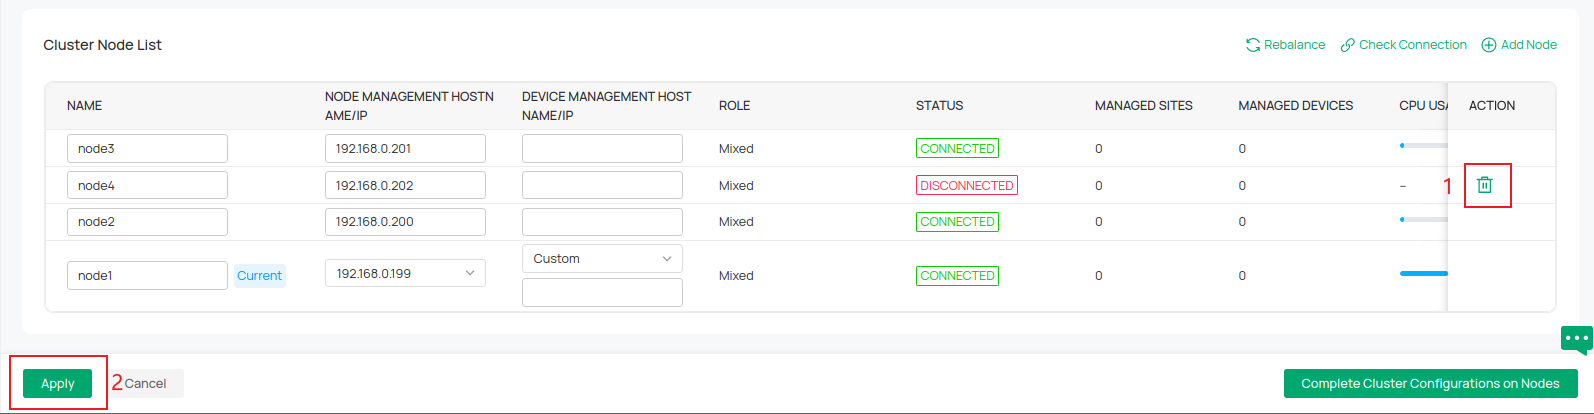
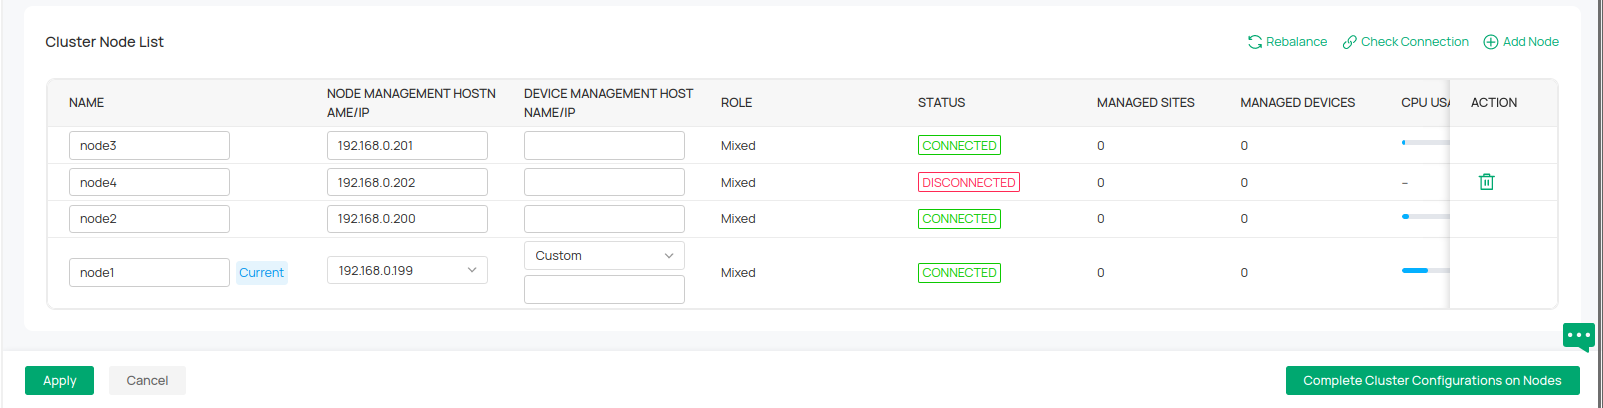 Step 3. When the delete icon appears on the node, click the delete button and then click Apply.
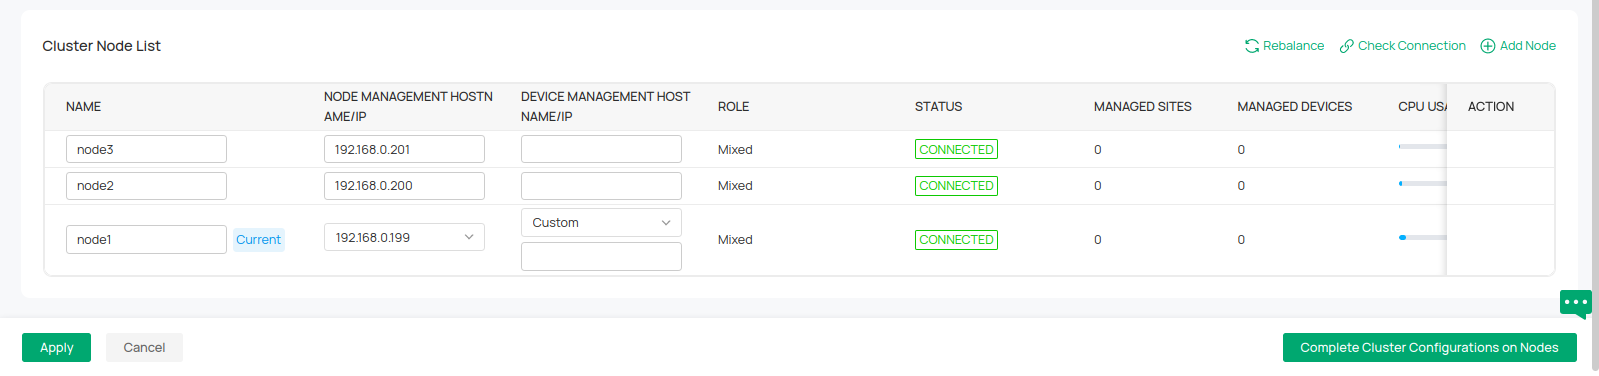
Step 4. You can see the node being deleted from any node.
How to Upgrade Controller Under Cluster mode.
At present, the Omada Cluster supports offline upgrades. Before you upgrade the Omada Cluster, you should stop the controller from running on all nodes.
To minimize the impact on the network, please try to upgrade the cluster during the free time.
Ensure all device firmware supports cluster deployment to prevent device disconnections after upgrade.
The specific steps for upgrading are as follows:
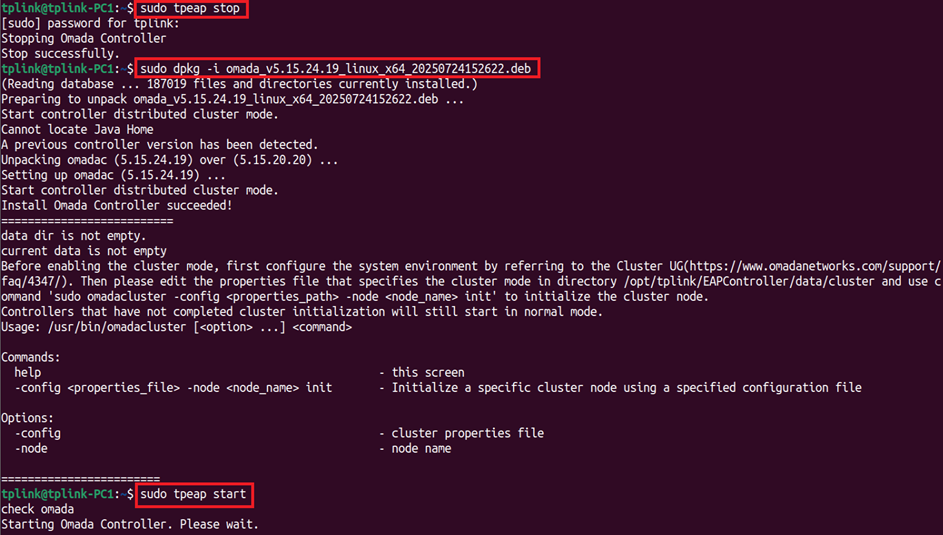
- Run the sudo tpeap stop command on all nodes to stop the cluster from running.
- Install the newer version controller on all nodes. Referring to the installation of your previous version, choose to install using deb or tar.gz.
- Please make sure that all nodes have been properly upgraded to the newer version first. Then run the Controller of all nodes at the same time, run the command sudo tpeap start.
- Wait for all controllers to display “Started successfully”. And then you can access the cluster normally.
Take the upgrade process of a node as an example:
How to troubleshoot if the Distributed cluster mode is not running?

- Check whether the modification of handle number was successful. You can use "ulimit -a" to verify if the handle number has been modified successfully.
- Check that the parameters for each node are consistent, including the Controller version, Mongodb version, and Java version used.
- If the nodes fail to connect successfully for an extended period, make sure to initialize the nodes starting with the primary node when configuring an existing Controller to a distributed cluster mode via the web.
How to troubleshoot if the node status is disconnected

Please check whether the time difference of Global View > Settings > System Settings > Current Node System Time for each node is within 20 seconds.
How to troubleshoot node stop failures caused by high system resource utilization before upgrading?
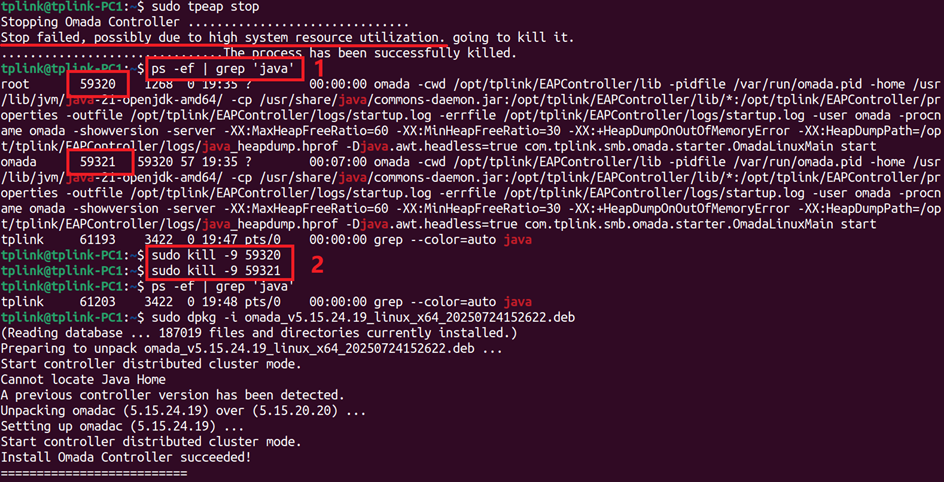
- Run the ps -ef | grep ‘java’ command on the abnormal node to query active Java processes in the system.
- Run the sudo kill -9 <PID> command to forcefully stop the Java process on the abnormal node (replace <PID> with the actual process ID).
- Follow the normal steps to install the newer version controller, then complete the upgrade.
How to troubleshoot if a node start failed caused by non-simultaneous execution of startup command?
Please run the sudo tpeap start command again on the abnormal node.
Get to know more details of each function and configuration please go to Download Center to download the manual of your product.
Questa faq è utile?
Your feedback helps improve this site.