How to enable Media Sharing on the AC VDSL/ADSL Modem Router
The feature of Media Sharing allows you to view photos, play music and watch movies stored in the USB disk directly from DLNA-supported devices in the same local network, such as your computer, pad and play station.
Note: here take Archer VR2600 as an example.
Step 1 Connect Your USB Disk
Insert a USB storage device into the USB port, make sure the USB light lit up on the modem router.
Note: If you use USB hubs, make sure no more than 4 devices are connected to the modem router.
• If the USB storage device requires using bundled external power, make sure the external power has been connected.
• If you use a USB hard drive, make sure its file system is FAT32 or NTFS. Some modem routers also support the HFS+ and exFAT file systems.
• Before you physically disconnect a USB device from the modem router, safely remove it to avoid data damage: Go to Advanced > USB Settings > Device Settings and click safely remove.
Step 2 Access the Media Files on Your USB Disk
Now the DLNA-supported devices (such as your computer and pad) connected to the modem router can detect and play the media files on the USB disks.
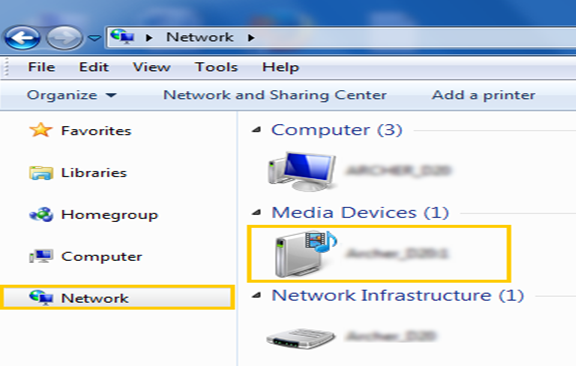
Go to Computer > Network, then click the Media Server Name (Archer_model number by default) in the Media Devices section.
Note: Here we take windows 7 as an example.
Step 3 Customize Your Settings
By default, Share All is enabled so all content on the USB disk is shared. If you want to only share specific folders, follow the steps below:
1. Access the web-based management interface of Archer VR200.
Please refer to How to log into the web-based interface of the VDSL/ADSL Modem Router (new designed blue UI)?
2. Select Basic>USB Settings>Sharing Access.
In Folder Sharing apart, it is set to share the whole device by default. Switch Share All off, click on Add to add a new sharing folder. Select the Volume Name and Folder Path, then enter a Folder Name as you like. Tick the option Enable Media Sharing to enable media server function. Click OK.
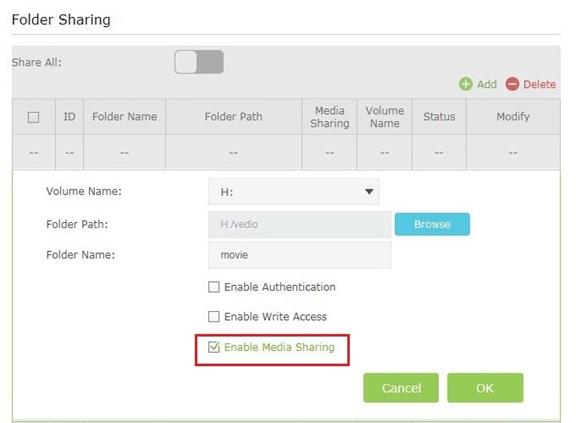
Note: The modem router can share eight volumes at most.
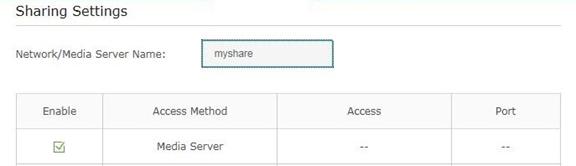
3. You can also modify the media server name or disable the feature of Media Sharing as needed.
In Sharing Settings apart, the Network/Media Server Name can be changed to something else as you like, such as myshare. You can deselect the check box of Media Server to disable the media server feature. Click Save.
Get to know more details of each function and configuration please go to Download Center to download the manual of your product.
¿Es útil esta pregunta frecuente?
Sus comentarios nos ayudan a mejorar este sitio.

