How to setup and use the FTP Server Function on your AC series VDSL/ADSL modem router
Note: Here take Archer VR2600 as an example.
Step 1
Insert your USB storage device into the modem router’s USB, then Wait and confirm the USB LED becomes solid on.
Step 2
Access the web-based management interface of Archer VR2600.
Please refer to How to log into the web-based interface of the VDSL/ADSL Modem Router (new designed blue UI)?
Step 3
Click Advanced > USB Settings -> Device Settings to check whether the USB device is identified by the modem router.
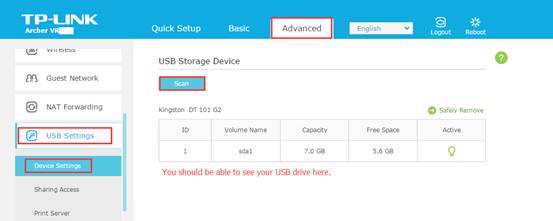
Tips:
If there is no device listed on this page, please click Scan. And you can also try unplug the USB device and plug it back in.
The modem router can share eight volumes at most. You can click  on the page to detach the corresponding volume you do not need to share.
Step 4: Enable the FTP
1) Check the options FTP and FTP (via Internet) to enable FTP server function.
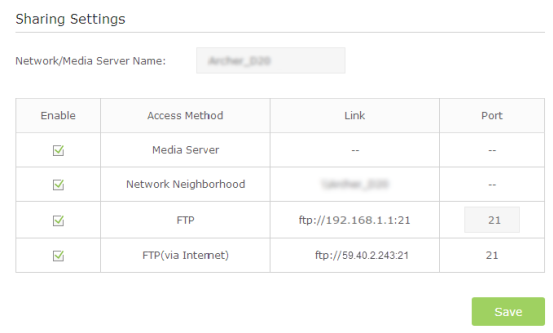
2) Share all is enabled so all content on the USB disk is shared by default. If you want to share specific folders only, follow the steps below:
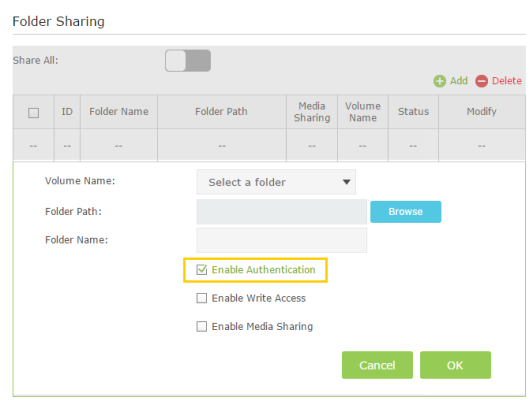
Switch off Share All, and click on Add to choose a new specific sharing folder. See example pictures below:
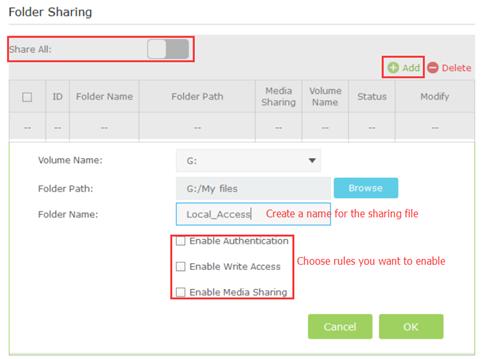
Explanations for the options:
Enable Authentication - A username and password will be required to access the Specific shared folder.
Enable Write Access - Select the check box to allow users to modify the folder content.
Enable Media Sharing - Enable media server function, you may click here to get more info.
Step 5: Enable Authentication for Data Security
It is strongly recommended that you set and apply a sharing account for data security.
1) Go to Sharing Account on the top. If check on Use Default Account, it would be admin/admin. If you choose Use New Account, you will have a separate login account for the USB device. Click on Save.
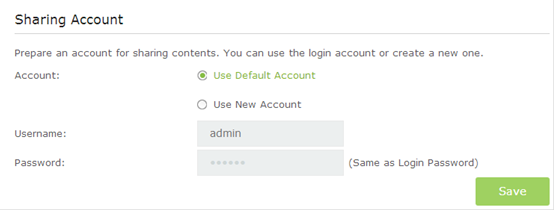
2) Enable Authentication to apply the sharing account.
If you leave Share All enabled, click the button to enable Authentication for all folders.

3) If Share All is disabled, enable Authentication for specific folders. Click on modify to modify the corresponding settings.
Step 6
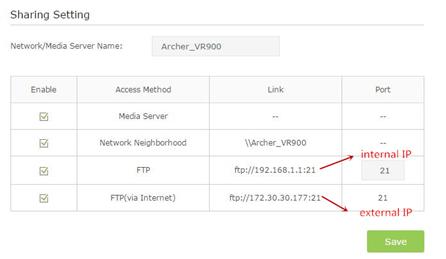
Now the FTP server can be accessed via local network. Please open the web browser and type in address ftp: //LAN IP, press enter. Then type in your account to access to the FTP server.
1) Open the Windows Explorer (or go to Computer, only for Windows users) or open a web browser.
2) Type the server address in the address bar: To access ftp server via internet please type in ftp://WAN IP address of the modem router:port number (such as ftp://59.40.2.243:21). If you have specified the domain name of the modem router, you can also type in ftp://domain name:port number (such as ftp://MyDomainName:21)
For example:The Address Bar of the Windows Explorer (Windows 7)
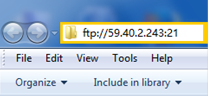
3) Press Enter on the keyboard.
4) Access with the username and password you set in Step 5 Enable Authentication for Data Security.
Get to know more details of each function and configuration please go to Download Center to download the manual of your product.
¿Es útil esta pregunta frecuente?
Sus comentarios nos ayudan a mejorar este sitio.

