How to Manage EAPs at Different Locations
Suitable for: EAP Controller 2.0.3 or higher EAP Controller 2.x version, take Controller 2.0.3 as an example.
Prior to controller 2.0.3 only the EAP devices in the same local network can be managed by EAP controller. If you have EAP devices at different sites you need to run EAP controller at each sites.
After upgrading EAP Controller to 2.0.3 or higher and EAP firmware to build 20150709 or later, you will be able to manage EAP at different locations through one EAP controller from Internet (also called L3 management).
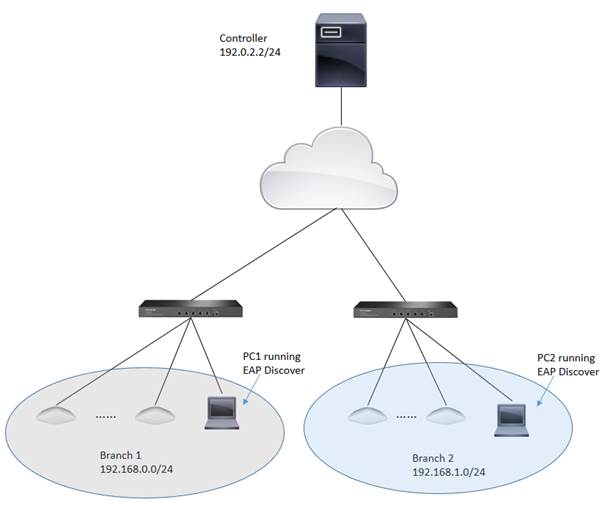
The below picture depicts an example. EAP Controller is installed on a server with public IP 192.0.2.2. At Branch 1 there is a DHCP server with DHCP pool 192.168.0.0/24. At Branch 2 DHCP pool is 192.168.1.0/24.

It is highly recommended you have DHCP server running at location where EAPs are to be installed. Otherwise you have to configure each EAP’s IP address individually to avoid IP conflict and do relevant settings on EAP controller or you will not be able to manage them.
Controller side prerequisite
EAP controller upgrades to 2.0.3 or higher.
Make sure firewall doesn’t block ports 8088, 8043, 29810, 29811, 29812 and 29813. Should your EAP controller is installed on a computer behind NAT router, make sure the above mentioned ports are opened for that computer. If you happen to use a TP-Link router you can refer to this FAQ. For other brand please contact their support.
EAP side settings
At EAP side the controller IP address, in the above example 192.0.2.2 need to be configured into each EAP device. There are two methods to configure the controller IP address.
Method 1. Set the controller IP/domain name via EAP Discover Utility
1. Download EAP controller from TP-Link website. Install EAP controller on a PC at site Branch 1. The PC should be in the same IP subnet as EAPs. In the example it is PC1.
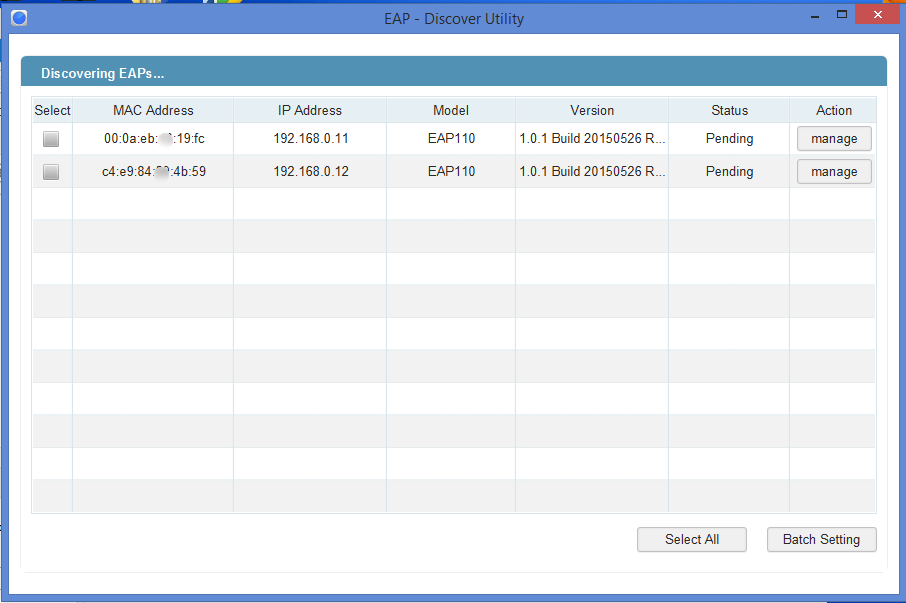
2. Run EAP Discover Utility (You will find it at C:\Program Files (x86)\TP-Link\EAP Controller\bin if you haven’t changed the installation path). All the EAP devices in the local network will be listed.

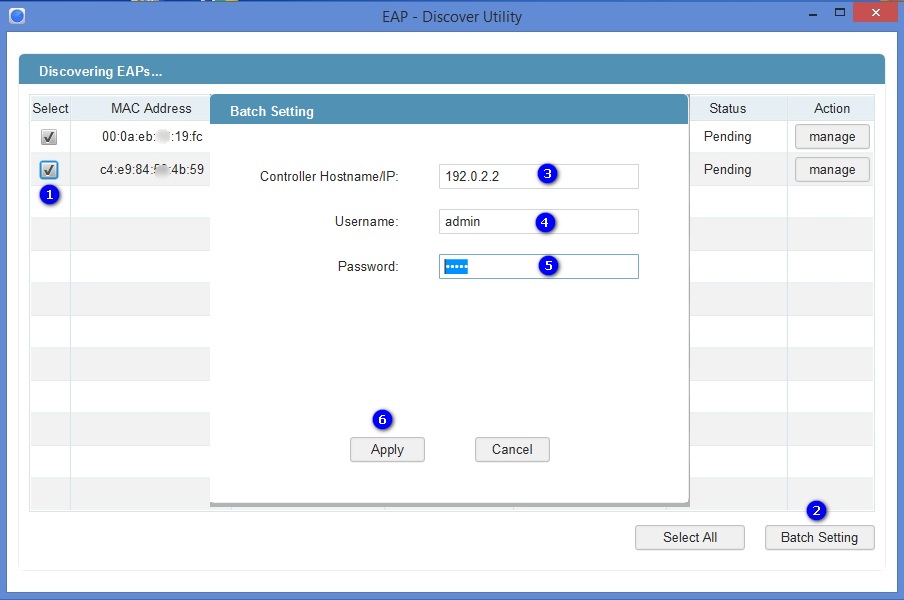
3. Since all the EAPs have the same Username and Password, you may use Batch Setting to set controller IP for them all. If your EAP devices have different username and password you can use the manage button to set the controller hostname/IP respectively.

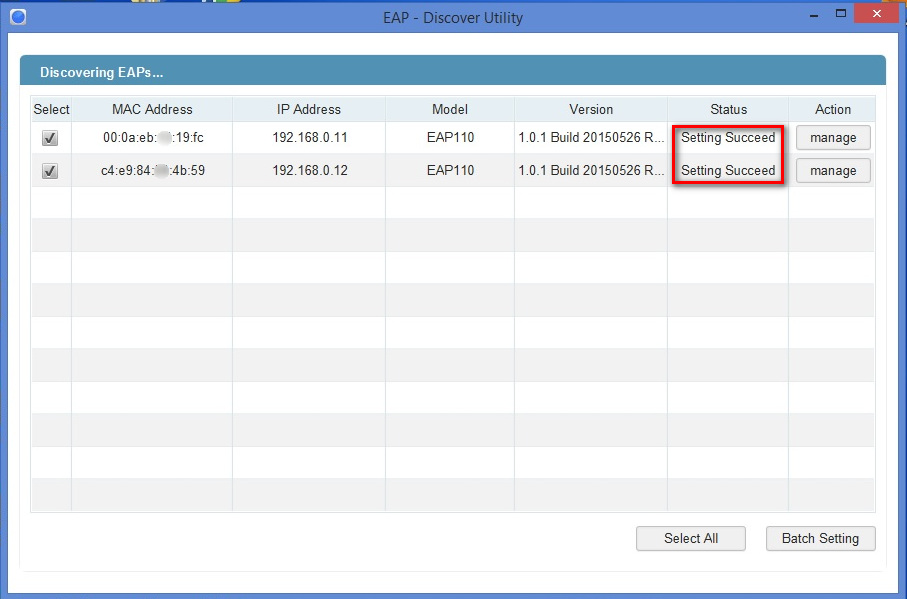
4. Wait until the status show as Setting Succeed.

5. The EAPs will be displayed as pending APs on controller waiting for adoption and management.

6. For EAPs located in Branch 2 use the same methods to set the controller’s IP address.
Method 2. Set option 138 on DHCP server
EAP devices can request controller IP via option 138 through DHCP. Take Branch 1 as example. Suppose the DHCP server in Branch 1 is capable of configure variable DHCP options. Set the controller IP, in our example, 192.0.2.2 as the option 138 value on it. All the EAP devices in the local network will be able to set 192.0.2.2 as the controller IP automatically after it boots up.
How to set option 138 on DHCP server varies from implementation to implementation which is out of the scope of this document. Please refer to DHCP server documentation for help. The below two examples used in our test are for your reference.
Cisco IOS CLI:
ip dhcp pool test
network 192.168.1.0 255.255.255.0
default-router 192.168.1.1
dns-server 8.8.8.8
option 138 ip 192.0.2.2
For more details please refer to Cisco website.
MikroTik RouterOS CLI:
#Assume you have already setup a dhcp server with item number 0
#0xC0000002 equeals 192.0.0.2
/ip dhcp-server option add code=138 name=controller value=0xC0000002
/ip dhcp-server network set 0 dhcp-option=controller
For more details please refer to MikroTik manual.
¿Es útil esta pregunta frecuente?
Sus comentarios nos ayudan a mejorar este sitio.


4.0-F_normal_20221110005047h.png)
4.0-F_normal_1593323206680k.png)
