How to connect TP-Link wireless IP camera to wireless router
This Article Applies to:
Note:Please ensure that you can view the camera on the desktop or laptop when the camera is connected to the router via Ethernet cable.
Step 1
Use an Ethernet cable to connect the camera to the LAN port of the wireless router first. We need wired connection to configure the camera at the very beginning.
Step 2
On a desktop or laptop which is connected to the same wireless router, open Intelligent IP Installer (you can find it in the Resource CD) and then highlight your camera.
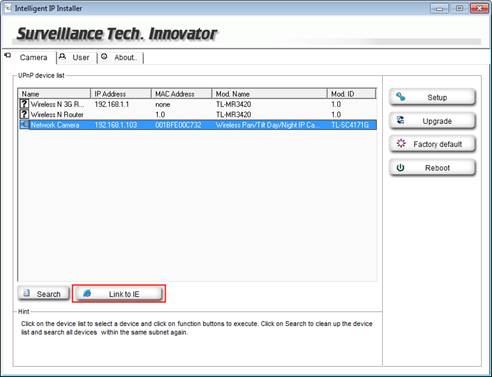
Click Link to IE button, IE will automatically started and the login window will be prompted.
Type the username and password in the login page (the default username and password both are admin), then click OK to connect to the device, you will be able to see the web configuration interface.
Note: If you changed the username and password before and forgot the username and password, please click here to reset the camera to default settings and then reconfigure the camera.
Or as now you know the IP address of the camera, you can manually type in the IP address in the address bar of other web browser such as IE, Firefox, Chrome or Safari. Here we just take IE as an example.

If you have changed the default port 3333, you have to add the port number after the IP address (we take 192.168.1.103:3333 as an example), click here to find out the port number of TP-Link IP Camera.
Step 3
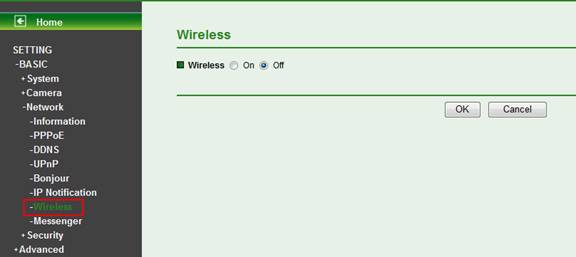
Go to SETTING->BASIC->Network->Wireless page. To enable wireless function, check the option on.
Step 4
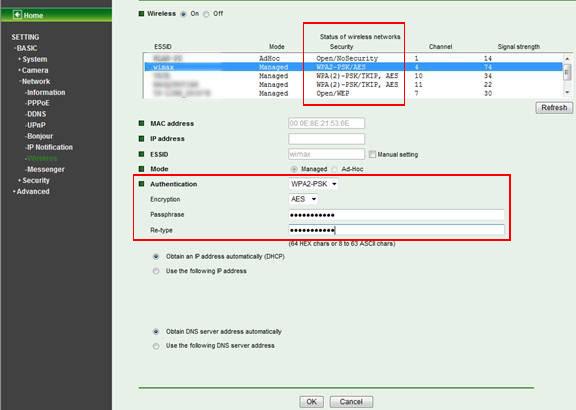
Click Refresh button, all the available wireless APs will be listed in the wireless network box. Highlight on your wireless router’s network name. Then fill in following content:
1. Select the corresponding Authentication, Encryption and type in the correct Passphrase or password which should match with the wireless settings in your wireless router.
Our camera could detect the basic wireless settings (Authentication, Encryption) of your wireless router. If you are not sure about the pass-phrase, please contact with the technique support of your wireless router.
Note: Under special cases, you check WPA-PSK/WPA2-PSK option on your wireless router and choose Automatic for the Version, Automatic for the Encryption.

But we only have WPA-PSK or WPA2-PSK to choose for the Authentication, and AES or TKIP for the Encryption on the camera.
We do suggest you choose the detected Authentication and Encryption shown on the camera page. If convenient for you, we hope you could fix the Authentication and Encryption on the wireless router.
2. Select Obtain an IP address automatically (DHCP) and Obtain DNS server addresses automatically. Click OK and the camera will start to connect to the router wirelessly.
.jpg)
Step 5
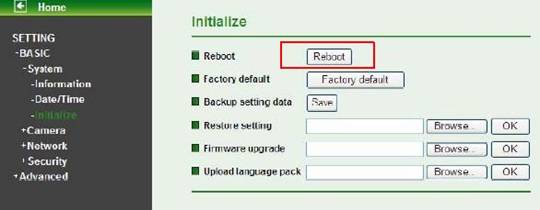
Go to SETTING->BASIC->Initialize, then Click Reboot button to reboot this IP Camera. A confirmation dialogue will appear and then click OK to process. It takes two minutes to reboot this IP Camera.
Step 6
After connect successfully, you can check the IP address assigned by the wireless router. There are mainly three methods you can use to check it.
Method 1: You can see IP address comes up in the wireless setting page of the IP camera.
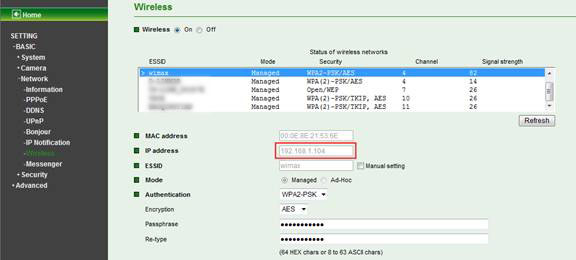
As you see from the picture, it’s a new IP address 192.168.1.104, different from wired IP address 192.168.1.103.
Method 2: Use Intelligent IP Installer. A new IP address comes up in the list after the IP camera was connected to the wireless router successfully.
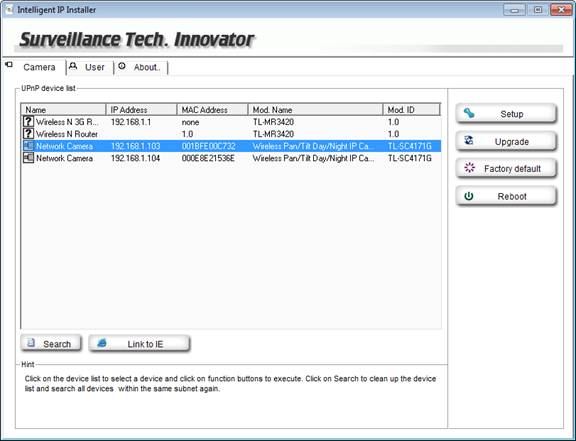
Method 3: Check the DHCP clients list in the web management page of your wireless router.
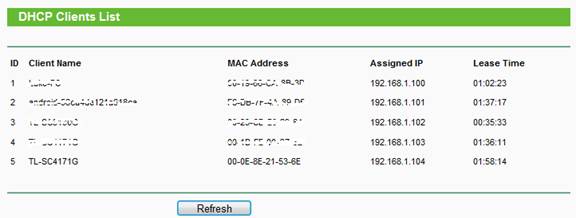
In Step 4, you can also assign a fixed IP address for the camera. Just choose use the following IP address and enter IP address, subnet mask, gateway and DNS information accordingly. Just keep in mind that the IP address you assigned to the camera should not be taken by other devices in your home network.
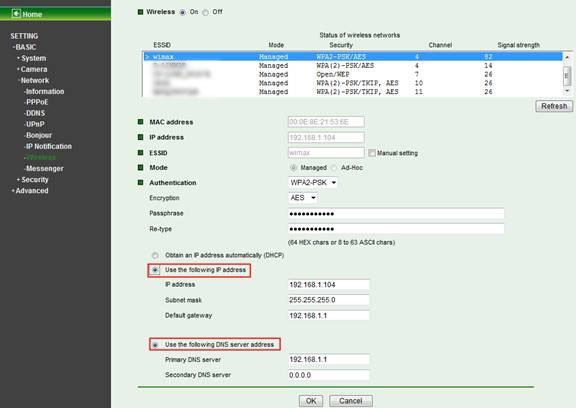
Step 7
Unplug the Ethernet cable from the camera to the router. And the camera is now connected to wireless router wirelessly.
Open the web browser and type the IP address (we take 192.168.1.104 as an example here) you check in the step 6 into the address bar and then Press Enter, now you can use any of your desktop and laptop in the network to view the camera as well.

Is this faq useful?
Your feedback helps improve this site.
TP-Link Community
Still need help? Search for answers, ask questions, and get help from TP-Link experts and other users around the world.