How to establish an L2TP Server by Omada Gateway in Standalone mode
ER7206 , ER8411 , ER707-M2 , ER706W-4G , ER7406 , ER605 , ER706W
Ostatnie aktualizacje mogły rozszerzyć możliwości lub dostęp do funkcji omówionych w tym poradniku FAQ. Odwiedź stronę pomocy technicznej swojego produktu, wybierz wersję sprzętową urządzenia i sprawdź jego Kartę katalogową lub sekcję Oprogramowań, aby zapoznać się z najnowszymi ulepszeniami dodanymi do produktu wraz z aktualizacją.
Application Scenario
Taking an example for ER7206 to explain how to establish an L2TP server by Omada Gateway in standalone mode. The connection topology is as follows:
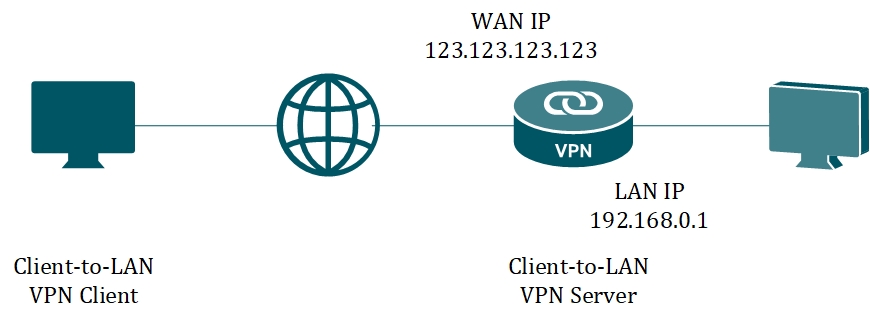
Note: If the Omada gateway is behind a NAT device, make sure that UDP port 1701 for L2TP traffic, UDP port 500/4500 for L2TP over IPsec VPN are open on the NAT device in front of the Omada gateway.
We configure ER7206 as the L2TP server.
Configuration Steps
Step 1. Check the network status.
Connect ER7206 according to the network topology and make sure that the Internet is available. Log into the router page, record the IP address (123.123.123.123) of the WAN port, and the LAN IP is 192.168.0.1/24 in default.
Step 2. Create the VPN IP Pool.
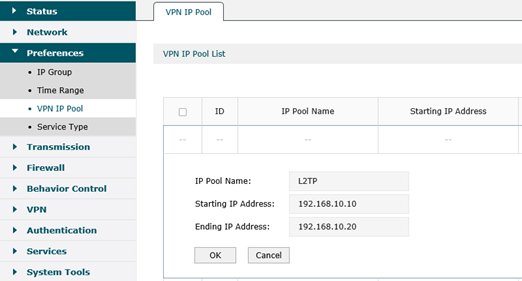
When the VPN client is applying to connect, the VPN server will assign a virtual IP address, which is from the VPN IP Pool. Go to Preferences --> VPN IP Pool, Click Add.
On the popup page, here we name the IP Pool Name as L2TP, configure Starting IP Address as 192.168.10.10, Ending IP Address as 192.168.10.20, then click OK to save the settings. You may set the values according to your network.
Step3. Enable L2TP VPN Server.
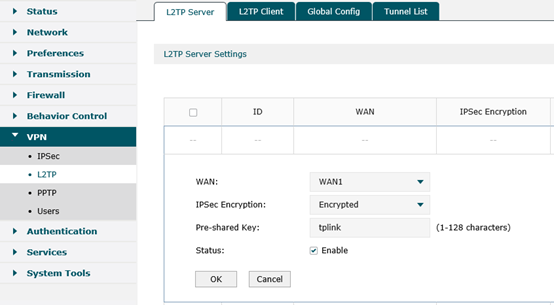
Go to VPN --> L2TP --> L2TP Server, click Add. On the popup page, choose WAN port as WAN1, specify IPsec Encryption as Encrypted (recommended for safety), set the Pre-shared Key as tplink (you can set it according to your demands) for IPsec encryption, then click OK to save the settings.
Step4. Create a L2TP VPN User.
Go to VPN ---> Users, click Add. Here we specify Account Name as tplink, Password as tplink, select Protocol as L2TP, configure Local IP Address as 192.168.0.210 (Local IP Address is the IP address of the virtual VPN adapter. It’s recommended configuring it in the same subnet with the LAN IP). On the below options, we specify IP Address Pool as L2TP we created above, DNS Address as 8.8.8.8, Network Mode as Client-to-LAN, Max Connections as 10, then click OK.
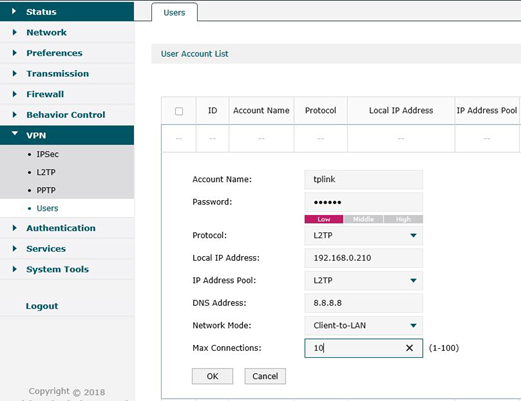
Till now, we have finished the configuration of the L2TP VPN Server on the Omada Gateway.
Please follow this FAQ to configure the VPN client on Windows PC: How to configure PPTP/L2TP client on remote PC?
Więcej
Czy ten poradnik FAQ był pomocny?
Twoja opinia pozwoli nam udoskonalić tę stronę.
Jakie są Twoje uwagi dotyczące tego artykułu?
- Niezadowolenie z produktu
- Zbyt skomplikowany
- Mylący tytuł
- Nie dotyczy mnie
- Zbyt ogólnikowy
- Inne
Dziękujemy
Dziękujemy za przesłanie opinii.
Kliknij tutaj, aby skontaktować się ze Wsparciem technicznym TP-Link.
z United States?
Uzyskaj produkty, wydarzenia i usługi przeznaczone dla Twojego regionu.
Ta witryna wykorzystuje tzw. pliki cookies, aby usprawnić jej przeglądanie, w celu analizy ruchu oraz do jak najlepszej optymalizacji wyświetlanych treści. W każdej chwili można wyłączyć obsługę plików cookies. Więcej informacji na ten temat dostępnych jest w Polityce prywatności
Podstawowe Cookies
Te pliki cookies niezbędne są do poprawnego działania witryny i nie moga zostać wyłączone.
TP-Link
accepted_local_switcher, tp_privacy_base, tp_privacy_marketing, tp_smb-select-product_scence, tp_smb-select-product_scenceSimple, tp_smb-select-product_userChoice, tp_smb-select-product_userChoiceSimple, tp_smb-select-product_userInfo, tp_smb-select-product_userInfoSimple, tp_top-banner, tp_popup-bottom, tp_popup-center, tp_popup-right-middle, tp_popup-right-bottom, tp_productCategoryType
Czat na żywo
__livechat, __lc2_cid, __lc2_cst, __lc_cid, __lc_cst, CASID
Youtube
id, VISITOR_INFO1_LIVE, LOGIN_INFO, SIDCC, SAPISID, APISID, SSID, SID, YSC, __Secure-1PSID, __Secure-1PAPISID, __Secure-1PSIDCC, __Secure-3PSID, __Secure-3PAPISID, __Secure-3PSIDCC, 1P_JAR, AEC, NID, OTZ
Cookies dotyczące analizy i marketingu
Analiza - Te pliki Cookies są wykorzystywane w celu analizy ruchu na naszej stronie, co umożliwia poprawę i dostosowanie wyświetlanych treści.
Marketing - Te pliki Cookies mogą być wykorzystywane przez naszych partnerów reklamowych podczas tworzenia profilu Twoich zainteresowań, co pozwala na wyświetlanie odpowiednich reklam na innych stronach.
Google Analytics & Google Tag Manager
_gid, _ga_<container-id>, _ga, _gat_gtag_<container-id>
Google Ads & DoubleClick
test_cookie, _gcl_au
Meta Pixel
_fbp
Crazy Egg
cebsp_, _ce.s, _ce.clock_data, _ce.clock_event, cebs
lidc, AnalyticsSyncHistory, UserMatchHistory, bcookie, li_sugr, ln_or