How to Upgrade the Firmware on the TP-Link Wi-Fi Routers (New Logo)
This article will guide you to upgrade the firmware on TP-Link Wi-Fi routers step by step.
First of all, please check whether your TP-Link router supports the TP-Link Cloud service or not. You may click here to check the Cloud Compatibility list.
Notes:
1) Some models have multiple hardware versions. Please verify the hardware version of your device. When upgrading use only firmware for the same hardware version. Wrong firmware upgrading may damage your device and void the warranty.
To check the hardware version of your device please click here.
For example, if you have an Archer C7 version 4, you would choose version 4. Please find out the correct hardware version and read the important note before the upgrade.

2) Do NOT upgrade the firmware via wireless connection
3) Do NOT turn off the power or cut down the Ethernet cable during upgrade process
4) Please pay attention to the Notes of the firmware you downloaded. In some cases new firmware cannot support a backup file of the older firmware. If this is the case, you will need to reconfigure the router manually.
Step 1. Download the latest firmware version for your device.
Go to download center for your Region on the TP-Link website. Then, select the appropriate drop downs for your TP-Link product. Choose the corresponding hardware version, click on Firmware. A list of available firmware will be displayed.
Note: The 6 digits in the firmware means the published date.

Step 2. Unzip/extract the Firmware from the downloaded .ZIP file
Locate the file you downloaded. Right-click the downloaded file and click the Extract All… option.

NOTE: The extracted firmware will show on a folder.
Step 3. Log in to the web-based interface of the router. If you don’t know how to do that, please refer to How do I log into the web-based Utility (Management Page) of TP-Link wireless router?
Step 4. Go to Advanced > System Tools > Firmware Upgrade.
Step 5. Focus on the Device Information section. Make sure the downloaded firmware file is matched with the Hardware Version.
Step 6. Focus on the Manual Upgrade section. Click Browse to locate the downloaded new firmware file, and click Upgrade. (Select the bin file that you extracted).
Picture 1:

Picture 2:

Wait a few minutes for the upgrade and reboot to complete.
Note:
1. During the online upgrade, please DON’T power off the router, unplug the Ethernet or disconnect from the wireless.
2. If you fail to download the firmware online, you can download it directly from the TP-Link official website. And manually upgrade the firmware as Case 1.
Online upgrade through web management page:
Step 1. Connect your device to the TP-Link wireless router either via Ethernet or wirelessly. Then open a browser and type http://tplinkwifi.net in the address bar. Press Enter and login the router.
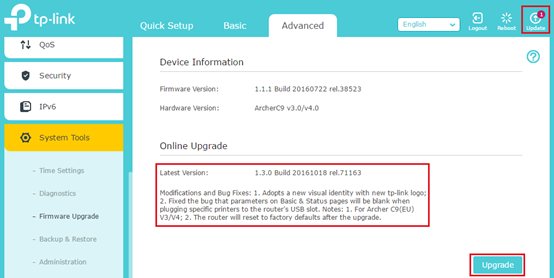
Step 2. If there is an update available, you will be notified by the Update icon in the upper right corner (if there is not update, the icon will not appear). Click Update and you will redirect to the Firmware Upgrade page on which you can check the latest firmware version and release notes.

Step 3. Click on the Upgrade button to begin the upgrade. Then wait until the router finishes the upgrade process, which will include a router reboot at the end.
*Note: Please make sure that you have a stable internet connection during the download process. Loss of connection during the process can damage the router.
Online upgrade through the Tether APP:
Step 1. Connect your smartphone to the Wi-Fi of the router. Then open the Tether app and login the router. Please tap the management icon at the bottom right corner, and you will see a red point in the System area which indicates there is new firmware for the router.
Step 2. Tap System > Firmware Update, and you will find the new version of firmware.

Tap Learn More to learn the release logs of the new firmware (recommended).

Note: Please pay attention to the release logs. If it mentions a reset after the upgrade, your previous configuration on the router including wireless settings will be reset to factory defaults, and you will need to connect your smartphone to the router with the default SSID and password printed on the bottom label.
Step 3. Tap Update to begin the upgrade process.
Get to know more details of each function and configuration please go to Download Center to download the manual of your product.
Este guia foi útil?
A sua resposta ajuda-nos a melhorar o nosso site.


