How to access TP-Link JetStream Managed Switch via the Console port
TL-SG3424 , TL-SG5428 , SX3008F , SG3428MP , SG3428X , T2600G-52TS , SG3452P , SX3016F , T2600G-28TS , T2500-28TC , T2700G-28TQ , T2500G-10TS , TL-SG5412F , T2600G-28MPS , TL-SX3008F , TL-SG3424P , TL-SG3428 , TL-SX3016F , SG3428 , TL-SL3428 , TL-SG3452P , TL-SG3428X , S5500-8MHP2XF , TL-SL3452 , TL-SG3428MP , TL-SG3216 , TL-SL5428E , T3700G-52TQ , T2600G-18TS , TL-SG3210 , TL-SG3452 , T2500G-10MPS , SG3210 , SG3452 , TL-SG3210XHP-M2 , S5500-24GP4XF , SG3428XMP , TL-SG3428XMP , T3700G-28TQ
As actualizações recentes podem ter expandido o acesso às funcionalidades abordadas nesta FAQ. Visite a página de suporte do seu produto, selecione a versão de hardware correta para o seu dispositivo e consulte a Folha de dados ou a secção de firmware para obter as mais recentes melhorias adicionadas ao seu produto. Tenha em atenção que a disponibilidade do produto varia consoante a região e que determinados modelos podem não estar disponíveis na sua região.
You can use the console cable to connect your PC to the console port of the TP-Link JetStream managed Switch and then manage the switch with the CLI.
Follow the steps below to manage the switch via the console port:
Step 1. Connect your computer to the switch.
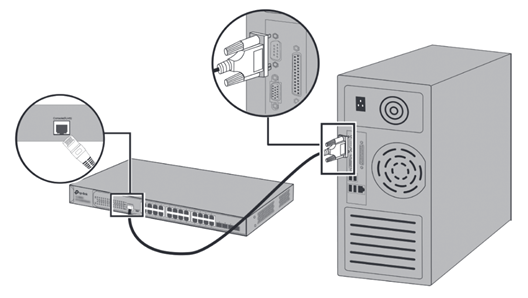
If your computer has a serial port (COM), connect it to the console port (RJ45) of the switch, with the RJ45 console cable.

If you only have USB ports on your computer, you can get a USB-to-RS232 cable. You need to install the RS232 driver for the cable, which is provided by your cable vendor.
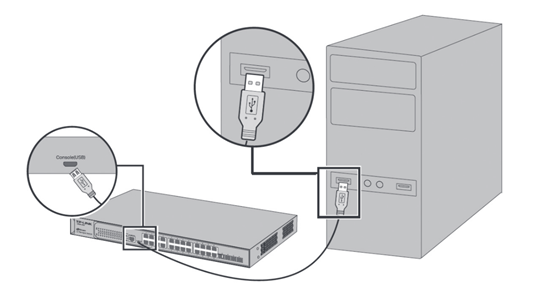
You can also choose a Micro-USB cable that supports data transfer to connect your computer to the switch. Then for Windows computers, click here to download and install the TP-Link USB Console Driver then continue. For Mac, please follow FAQ 3177.
Note: If you need to enter the BootUtil menu to reset the switch or recover the password, please refer to FAQ 3146. We recommend an RJ45 Console cable or USB-to-RS232 cable, as it might be more difficult to enter the BootUtil menu with a Micro-USB cable. If you still cannot enter the BootUtil after several attempts, you may get a USB-to-RS232 cable.

Step 2. Install a Terminal Emulator.
For Windows computers, you need to install a terminal emulator, such as Putty, Tera Term. Go to the official website to download the installer and follow the prompts to install the terminal emulator.
Note: If you use the Micro-USB cable, we recommend “Tera Term”, which you can download and install from the official website.
Step 3. Launch and Configure the Terminal Emulator.
Run your terminal emulator with the following serial parameters
- Baud Rate: 38400bps
- Data Bits: 8
- Parity: None
- Stop Bits: 1
- Flow Control: None
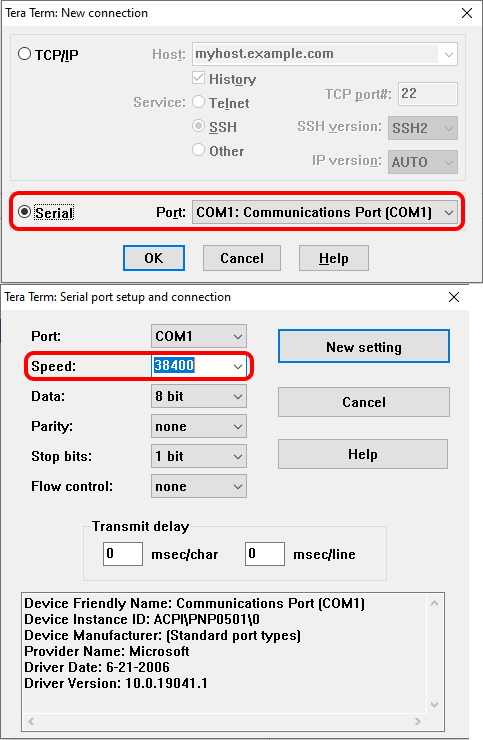
For Tera Term, choose the serial port, then go to Setup – Serial Port, set the speed to 38400, then click “New setting”.

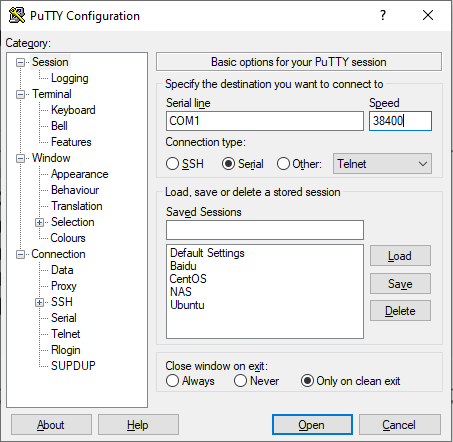
For Putty, select Serial, change the Speed to 38400, and then click “Open”.

Step 4 Launching the CLI
Enter the username and password, then you can manage the switch. Please refer to the User Guide, and CLI Reference Guide, which can be found on the support page for your switch model.
Perguntas Frequentes Relacionadas (FAQ's)
Este guia foi útil?
A sua resposta ajuda-nos a melhorar o nosso site.
Qual é a sua preocupação com este artigo?
- Insatisfeito com o produto
- Demasiado Complicado
- Título Confuso
- Não se aplica a mim
- Muito Vago.
- Outro
Obrigado
We appreciate your feedback.
Click here to contact TP-Link technical support.
Este site utiliza cookies para melhorar a navegação no site, analisar atividades online e proporcionar aos utilizadores a melhor experiência no nosso site. Pode opor-se à utilização de cookies a qualquer momento. Pode aprender mais informações no nosso política de privacidade .
Este site utiliza cookies para melhorar a navegação no site, analisar atividades online e proporcionar aos utilizadores a melhor experiência no nosso site. Pode opor-se à utilização de cookies a qualquer momento. Pode aprender mais informações no nosso política de privacidade .
Cookies Básicos
Os cookies são necessários para o funcionamento do website e não podem ser desativados nos seus sistemas.
TP-Link
SESSION, JSESSIONID, accepted_local_switcher, tp_privacy_base, tp_privacy_marketing, tp_smb-select-product_scence, tp_smb-select-product_scenceSimple, tp_smb-select-product_userChoice, tp_smb-select-product_userChoiceSimple, tp_smb-select-product_userInfo, tp_smb-select-product_userInfoSimple, tp_top-banner, tp_popup-bottom, tp_popup-center, tp_popup-right-middle, tp_popup-right-bottom, tp_productCategoryType
Youtube
id, VISITOR_INFO1_LIVE, LOGIN_INFO, SIDCC, SAPISID, APISID, SSID, SID, YSC, __Secure-1PSID, __Secure-1PAPISID, __Secure-1PSIDCC, __Secure-3PSID, __Secure-3PAPISID, __Secure-3PSIDCC, 1P_JAR, AEC, NID, OTZ
Zendesk
OptanonConsent, __cf_bm, __cfruid, _cfuvid, _help_center_session, _pendo___sg__.<container-id>, _pendo_meta.<container-id>, _pendo_visitorId.<container-id>, _zendesk_authenticated, _zendesk_cookie, _zendesk_session, _zendesk_shared_session, ajs_anonymous_id, cf_clearance
Cookies de Análise e Marketing
Os cookies de analise permite-nos analisar as suas atividades no nosso website para melhorar e ajustar a funcionalidade do nosso website.
O cookies de marketing podem ser definidos através do nosso website pelos nossos parceiros publicitários de forma a criar um perfil dos seus interesses e mostrar-lhe anúncios relevantes em outros websites.
Google Analytics & Google Tag Manager
_gid, _ga_<container-id>, _ga, _gat_gtag_<container-id>
Google Ads & DoubleClick
test_cookie, _gcl_au


