How to check the MAC address of your computer
Choose the operating system of your computer. Through Control Panel:
Step 1
Click Start->Control Panel->select and click Network and internet connections (If you cannot find it, please go next) ->select and double click Network Connections.
Step 2
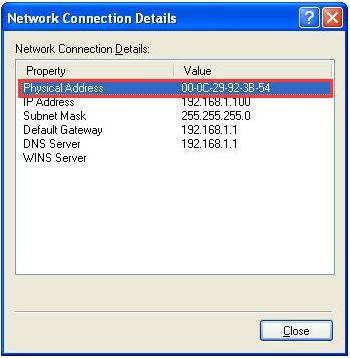
Highlight and right-click the Local Area Connection icon(If your computer is connected to a wireless network, please click Wireless network connection icon); click on Status and go to Support and Detail. The physical address is the MAC address of your computer will display.


Step 1
Click Start ->Control Panel -> Network and Internet -> Network and Sharing Center.
Step 2
In the task list, please click Manage network connections( If your computer is connected to a wireless network please click Wireless network connection icon). Highlight and right-click the Local Area Connection icon; click on Status and go to Details. The physical address is the MAC address of your computer will display.

Step 1
Click Start ->Control Panel -> Network and Internet -> Network and Sharing Center.
Step 2
In the task list, please click Change adapter settings. Highlight and right click the Local Area Connection icon( If your computer is connected to a wireless network please click Wireless network connection icon); click on Status and go to Details. The physical address is the MAC address of your computer will display.

Step 1
Go to Control Panel.
Here we will illustrate different ways to find control panel on Windows 8.
1) Press “Windows key  +F”, a search box will come out, please input control panel and press enter;
2)Press “Windows key+ R”, then there will be a “run” box, input control panel and press enter;
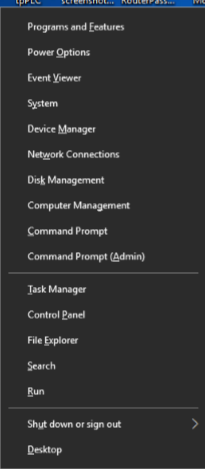
3) Press “Windows key +X”, and click on “control panel”;
4) You can also input “control panel” in the search bar on the right-hand side of the screen.
Step 2
Click on Network and Internet -> Network and Sharing Center, click on Change adapter settings on the left side.
Step 3
Highlight and right click on Ethernet(If your computer is connected to a wireless network please click Wi-Fi icon), go to Status -> Details. The physical address is the MAC address of your computer will display.

Method 1
Step 1
Go to Control Panel. Press Windows key+X at the same time and select Control Panel.

Step 2
Click on Network and Internet -> Network and Sharing Center, click on Change adapter settings on the left side.
Step 3
Highlight and right click on Ethernet, go to Status -> Details. The physical address is the MAC address of your computer will display.

Method 2
Click the network icon (may look like a computer or Wi-Fi signal) in the task tray. Go to Network settings.


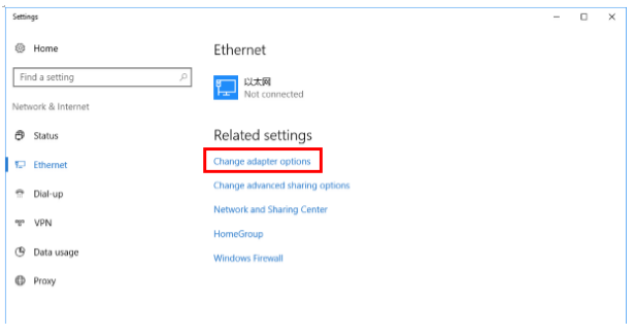
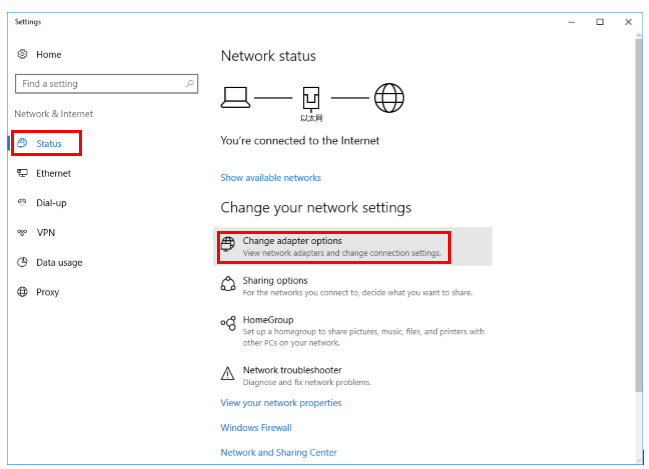
Click Ethernet > Change adapter options. Or click Status > Change adapter options.

Highlight and right click on Ethernet, go to Status -> Details. The physical address is the MAC address of your computer will display.
Step 1
Click the Apple icon, from the Apple drop-down list, select System Preferences.

Step 2
Click the Network icon.

Step 3
In the left column, select Ethernet (for wired connection) or Wi-Fi (for wireless connection).
Then click on Advanced in the lower right corner.

Step 4
Click the "Wi-Fi" tab in the Wi-Fi window.
Your MacBook's Wi-Fi MAC address is listed at the bottom of the window as the "Wi-Fi Address."

Step 5
The Ethernet MAC address.
Click the "Hardware" tab in the Ethernet window.
The Ethernet MAC address is listed right below the tabs.

Fick du svar på din fråga?
Your feedback helps improve this site.
TP-Link Community
Still need help? Search for answers, ask questions, and get help from TP-Link experts and other users around the world.


