How to set up Remote Management on the Wi-Fi Routers (new logo)
1. Log in to the web-based interface of the router. If you don’t know how to do that, please refer to How do I log into the web-based Utility (Management Page) of TP-Link wireless router?
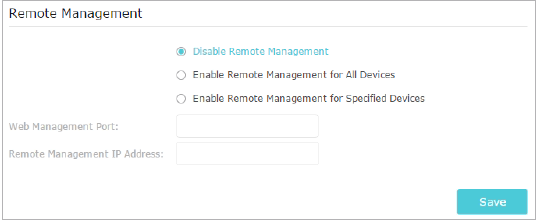
2. Go to Advanced > System Tools > Administration and complete the settings in Remote Management section as needed.

- Forbid all devices to manage the router remotely:
Select Disable Remote Management and click Save.
- Allow all devices to manage the router remotely:
- Select Enable Remote Management for All Devices.
- Enter Web Management Port (1024-65535 or 80).
- Click Save.
Devices on the Internet can log in to http://Router’s WAN IP address:port number (such as http://113.116.60.229:1024) to manage the router.
Note: The remotely accessed device can see all the functions of the web management page but cannot modify and set Internet settings, IPv6, Backup&Restore, VPN function, and local firmware upgrade.
Tips:
You can find the WAN IP address of the router on Basic > Network Maps > Internet.
The router’s WAN IP is usually a dynamic IP.
- Allow specific devices to manage the router remotely:
- Select Enable Remote Management for Specified Devices.
- Enter Web Management Port (1024-65535 or 80).
- In Remote Management IP address, enter the IP address of the remote device to manage the router.
- Click Save.
Devices using this WAN IP can manage the router by logging in to http://Router’s WAN IP:port number (such as http://113.116.60.229:1024).
Get to know more details of each function and configuration please go to Download Center to download the manual of your product.
คำถามที่พบบ่อยนี้มีประโยชน์หรือไม่?
ความคิดเห็นของคุณช่วยปรับปรุงเว็บไซต์นี้


