Changing Channel and Channel Width Settings on a TP-Link Router (Blue GUI)
A wireless channel determines which operating frequency will be in use. It is not necessary to change the channel unless you’re noticing interference problems with nearby access points. The Channel Width setting is preset to automatic, allowing the client’s channel width for to adjust automatically.
Related Article: Changing Channel and Channel Width on a TP-Link Router (new logo)
Old Blue GUI
Step 1: Click Advanced.

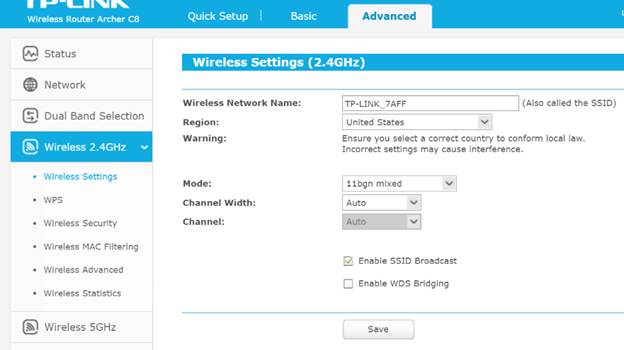
Step 2: Click Wireless 2.4GHz, then Wireless Settings. Change your Channel and Width settings to preference, then click Save.
Change the Channel (channels 1, 6 and 11 are generally best, but any channel can be used). Also, change the channel width to 20MHz.

Step 3: Repeat for Step 2 for 5GHz if your 5GHz network has interference problem.
Note :For 5GHz, we recommend you use channel in Band 4, which is channel 149-165, if your router is US version.

New Blue GUI
Step 1: Click Advanced.

Step 2: Click Wireless, then Wireless settings. Chose Band, then set your Channel and Width settings to preference and click Save.
Change the Channel (channels 1, 6 and 11 are generally best, but any channel can be used). Also, change the channel width to 20MHz

Step 3: Repeat for Step 2 for 5GHz if your 5GHz network has interference problem.
Note :For 5GHz, we recommend you use channel in Band 4, which is channel 149-165, if your router is US version.

Step 4: Click the reboot button, located at the upper right corner of the screen to apply your changes.

คำถามที่พบบ่อยนี้มีประโยชน์หรือไม่?
ความคิดเห็นของคุณช่วยปรับปรุงเว็บไซต์นี้