How to use VIGI cameras with other NVR brands or NAS
The VIGI cameras work with VIGI NVR as well as other NVR brands or NAS for easier batch access and management. It is recommended to use the VIGI cameras with the VIGI NVR. For other NVR brands, make sure they support ONVIF and RTSP protocols. Here we will show you how to use VIGI cameras with other NVR brands.
Step 1: Power on your cameras and connect them to the same network as your NVR.

Step 2: Activate the cameras using the VIGI Security Manager or VIGI App.
1. Download the VIGI Security Manager on your windows computer at https://www.tp-link.com/download-center/
2. Install the VIGI Security Manager and open it.
3. Go to Settings > Discovered Devices. Cameras on the same network as your computer can be automatically discovered.
4. Click + Add to activate your discovered cameras by setting passwords.
5. Follow the instructions to add your cameras.
Step 3: Refer to the NVR’s User Manual to add cameras.
We will show you some basic parameters that it may require to connect the VIGI camera to your NVR.
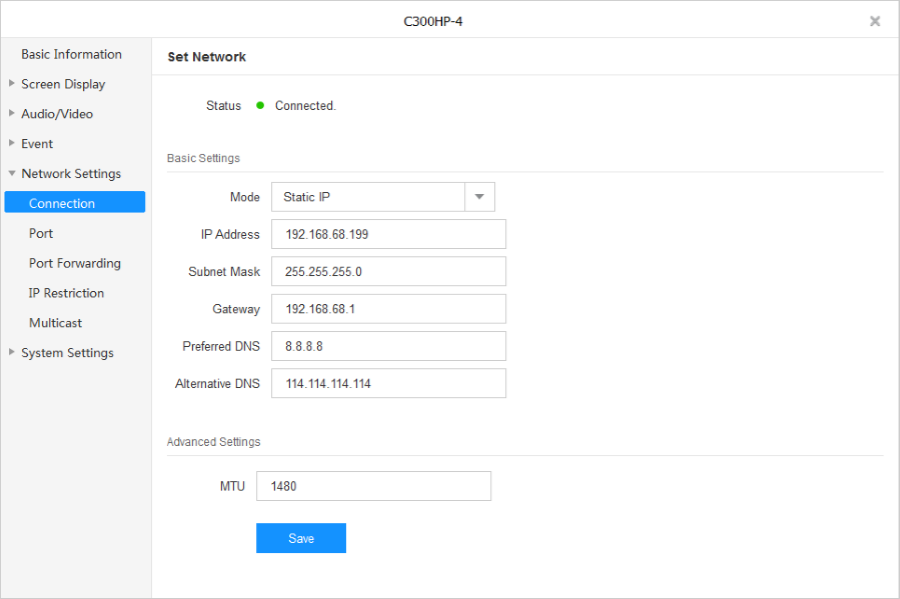
1. The IP address of the camera.
Open VIGI Security Manger and go to Settings > Device > Device List > My Devices > Settings icon of the camera > Network Settings > Connection.

For some NVRs, you’ll need to modify the IP address of the VIGI camera to the same network segment as the NVR for successful adding.
2. The ports for standard ONVIF and RTSP protocols.
Please select Onvif protocols to add VIGI cameras.
ONVIF Service Port: 2020
RTSP Service Port: 554
3. The username/password of the camera.
Username: admin
Password: It is set when you activated the camera. If you forget it, please refer to the link to reset the password.
Get to know more details of each function and configuration please go to Download Center to download the manual of your product.
คำถามที่พบบ่อยนี้มีประโยชน์หรือไม่?
ความคิดเห็นของคุณช่วยปรับปรุงเว็บไซต์นี้


