How to Configure Bridge Mode on TL-WR702N
บทความนี้ใช้กับ:
Note: This FAQ is only suitable for TL-WR702N with firmware version 130314 or older; it is NOT suitable for 130528 or later version.
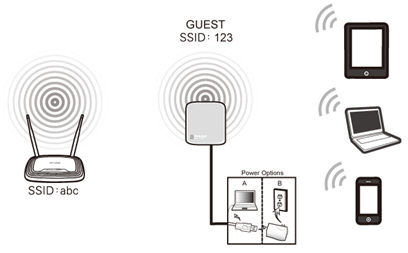
Definition:The TL-WR702N borrows existing wireless Internet and broadcasts it using a different network name(SSID) and password. This application can create two individual networks for two groups of users sharing one Internet.
Application: Small restaurant,shop,bar,home,office and others where Internet service needs to be provided for guests without revealing the password of the existing network for hosts.
Physical Connection
Step 1:
Connect the WR702N directly to your computer’s Ethernet port by an Ethernet cable;
Step 2:
Power on the WR702N
.jpg)
Initial Computer Setup– For Windows 7, Vista & XP (For Mac OS X, please go to page3)
Step 1:
Windows 7&Windows Vista: Go to Start->Control Panel ->Network and Sharing Center
Windows XP: Go to Start->Control Panel->Network Connections
.png)
Step 2:
Windows 7: Go to Network andSharing Center->Change Adapter settings
Windows Vista: Go to Network andSharing Center->Manage Network Connections
Windows XP: (Go to Next Step)
.png)
Step 3:
Windows 7, Vista and XP: Right Click Local Area Connection ->Select Properties -> Double Click Internet Protocol Version 4 (TCP/IPv4) or Internet Protocol (TCP/IP) for Windows XP.
.png)
Step 4:
Windows 7, Vista and XP: Select “Use the Following IP address:”
Type the following information:
IP address: 192.168.0.10
Subnet mask: 255.255.255.0
Click OK to exit
Click OK again to apply the settings.
.png) Windows 7, Vista & XP
|
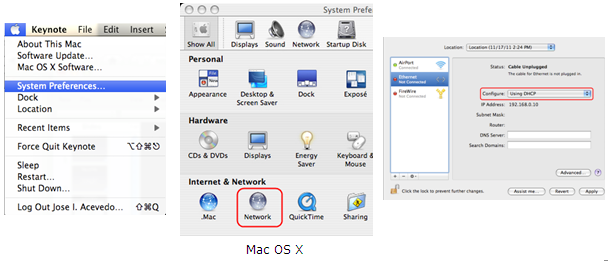
Initial Computer Setup– For Mac OS X
Go to the Apple->System Preferences>Network-> Highlight Ethernet ->Configure IPv4: Using DHCP with manual address
Input the IPv4 Address: 192.168.0.10
Click Apply
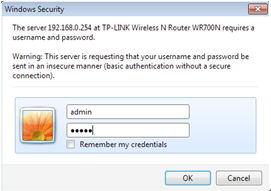
Access the Management Page
Open a Web Browser -> Type 192.168.0.254 in the address bar -> Press Enter

Enter the default User Name: admin
Enter the default Password: admin
Click OK
Run Quick Setup
Step 1:
Go to Quick Setup-> Click Next
.jpg)
Step 2:
Select Bridge-> Click Next
.jpg)
Step 3:
Click Survey
.jpg)
Locate your router network name under the SSID column, remember the Channel (The channel your wireless network is using)-> Click Connect
.jpg)
Channel: Please select the same channel that your existing wireless network is using too
Security Options: (Please match Security Options with your existing router)
Please refer to Original Equipment Manufacturer for details
Password: (Please match Security Password with your existing router)
Step 4:
Click: Next
.jpg)
If you want to provide an open network to your guest, please select Disable Security. Otherwise, select: Enable Securityand input the PSK Password.
PSK Password: Create a new security password for the guest wireless network
Step 5:
Click Next
.jpg)
Step 6:
Click: Reboot, and wait until it goes to 100%
.jpg)
Relocate the WR702N
You may now relocate the WR702N to a centralized location in order to broadcast a guest network.
Congratulations! You have created a temporary guest wireless network which shares the internet without exposing your wireless password.
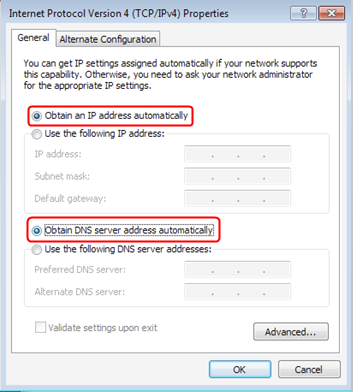
Final Computer Reversion– For Windows 7, Vista & XP (For Mac OS X, please go to page 9)
Step 1:
Windows 7&Windows Vista: Go to Start->Control Panel ->Network and Sharing Center
Windows XP: Go to Start->Control Panel->Network Connections
Step 2:
Windows 7: Go to Network andSharing Center->Change Adapter settings
Windows Vista: Go to Network andSharing Center->Manage Network Connections
Windows XP: (Go to Next Step)
Step 3:
Windows 7, Vista and XP: Right Click Local Area Connection ->Select Properties -> Double Click Internet Protocol Version 4 (TCP/IPv4) or Internet Protocol (TCP/IP) forWindows XP.
Step 4:
Windows 7, Vista and XP: Select “Obtainan IP address automatically” and “Obtain DNS server address automatically”
Click OK to exit
Click OK again to apply the settings.
 Windows 7, Vista & XP
|
Final Computer Reversion – For Mac OS X
Go to the Apple>System Preferences->Network-> Highlight Ethernet ->Configure IPv4: Using DHCP
Click Apply
If it doesn't work, please feel free to contact us(support@tp-link.com).
Get to know more details of each function and configuration please go to Download Center to download the manual of your product.
คำถามที่พบบ่อยนี้มีประโยชน์หรือไม่?
ความคิดเห็นของคุณช่วยปรับปรุงเว็บไซต์นี้