如何將我的TP-Link 無線路由器設定為基地台模式呢?

Archer C1200 , Archer C5400 , Archer C4 , Archer C5 , TL-WR843ND , Archer AX10 , Archer C2 , Archer C59 (EU) , Archer AX96 , Archer C5v , Archer C6U , TL-WR940N , TL-WR1043N , Archer C80 , Archer C58HP , Archer AXE95 , Archer C8 , Archer AX10000 , Archer C9 , Archer C6 , Archer C7 , Archer AX90 , TL-WR843N , Archer C5400X , TL-WR829N , Archer A20 , Archer C60 , Archer A1200 , Archer C64 , TL-WR820N , TL-WR941N , TL-WR941ND , TL-WR949N , TL-WR901N , TL-WR844N , Archer C59 , Archer C58 , Archer AX4200 , Archer C3200 , Archer A2 , Archer AX75 , Archer AX73 , Archer A10 , Archer C50 , Archer C55 , Archer C54 , TL-WR841N , Archer AXE75 , TL-WR849N , Archer A6 , Archer A7 , Archer AX72 , Archer A5 , TL-WR801N , Archer A8 , Archer A9 , Archer AX68 , Archer AX5300 , Archer C4000 , TL-WR842N , TL-WR841HP , Archer AXE300 , Archer AX1500 , Archer AX60 , Archer AX3000 , Archer A2600 , Archer AX55 , TL-WR841ND , Archer C5200 , Archer AX53 , Archer AX51 , Archer C50 V3.0 , Archer C5 V4 , Archer A2200 , Archer C3150 , Archer AX50 , TL-WR847N , Archer C20 V4 , Archer AX6000 , Archer C25 , Archer C24 , Archer A64 , Archer C2 V1 , Archer C2600 , Archer C21 , Archer C20 , Archer C2 V3 , Archer AX1800 , TL-WR945N , Archer AX206 , TL-WR842ND , Archer C900 , Archer AX4400 , Archer C3000 , Archer C50
Recent updates may have expanded access to feature(s) discussed in this FAQ. Visit your product's support page, select the correct hardware version for your device, and check either the Datasheet or the firmware section for the latest improvements added to your product. Please note that product availability varies by region, and certain models may not be available in your region.
本文將指導您將TP-Link 11n無線路由器設定為基地台,基地台可以將現有的有線網路轉換為無線網路。
首先請先登入產品設定頁面,確認左側選單中是否有運作模式(Operation Mode)選項,請參考:如何登入至TP-Link 無線路由器的網頁介面 (管理頁面)?
情境1. 若路由器具有運作模式可切換,請依據底下指示一步步操作。
1. 將路由器接上變壓器並啟動路由器。
2. 從您網路來源設備拉一條網路線連接到路由器的WAN連接埠,如下圖。
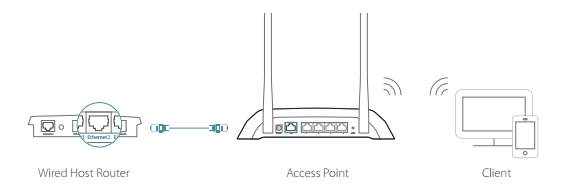
3. 使用電腦透過網路線連接到路由器的LAN,或無線設備連接到產品的Wi-Fi (名稱/SSID和密碼可在機器底部標籤找到)來連接路由器。
4. 開啟網頁在網址列輸入:http://tplinkwifi.net ,並使用admin作為密碼登入。
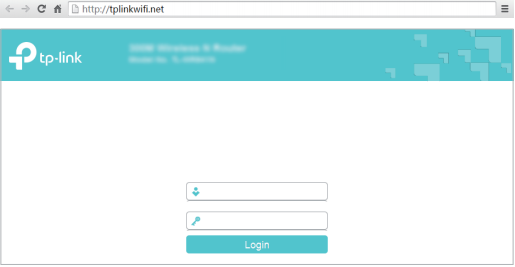
註:如果使用IP瀏覽器時不會出現上述畫面,這代表您的IE瀏覽器已設置為代理。請至IE瀏覽器工具選單 網際網路選項>連線>區域網路LAN設定,取消選取 為您的LAN使用Proxy伺服器然後點選確定。
5. 成功登入後,請在模式選取基地台模式並依照快速設定指示完成設定。
6. 使用設定好的無線網路名稱和密碼來連線。
情境2. 若路由器不具有運作模式可切換,請依據底下指示一步步操作。
步驟1
登入路由器的網頁管理介面,請參閱:
如何登入至TP-Link 無線路由器的網頁介面 (管理頁面)?
步驟2
至網路設定>LAN 請您將您的TP-Link N路由器 的LAN IP位址變更與您主路由器相同子網段的IP位址,該IP位址應在主路由器的DHCP範圍之外。
例:如果您主路由器的DHCP為192.168.2.100 -192.168.2.199,則可以將IP位址設定為192.168.2.11。
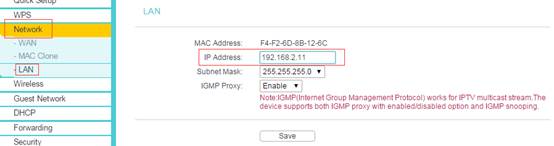
註:更改LAN IP位址後需要重新啟動,您需要以新的LAN IP位址來登入TP-Link路由器。
步驟3
至無線網路>無線網路設定來設定您的無線網路名稱,並點選儲存。
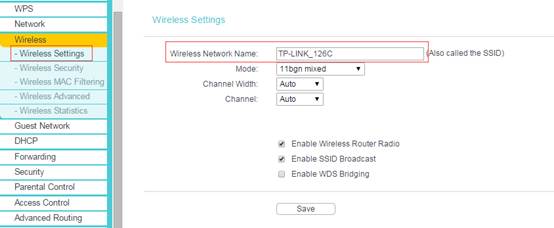
註:此處的SSID為基地台的無線網路名稱,可以與主路由器網路名稱相同也可不同,建議不同以辨識網路。
步驟4
至無線網路>無線網路安全性,設定您的無線網路加密類型,建議選擇
WPA/WPA2-Personal,設定完成後點選儲存。
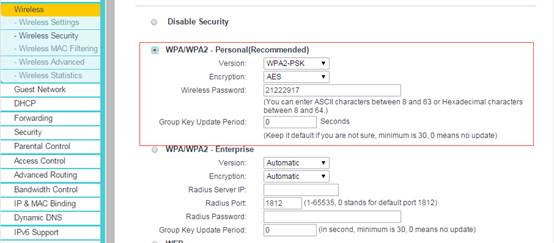
註:若您使用雙頻路由器,則在5GHz也重覆此過程。
步驟5
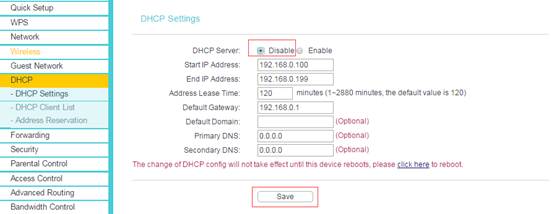
至DHCP>DHCP設定,並選擇停用DHCP伺服器功能,完成後點選儲存。
步驟6
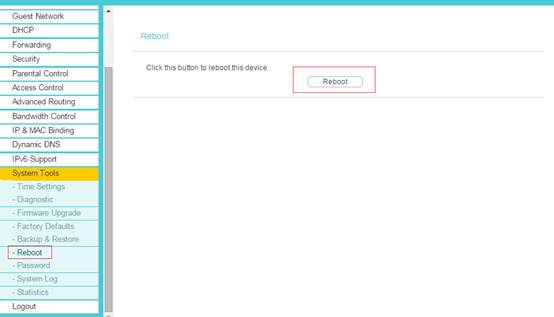
至系統工具>重新啟動,並點選重新啟動來重啟設備。
步驟7
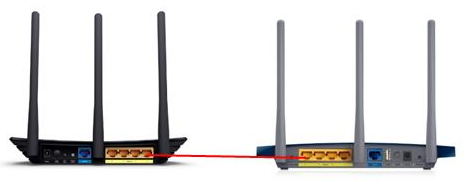
使用網路線將主路由器連接到TP-Link N路由器的LAN連接埠。TP-Link N路由器上的所有其他LAN連接埠,現在都會授予設備網路存取權限。 或者任何無線設備現在都可以透過使用上述步驟中設定的SSID和密碼上網。
相關 FAQ
這篇faq是否有用?
您的反饋將幫助我們改善網站
What’s your concern with this article?
- Dissatisfied with product
- Too Complicated
- Confusing Title
- Does not apply to me
- Too Vague
- 其他
謝謝
感謝您的反饋。
點擊此處與TP-Link技術支持聯繫。
基本 Cookies
These cookies are necessary for the website to function and cannot be deactivated in your systems.
TP-Link
accepted_local_switcher, tp_privacy_base, tp_privacy_marketing, tp_smb-select-product_scence, tp_smb-select-product_scenceSimple, tp_smb-select-product_userChoice, tp_smb-select-product_userChoiceSimple, tp_smb-select-product_userInfo, tp_smb-select-product_userInfoSimple, tp_top-banner, tp_popup-bottom, tp_popup-center, tp_popup-right-middle, tp_popup-right-bottom, tp_productCategoryType
Livechat
__livechat, __lc2_cid, __lc2_cst, __lc_cid, __lc_cst, CASID
Youtube
id, VISITOR_INFO1_LIVE, LOGIN_INFO, SIDCC, SAPISID, APISID, SSID, SID, YSC, __Secure-1PSID, __Secure-1PAPISID, __Secure-1PSIDCC, __Secure-3PSID, __Secure-3PAPISID, __Secure-3PSIDCC, 1P_JAR, AEC, NID, OTZ
分析和行銷 Cookies
Analysis cookies enable us to analyze your activities on our website in order to improve and adapt the functionality of our website.
The marketing cookies can be set through our website by our advertising partners in order to create a profile of your interests and to show you relevant advertisements on other websites.
Google Analytics & Google Tag Manager
_gid, _ga_<container-id>, _ga, _gat_gtag_<container-id>
Google Ads & DoubleClick
test_cookie, _gcl_au
Meta Pixel
_fbp
Crazy Egg
cebsp_, _ce.s, _ce.clock_data, _ce.clock_event, cebs
lidc, AnalyticsSyncHistory, UserMatchHistory, bcookie, li_sugr, ln_or