How to add an Omada Gateway to the network?(Controller 4.3.5 or below)
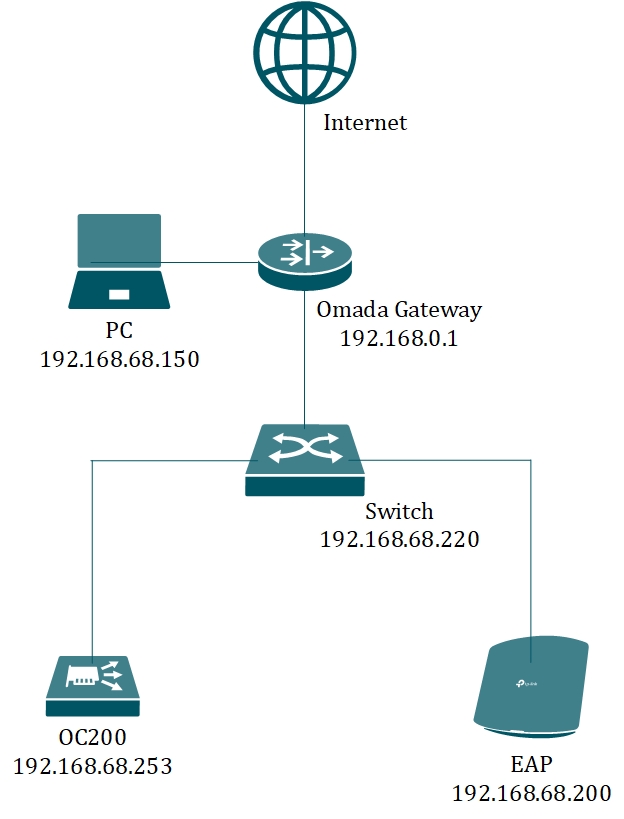
If you would like to replace your existing router with an Omada Gateway to the working network, you will face some problems, such as IP conflict or adoption failure. This article will introduce the recommended configuration process and help sort out the configuration process, taking the below network as an example.

All existing devices in this network have obtained IP addresses in the subnet of 192.168.68.0/24. However, the default LAN IP address of Omada Gateway is 192.168.0.1, which is in a different subnet from the devices, and will cause adoption failure.
Note: In this article, all Italicized texts indicate the functions or options of the controller page.
Step 1. Set a static IP address for OC200
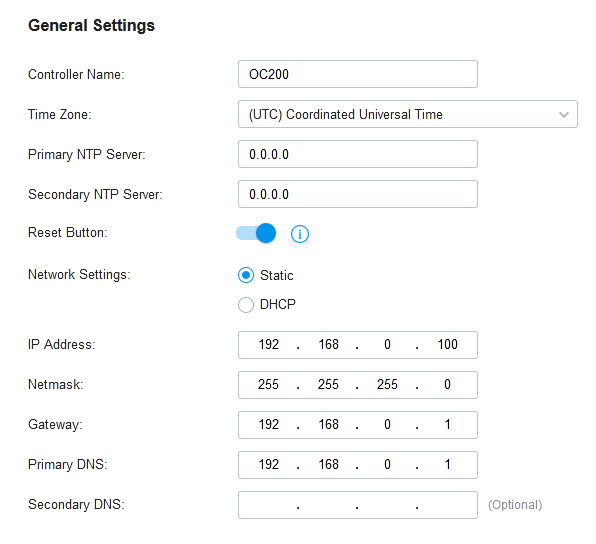
Before replacing the old router, please log into the Controller page, go to Settings –> Controller, select “Static” for Network Settings, and enter the following item as shown in the figure, and click Save. Wait for several seconds, and you can replace the old router with your Omada Gateway.
Besides, we recommend connecting your PC to the second network port of your OC200 or OC300.

Step 2. Adopt the Omada Gateway
Input 192.168.0.100 to the address bar and you will visit the OC200 controller page. After logging into the page, go to Devices, there will be the Omada Gateway in Pending status. Please click the gateway and adopt it.
Besides, you may find the controller will try to connect the adopted devices but fail, which is normal because the controller’s IP address has been changed, please don’t worry about this.
Step 3. Change the LAN IP address
After adoption, the status of Omada Gateway will change to “Connected”, then please go to Settings –> Wired Networks –> LAN, edit LAN network, change the Gateway/Subnet to 192.168.68.1/24, “Update DHCP range”, and click Save.
Then switch back to Devices, and you will find the status of Omada Gateway change to “Configuring”, please wait here for about one minute.
Step 4. Change the IP address of OC200
Please go to Settings –> Controller, you may change the Static IP address to 192.168.68.253. Wait for several seconds, unplug the network cable of your PC and plug it back in to obtain a new IP address, then you can visit the controller page with 192.168.68.253, and find that all the devices are connected.
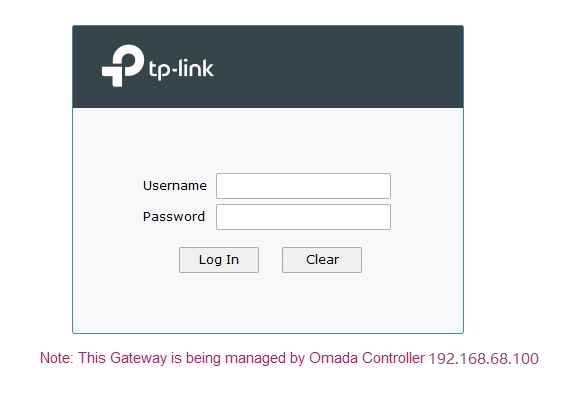
You can also change the network settings to DHCP. Then please visit 192.168.68.1, you will find the IP address of OC200 is displayed at the bottom of the web page. Here in the below image, the IP address of OC200 is 192.168.68.100.

Чи була ця стаття корисною?
Ваш відгук допомагає вдосконалити цей сайт.


