How to configure Static Routing on wireless routers
NOTE: For the new UI, please refer to another FAQ: How to Create Static Routing on TP-Link Routers
Overview:
A static route is a pre-determined path that network information must follow to reach a specific host or network.
Here are two typical scenarios, as examples of when a static route is needed, consider the following case.
Scenario 1:
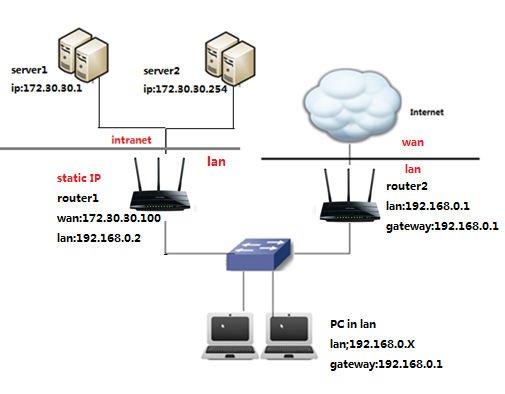
Issue: The gateway of PC is router2 which connected the Internet, but when PC visit servers in intranet, firstly the request will be sent to router2. Because there is no route to server1 and server2 on route table of router2, thus the request will be thrown away.
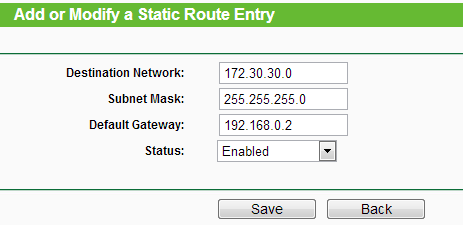
Resolution: Therefore, if you want PC to visit servers in intranet, you have to set up a static route on router2 helps your packet route to router1.
Net parameter:Servers in net segment: 172.30.30.0. IP subnet mask for this net segment is 255.255.255.0
Scenario 2:
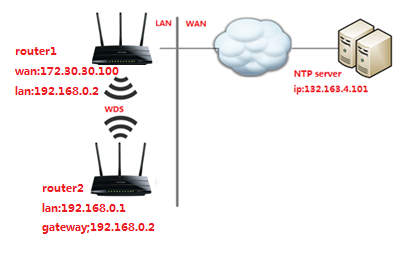
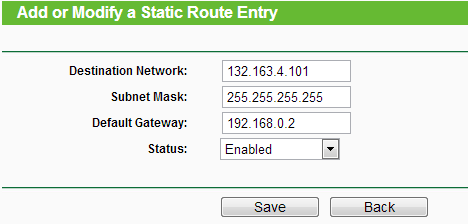
Issue: The gateway of LAN network is router 1, and router2 WDS router1’s signal.
But there is no route record from router2 to NTP server on route table of router2, therefore, router2 can’t get synchronization time from server.
Resolution: In order to solving the issue, you have to set up a static route on router2.
Net parameter:The IP of Server in Internet is 132.163.4.101. IP subnet mask for this address is 255.255.255.255
Steps of Configurations:
Step 1
Login configure page of router.
According to scenario 1 and scenario 2: type 192.168.0.1 in address bar,

Step 2
Type the username and password in the login page. The default username and password are both admin in lower case.
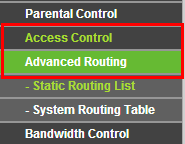
Step 3
Click Advanced Routing button on the left side of the screen, then select Static Routing List(in 54Mbps Wireless Router, the name of button is Static Routing).
Refer to picture:
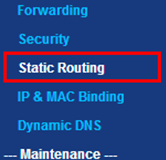
And the page of Static Routing would appear on the screen:
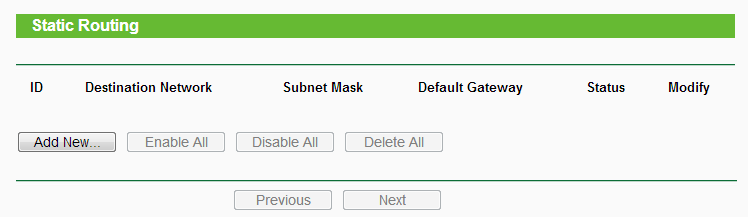
Step 4
Click Add New….
Input destination network, subnet mask, default gateway, select status and save it.
Please refer to following introduction to input parameter.
Introduction:
In 1st bar, type the IP address of destination.
In 2ndbar, type the IP subnet mask for this destination.
In 3rdbar, type the gateway IP address, that must be on the same LAN segment as the router.
As per scenario 1, for net segment
As per scenario 2, for single IP address
If there are any further problems, please contact TP-Link Support.
Get to know more details of each function and configuration please go to Download Center to download the manual of your product.
Чи була ця стаття корисною?
Ваш відгук допомагає вдосконалити цей сайт.

3.0-A_normal_1584497102381x.png)
