Configure rogue AP detection on EAP/Omada Controller
Suitable for: EAP/Omada Controller 2.0.3 or higher and all EAPs
A rogue AP is an access point that has been installed in a local network without explicit authorization from a network administrator.
The EAP device can scan all channels to detect all APs in the vicinity of the network. By default, all available APs seen by the EAP are shown on the Untrusted Rogue APs page. Network administrator can take further actions according to this list, for instance take out the rogue AP from the local network.
This article is aimed to give you some instructions on how to configure the Rogue AP Detection function on EAP/Omada controller.
Step 1 Enable Rogue AP Detection
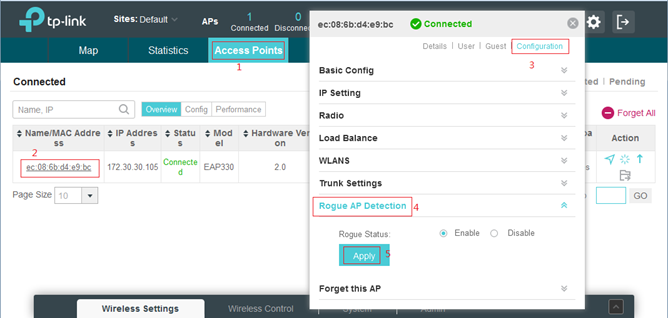
Go to Access Points. Choose one of the EAP that you want to enable rogue AP detection. Then select Configuration->Rogue AP Detection configuration->Enable Rogue Status and click Apply.

Step 2 Add the Trusted Rogue APs
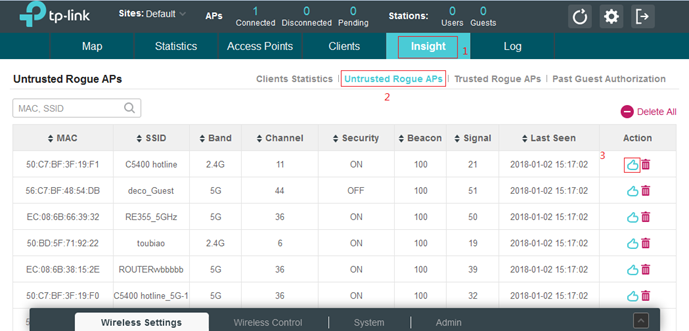
Go to Insight. Select Untrusted Rogue APs and it will show all APs in the vicinity of the network. You can click “ ” to add a known AP to Trusted AP list.

Notes:
- All channels will be scanned and thus clients which are connected to this EAP will be disconnected during the detecting process.
- The scan process will take some time; in other words, you need to wait a moment before you can see any entries on Untrusted Rogue APs page.
Is this faq useful?
Your feedback helps improve this site.
TP-Link Community
Still need help? Search for answers, ask questions, and get help from TP-Link experts and other users around the world.


4.0-F_normal_1593323197059j.png)
_EU_3.0_2401__normal_20240119043538b.png)