How to set the PVID/VLAN ID for the second port on the EAP
Note: This article applies to EAP-Wall series products, for EAP-Ceiling products, its second port is a bridge port that does not support VLAN configuration.
In some scenarios, you have set the multiple VLAN on the switch, but you also want to set the corresponding VLAN on the EAP which is connected behind the switch. If the network topology like Gateway---Switch-----EAP-Wall series product, and here are VLAN settings on the front devices like VLAN 10, then you can also set the PVID (VLAN ID) for other ports on EAP as you want. You can refer to the following steps.
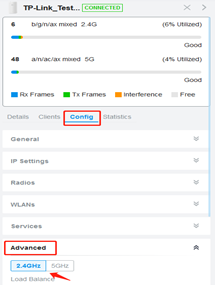
1) Go to Devices, and click the desired EAP, then go to Config > Advanced in the Properties window.

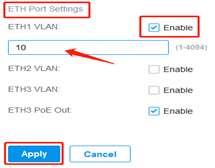
2) Choose 2.4GHz or 5GHz, and select the corresponding ETH port to set the VLAN ID/PVID. Take the ETH1 Port as an example, enable it, and type in the corresponding VLAN number.

At the beginning of this article, we mentioned that you set VLAN 10 on the switch, so let's use 10 as an example here as well. Once this is set up, for this port, PVID is 10, VLAN10 is untagged and no VLAN is tagged.
If you want the switch to transmit data for VLAN 20, then you need to change the number of the ETH1 Port to 20 here, and so on.
Is this faq useful?
Your feedback helps improve this site.
TP-Link Community
Still need help? Search for answers, ask questions, and get help from TP-Link experts and other users around the world.


