How to Use Storage Sharing on the TL-WR902AC (Standard Router and Hotspot Router Mode)
Share your USB storage device with different users on the network.
Step 1. Connect Your USB Disk
Insert your USB storage device into the router’s USB port directly or using a USB cable.
Wait several seconds until the USB LED becomes solid on.
Tips:
- If you use USB hubs, make sure no more than 2 devices are connected to the router.
- If the USB storage device requires using bundled external power, make sure the external power has been connected.
- If you use a USB hard drive, make sure its file system is FAT32 or NTFS.
- Before you physically disconnect a USB device from the router, safely remove it to avoid data damage: Go to Advanced > USB Settings > Storage Sharing and click Eject Disk.
Step 2. Access the web-based management interface of TL-WR902AC
Visit http://tplinkwifi.net, and log in with the username and password you set for the router.
Step 3. Manage USB Settings
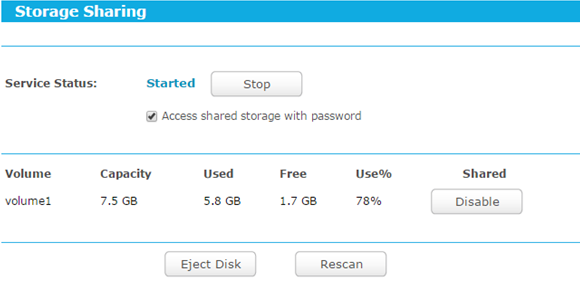
Go to Advanced > USB Settings > Storage Sharing to check whether the USB device is identified by the modem router.
If there is no device listed on this page, please click Scan. And you can also try unplug the USB device and plug it back in.
Note:
- Access shared storage with password - Check this box to ask users to provide the username and password to access the USB drive.
- Click Eject Disk to safely remove the USB drive that is connected to the router.
- Click Rescan to start a new scan.

Step 4. Manage User Account
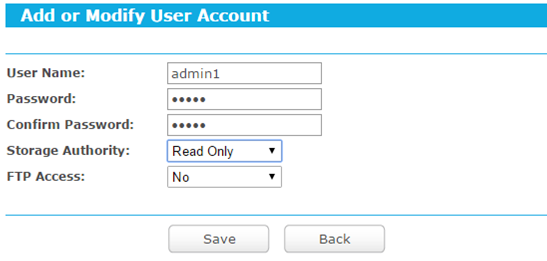
Go to Advanced > USB Settings > User Accounts. Click Add New User. Specify a new username and password in the User Name and Password fields, and re-enter the password for confirmation.

You can check the newly added account and also edit or delete the account.

Step 5. Access Your USB Disk
By default, all the network clients can access your USB disk. Refer to the following table for access instructions. You can customize user accounts by referring to User Accounts.
For windows computer:
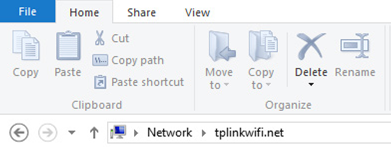
Open the Windows Explorer (or go to Computer), type the server address \\tplinkwifi.net in the address bar, enter a username and password if required and then press [Enter]. (Here we take Windows 8 as an example.)

For Mac computer:
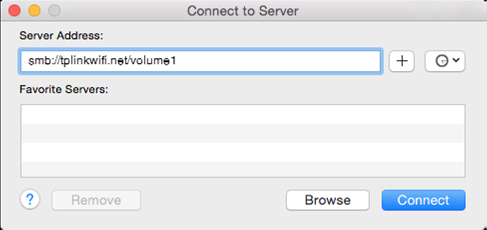
1) Click Go in the top left corner of the desktop and go to connect to Server.
2) Type the server address smb://tplinkwifi.net/volume1.(Here we take volume1 for example.)
3) Click Connect.

4) When prompted, select the Guest radio box (If you have set up a username and password to deny anonymous access to the USB disk, you should select the Registered User radio box. To learn how to set up an account for the access, refer to User Accounts).
For tablet:
Use a third-party app for network files management.
Get to know more details of each function and configuration please go to Download Center to download the manual of your product.
¿Es útil esta pregunta frecuente?
Sus comentarios nos ayudan a mejorar este sitio.