How to set up my modem router for Singtel Mio TV (TrendChip solution)
Este artículo se aplica a:
Before you begin, please note:
1. As the configuration need DHCP Port Filter function,Below is a list which support DHCP Port Filter. Please downgrade/upgrade the firmware to be following versions. You may download them from download-center.html, then refer the guide in the downloaded firmware to downgrade/upgrade and reset.
|
Model No
|
DHCP Port Filter
|
|
TD-W8151N_v1
|
101222
|
|
TD-W8101G_v2
|
100819
|
|
TD-W8101G_v3
|
110119
|
|
TD-W8901G_v3
|
100521
|
|
TD-W8901G_v6
|
110119
|
|
TD-W8951ND_v1
|
100728
|
|
TD-W8951ND_v3
|
101222
|
|
TD-W8961ND_v1
|
100722
|
2. Below is sample for TD-W8951N,the PVC list for different firmware version may change.
Configuration overview:
- Internet Group: LAN port 1\2\3 + Wireless bind to PVC3 (0/100 PPPoA connection)
- IPTV Group: LAN port 4 binds to PVC0 (1/100 Bridge connection)
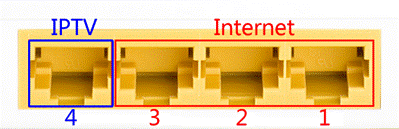
*You can change the IPTV Port according to your requirement.
Step-by-Step Configuration:
1. Login the modem
Step 1:
Open your web browser and enter 192.168.1.1 in the address bar,
then press "Enter".
.jpg)
Step 2:
Enter the username and password of your modem. By default They should be "admin" and "admin" If you have changed them, please enter the new username and password.
.jpg)
2. Configure PVCs:
Please find PVC 0/100 and 1/100 in the status page
.jpg)
Note: If there is no corresponding PVC, you can change the PVC4 8/35 value to be 0/100 or 1/100.
Go to Interface Setup->Internet, edit the two PVCs: PVC3:0/100 at PPPOA
Go to Interface Setup->Internet, edit the two PVCs: PVC3:0/100 at PPPOA
mode with “IGMP V2 ”enabled, PVC0:1/100 at Bridge mode which is for IPTV:
PVC3 (0/100) PPPoA with NAT for Internet: Port 1+Port 2 + Port 3+Wireless;
PVC0 (1/100) Bridge for IPTV: Port 4
PVC3 for Internet:
.jpg)
.jpg)
PVC0 for IPTV:
.jpg)
Go to Status page to check the PVC Summary:
.jpg)
3. LAN Setting:
Go to “Interface Setup –> LAN” page, Enable Multicast IGMP v2 and IGMP Snoop. At Physical Ports, please un-tick port 4.
Note: DHCP service will NOT be applied on port 4, so if now you’re connecting the computer with port 4, please re-connect the Ethernet cable to port1/port2/port3.
.jpg)
4. VLAN Setting:
VLAN1: PVC3 + LAN Port 1 + Port 2 + Port 3+Wireless LAN
VLAN2: PVC0 +Port 4
Step 1:
Active VLAN Function;
Step 2:
Go to “Assign VLAN PVID for each Interface”
.jpg)
.jpg)
Click SAVE then NEXT
Step 3:
“Define VLAN Group”
VLAN1: PVC 3 + LAN Port 1 +Port 2 +Port 3+ Wireless LAN for Internet
.jpg)
VLAN2: PVC0 + Port 4 for IPTV
.jpg)
Check finished VLAN Group List:
.jpg)
5. Go to Maintenance->SysRestart to reboot the router.
.jpg)
6. Backup the modem settings:
If your IPTV service works normally, you can export the current settings as a backup. Please go to Maintenance->Firmware page and click ROMFILE SAVE button. Then save the ROM-0 file in a floder as a backup configuration.
.jpg)
If you occasionally changed the modem setting and need recover the Mio TV settings, you can go to Maintenance->Firmware page and Browse the ROM-0 file then click UPGRADE button.
.jpg)
Check the internet and Mio TV connection.
¿Es útil esta pregunta frecuente?
Sus comentarios nos ayudan a mejorar este sitio.