¿Cómo encontrar la dirección IP en sus dispositivos?
Cuando su computadora esté conectada a una red, se le asignará una dirección en la red llamada dirección IP.
Los pasos a continuación le ayudarán a encontrar la dirección IP de su computadora. Hay dos formas de encontrar la dirección IP de su computadora.
Elija el sistema operativo de su computadora.
Paso 2
Resalte y haga clic con el botón derecho en el icono Conexión de área local; haga clic en Estado y vaya a Soporte. Se mostrará la dirección IP.
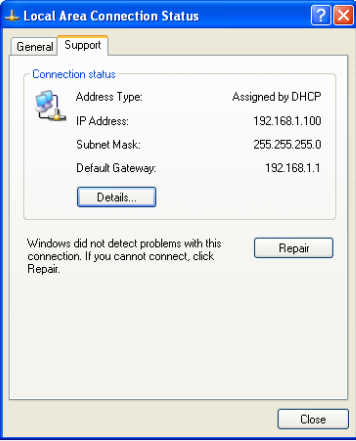
Note: If your computer is connected to a wireless network please click the Wireless network connection icon.
Step 1
Click Start ->Control Panel -> Network and Internet -> Network and Sharing Center.
Step 2
In the task list, please click Change adapter settings. Highlight and right click the Local Area Connection icon; click on Status and go to Details. The IP address will display.
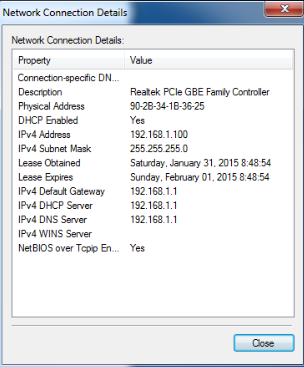
Note: If your computer is connected to a wireless network please click the Wireless network connection icon.
Step 1
Click Start ->Control Panel -> Network and Internet -> Network and Sharing Center.
Step 2
In the task list, please click Manage network connections. Highlight and right click the Local Area Connection icon; click on Status
and go to Details. The IP address will display.
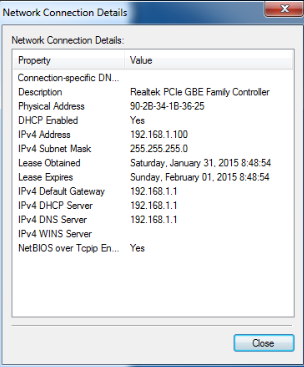
Note: If your computer is connected to a wireless network please click the Wireless network connection icon.
Step 1
Go to Control Panel.
Here we will illustrate different ways to find a control panel on Windows 8.
1) Press “Windows key  +F”, a search box will come out, please input the control panel and press enter;
2)Press “Windows key+ R”, then there will be a “run” box, input control panel, and press enter;
3) Press “Windows key +X”, and click on “control panel”;
4) You can also input “control panel” in the search bar on the right-hand side of the screen.
Step 2 Click on Network and Internet -> Network and Sharing Center, click on Change adapter settings on the left side.
Step 3 Highlight and right-click on Ethernet, go to Status -> Details. The IP address will display.
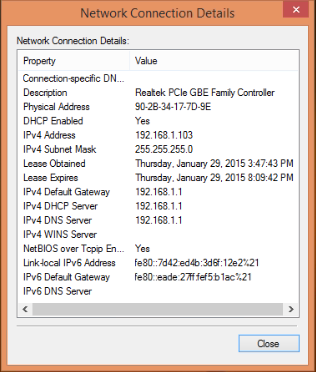
Note: If your computer is connected to a wireless network please click the Wi-Fi icon.
Method 1
Step 1 Go to Control Panel. Press Windows key+X at the same time and select Control Panel.
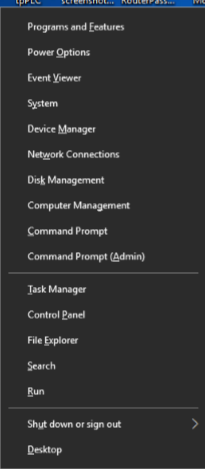
Step 2 Click on Network and Internet -> Network and Sharing Center, click on Change adapter settings on the left side.
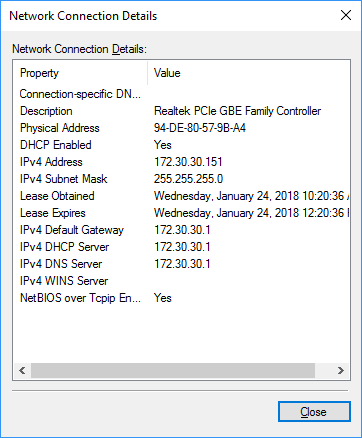
Step 3 Highlight and right-click on Ethernet, go to Status -> Details. The IP address will display.
Method 2
Step1
Situation 1
Click the network icon (may look like a computer or Wi-Fi signal) in the task tray. Go to Network settings.


Situation 2
Click the Windows symbol and then choose the Settings button on the bottom-left corner. It will pop up on the Settings page, go to Network & Internet.


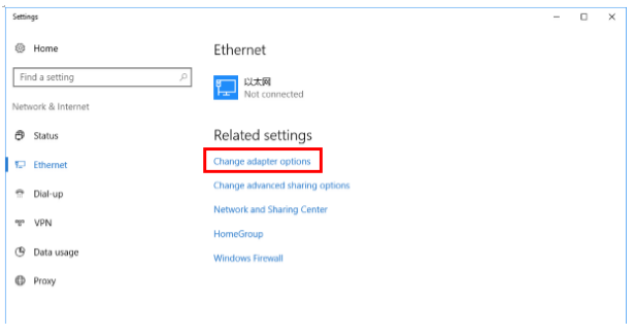
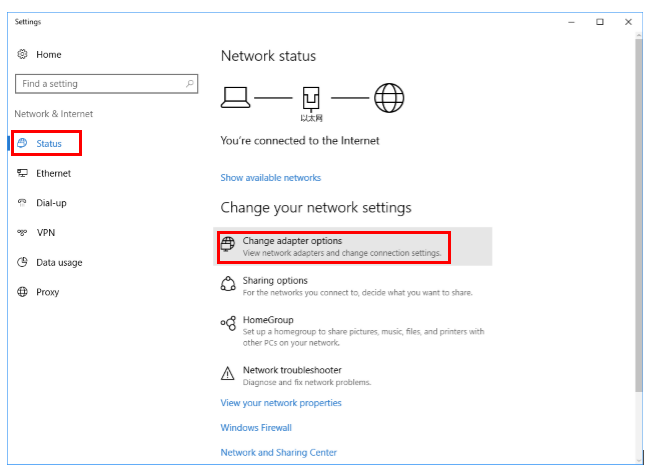
Step 2 Click Ethernet > Change adapter options. Or click Status > Change adapter options. The IP address will display.
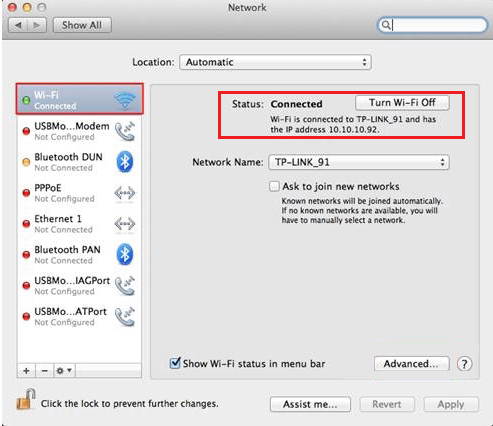
Step 1 Click the Apple icon, from the Apple drop-down list, select System Preferences.
Step 2 Click the Network icon.
Step 3 In the left column, select Ethernet (for wired connection) or Wi-Fi (for wireless connection). Your IP address will be listed directly beneath your connection status, in smaller print.
Step 1 Select the Time in the bottom-right corner of the screen. If you don't see the Chrome OS shelf, tap or click in the bottom-right corner of the screen to bring it up.
Step 2 Select your Wi-Fi network in the pop-up window.

Step 3 Click the Network icon.
Step 4 Your Chromebook's IP address and MAC will appear in a small pop-up window. The Mac address is listed as Wi-Fi.

Step 5 Double-check on the Your Wi-Fi name and it will pop up on the Settings page. Click on Network, you will also see the IP Address, Subnet Mask, and Default Gateway.

Step 1 On your device home screen, tap Settings and select WLAN.

Step 2 Select the information icon to the right of the connected network. Tap on the blue lowercase ( i ) in the circle, for the address section of your iPhone.

The title labeled IP Address would be your local IP address for your iPhone.

Step 1 On your device access Settings and choose WLAN.


Step 2 Choose the Wi-Fi you have connected, then you can see the IP address you get.

¿Es útil esta pregunta frecuente?
Sus comentarios nos ayudan a mejorar este sitio.