What's the difference between Master Administrator, Administrator and Viewer account in Omada Controller?
Apply to: Omada SDN Controller
Overview
When you are ready to add new administrators to your Omada Controller, there will be three types of account roles you choose to assign. Master Administrator, Administrator, and Viewer. The level of rights and access will be determined by the type of account role assigned to the user.
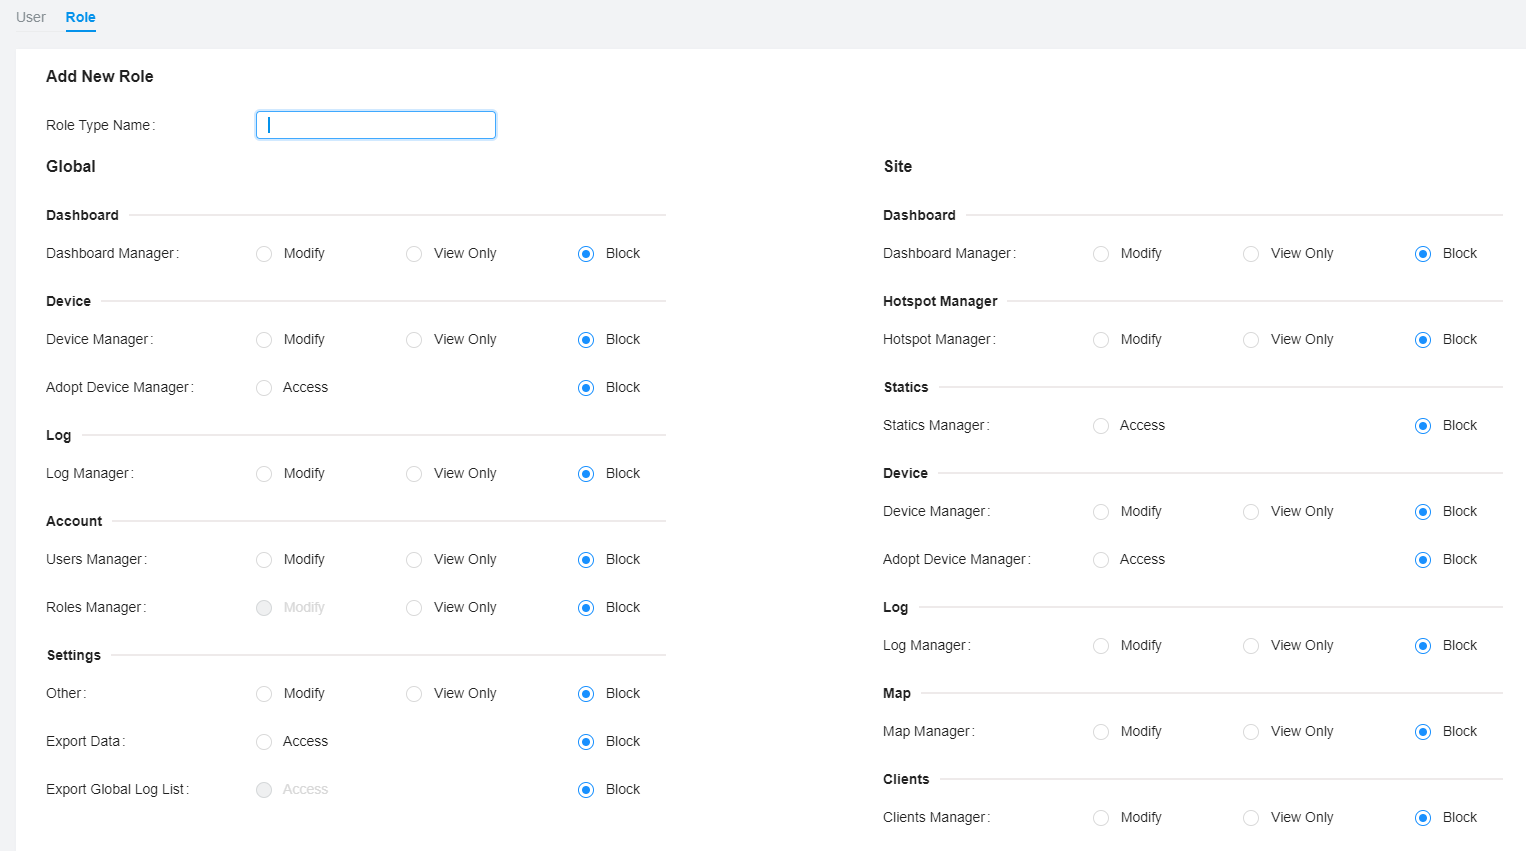
*With V5.9 and up of the Omada Controller supports customized user role settings. These 3 roles remain the default options.
When you add a new user to an Administrator or Viewer role, you could specify which sites you want them to have permission to access. These users cannot see sites beyond their assigned authorization. Their management will be limited to their access and assigned role. Master Administrator users have full access and can assign lesser roles and access.
Account Description
1) Master Administrator
This role is assigned to the user who sets up the Controller for the first time. The account’s login will be tagged as a Master Administrator account and will have full access to Controller and all sites and systems it manages.
2) Administrator account
Administrator accounts have more access than a viewer account but less than a Master Administrator account. The account cannot access the following options:
Global-View: Logs
Global-View: Settings
Site view: Transmission > Quality of Services
Site view: VPN > Wireguard
Site view: Profiles > Service Type
Site view: Services > DNS Proxy
Site view: Services > Export Data
Log out (top right corner)
3) Viewer account
Viewer accounts have the following restrictions:
No access——You cannot get to it or see anything
- Site >Device Account
- Wired > Internet > WAN
- Wireless Networks > WLAN > AI WLAN Optimization
- VPN >VPN > IPsec Failover/ SSL VPN
- Services > DHCP Reservation/Dynamic DNS/SNMP
- Account Settings (top right corner)
View only——You have access to it but have no permission to edit or see details of existing entries
- Dashboard
- Map
- Devices->Device List
- Insight
- Logs
- Tools
- Report
- Wired Networks->Internet->WAN mode
- Wired Networks->Internet->LAN
- Wireless Networks->WLAN
- Network Security->ACL
- Network Security->URL Filtering
- Network Security->Attack Defense
- Network Security->Firewall
- Network Security->IP-MAC Binding
- Transmission
- Authentication->Portal/ MAC-Based Authentication/ RADIUS Profile/ LDAP
- Services > mDNS/ UPnP/ SSH/ Reboot Schedule/ PoE Schedule/ IPTV/ Upgrade Schedule
Customized roles - Omada Controller v5.9
After you have upgraded your Omada Controller to v5.9 or higher, you’ll be able to assign customize roles with different permissions you want a specific user to have.

Is this faq useful?
Your feedback helps improve this site.
TP-Link Community
Still need help? Search for answers, ask questions, and get help from TP-Link experts and other users around the world.


_EU_3.0_2401__normal_20240119043538b.png)
4.0-F_normal_1593323197059j.png)
