如何設定電力線網路

當您設定時
更新02-17-2025 05:36:28 AM Number of views for this article14924
這篇文章適用於: 

什麼是電力線?

電力線產品將家庭的電線轉變為網路線,並將訊號傳輸到每個房間。只要有電源插座,您就可以組建電力線網路,無需昂貴而複雜的乙太網路線。

要形成基本的電力線網路,必須布置兩個或更多電力線網路,並連接到同一個電路,無論是有線還是無線。

電力線網路橋接器只是即插即用設備,因此請將兩個電力線裝置插入同一房間的牆上插座。等待2-3分鐘;當電力線裝置 LED 亮起時,透過乙太網路線將電力線網路橋接器連接到路由器的 LAN 端口,然後將另一個電力線網路橋接器重新定位到新位置並享受新的擴展網路。

如果電力網路橋接器無法自動配對,請依照下列步驟操作。

注意:以 TL-WPAxxxx 開頭的型號將 Wi-Fi 訊號(“W”代表“無線”)。以 TL-PAxxxx 開頭的型號僅支援乙太網路連接。


方法 1:透過配對連接電力線網路

步驟 1:打開電力線網路橋接器的電源。

將電力線擴展器插入現有電力線網路橋接器附近的牆上插座。

注意:我們建議您在配對時將電力線設備盡可能靠近彼此插入。然後,配對完成後,它們就會被重新定位到需要的地方。

需要一個電力線網路橋接器透過乙太網路線連接到路由器。

步驟2:配對電力線網路橋接器。

a.一個。按住電力線網路橋接器上的配對按鈕一秒鐘。然後,電源燈將快速閃爍。

注意:如果電源燈沒有閃爍,請長時間按住配對按鈕。

A white TL-WPA4220 device with a Wi-Fi button, two Ethernet ports, a pairing button, a reset button on the bottom, a plug, and a green Wi-Fi indicator light. A white TL-PA4010 Powerline Adapter. It has a Power Plug on the right side, a Pair Button in the middle, and an Ethernet Port on the left.  It has an integrated electrical socket, a plug, a Wi-Fi button, a pair button on the left side, an LED button, a reset button, and an Ethernet port.

b.b.在 2 分鐘內,按住另一個電力線擴展器上的配對按鈕一秒鐘。然後,兩個電力線設備上的電源燈同時快速閃爍。

c. c.當電力線 LED 亮起時,表示新設備已成功加入您的電力線網路。

筆記:

1. 對於 TL-PA201/TL-PA211 V1/TL-PA210 V1/TL-PA251 V1,您需要按住配對按鈕 3-8 秒才能開始配對過程。

2. 如果您想要新增更多擴展器,請按下其中一個現有網路上的配對按鈕,然後按下想要加入現有網路的橋接器上的配對按鈕。只需按照上述說明逐一添加它們即可。

步驟 3:重新定位電力線橋接器。

等待兩台電力線橋接器上的電力線燈全部亮起後,請透過乙太網路線將一條電力線橋接器連接到路由器,並將另一電力線橋接器插入所需的位置。

筆記:

1. 如果電力線燈為紅色,則表示電力線網路橋接器的訊號強度較差。嘗試將其插入另一個牆上插座。

2. 如果您有電力線擴展器,預設的 Wi-Fi 名稱和密碼將列印在 Wi-Fi 資訊卡和裝置底部的標籤上。

步驟 4:將設備連接到電力線網路橋接器並享受網路。

如果您想更改電力線擴展器的 Wi-Fi 名稱,請參閱 如何使用 tpPLC App(智慧型手機)變更無線設定。


方法 2:透過 tpPLC App(智慧型手機)

步驟 1:透過無線連接到網路橋接器

注意:網路橋接器需要網路存取才能運作。

步驟 2:啟動 tpPLC APP

A mobile screen with a TP-Link app group. The tpPLC app is highlighted with a red circle. Other apps in the group include tpCamera, Kasa, Amazon Alexa, and Arlo.

步驟3:點選新增按鈕。

In the top right corner, there is a plus sign indicating an option to add a new device. 

步驟4:輸入設備的電力線金鑰。

注意:電力線金鑰位於設備背面。請記住,之後將其重新插入。
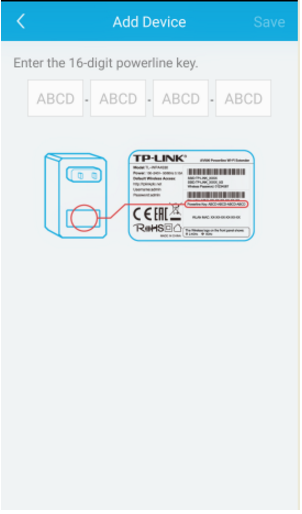
On the Add Device screen, it says, 'Enter the 16-digit powerline key.' There are four input boxes on the screen, each with a placeholder 'ABCD'. On the right is a diagram of a device label with the TP-LINK logo and some text. There is a ‘Save’ button in the upper right corner of the screen.

步驟 5:點選「儲存」。


方法 3:透過應用程式

步驟 1:記下設備標籤上印刷的 16 位元電力線路金鑰。

步驟 2:將裝置插入牆上插座,等待其 LED 穩定下來。

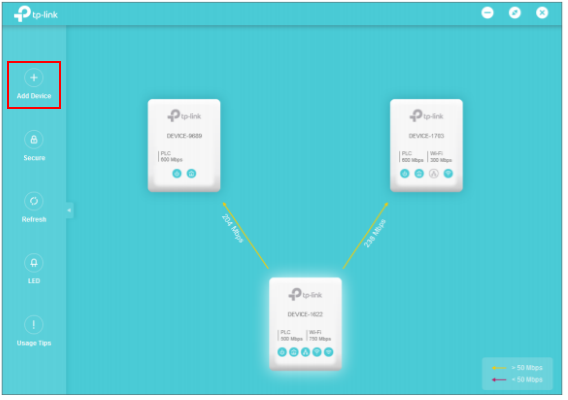
步驟3:開啟應用程式並點擊左欄中的「新增裝置」。

注意:如果尚未安裝應用程序,請參閱 如何使用 tpPLC 應用程式設定新的電力線路網路名稱

There is a red-boxed ‘Add Device’ option at the top of the left menu. On the right is a network topology diagram showing three devices and their connection relationship.

步驟4:在新增設備頁面,輸入您記下的電力線金鑰,然後按一下儲存。
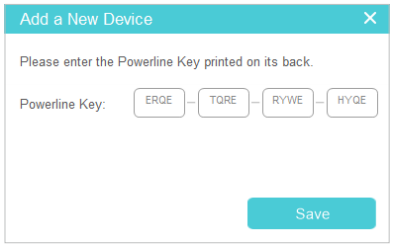
On the ‘Add a New Device’ page, you will be prompted to enter the powerline key on the back of the device. There are four input boxes on the page, and you need to enter the powerline key separately. There is a ‘Save’ button in the lower right corner.

現在,新設備將出現在應用程式中。

要了解每個功能和配置的更多詳細信息,請前往下載中心下載產品手冊。.

Related FAQs

這篇faq是否有用?

您的反饋將幫助我們改善網站

Recommend Products

來自 United States?

取得您的地區產品、活動和服務。