How to install your Tapo Dual-Lens Smart Baby Camera
The baby camera package includes three different stands for versatile mounting options and monitoring needs. Before you start, please choose how to install the camera based on your needs.
Install the camera on the crib railing with the clamp mount.

1. Find the Right Position
1) Avoid installing the camera at the head or foot of the crib. The long sides of the crib are recommended.

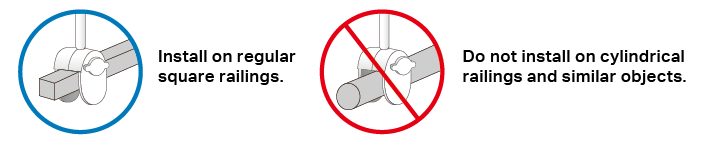
2) Install the clamp mount on a regular plane. Please do not install it on irregular shapes, including handrails, cylindrical railings, and similar objects.
3) Unstable installation may cause the device to fall over, endangering your baby's safety.
2. Assemble the Tube
1) Pull out the excess cord from the clamp side of the tube.

2) Insert the gooseneck in the correct orientation, then align the inner and outer tube joints.
Note: Ensure the bracket side and adjustment knob are in the same orientation.

3) Rotate the connector outside anticlockwise until tightened.

3. Install the Gooseneck Clamp Mount
1) Rotate the adjustment knob anticlockwise to loosen the clamp mount.
Note: To ensure stability, the thickness of the crib railing should be 5 mm (0.2 in.) - 40 mm (1.5 in.).
2) Attach the clamp mount to the center of the long sides of the crib.
3) Rotate the adjustment knob clockwise until tightened as much as possible.
Note: Keep the metal supports of the clamp mount in tight contact with the top surface of the crib railing while rotating the knob.


4. Secure the Baby Camera
Firmly plug the power cord into the Type-C port of the camera. Then attach the camera to the bracket and rotate clockwise to secure.
5. Adjust the Gooseneck
Power up the camera and preview the video on the Tapo app. Bend the gooseneck to adjust the installation height for the best viewing angle.
Note: The maximum installation height is 88 cm (2.89 ft). Avoid the gooseneck contact with oily substances to keep it firm. Refrain from overbending the gooseneck to prevent deformation and rebounds.

Mount the camera on a wall/ceiling with the included accessories.

1. Mark Mounting Position
1) Place your crib against the wall where you will mount the camera. Find the crib center and mark the centerline on the wall.
Note: Ensure no studs are in the crib center and the power outlet is out of your baby’s reach.

2) Power up your camera. Move it along the centerline and preview the video on the Tapo app. When the entire crib is within the camera’s wide-angle view, make a mark on the wall.

2. Mount the L-Shaped Mounting Bracket
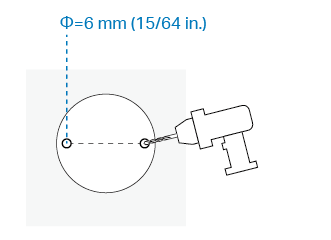
1) Stick the mounting template to the marked position. Drill two holes according to the template.
2) Insert two mounting anchors into the holes, then use the mounting screws to affix the bracket over the anchors.
Note: Affix the bracket through the corresponding screw holes as instructed to ensure stability when you mount it on a wall or ceiling.

3. Secure the Baby Camera
Firmly plug the power cord into the Type-C port of the camera. Attach the camera to the bracket and rotate to secure the camera.

Place the camera on a flat surface like a table or shelf.

Is this faq useful?
Your feedback helps improve this site.

TP-Link Community
Still need help? Search for answers, ask questions, and get help from TP-Link experts and other users around the world.