Network Video Recorder User Guide

Get Started

This chapter guides you on how to set up your NVR for the first time. The quick setup wizard brings you convenience and flexibility to configure VIGI NVR. This chapter includes the following sections:

? Connect the Hardware

? Log In to Your NVR

? Set Up NVR via Quick Setup Wizard

The VIGI network video recorder (NVR) coordinates with camera systems to help you view, store, and playback videos. With the support of ONVIF, you can easily add cameras of different brands. Also, it supports detecting events and sending you up-to-date notifications. Moreover, you can manage and monitor the NVR and cameras remotely via the VIGI app or VIGI Security Manager.

1. 1 Connect the Hardware

To manage multiple cameras, you should prepare a network device, such as a switch or a router. Connect the NVR and cameras to the network device to ensure they are in the same network. Follow the steps below to connect the devices.

1. Connect your monitor to the HDMI or VGA port according to the connection port it supports.

2. Connect your monitor to a power source and turn it on.

3. Connect the LAN port of the NVR to a network device with an Ethernet cable.

4. Connect the provided USB Mouse to the USB Interface of the NVR (front panel).

5. Connect the power adapter to the NVR.

6. Connect the cameras to the network device.

1. 2 Log In to Your NVR

With an user interface displayed on monitor, it is easy to configure and manage the NVR. Follow the steps below to log in to your NVR for the first time.

1. Set the login password for your NVR and preset a password for the cameras. Enter a password reset email for your NVR and cameras, which is used to reset the password if you forgot it. Click Complete .

New Password

Confirm Password

Password Reset Email for NVR

Camera’s Password

Password Reset Email for Camera

Same as the NVR

4. In the pop-up window, click Enable or Cancel to enable or disable Plug and Play. If you click Enable , your cameras will be automatically added to the NVR. It is recommended to enable this function to simplify the processes of quick setup and adding cameras.

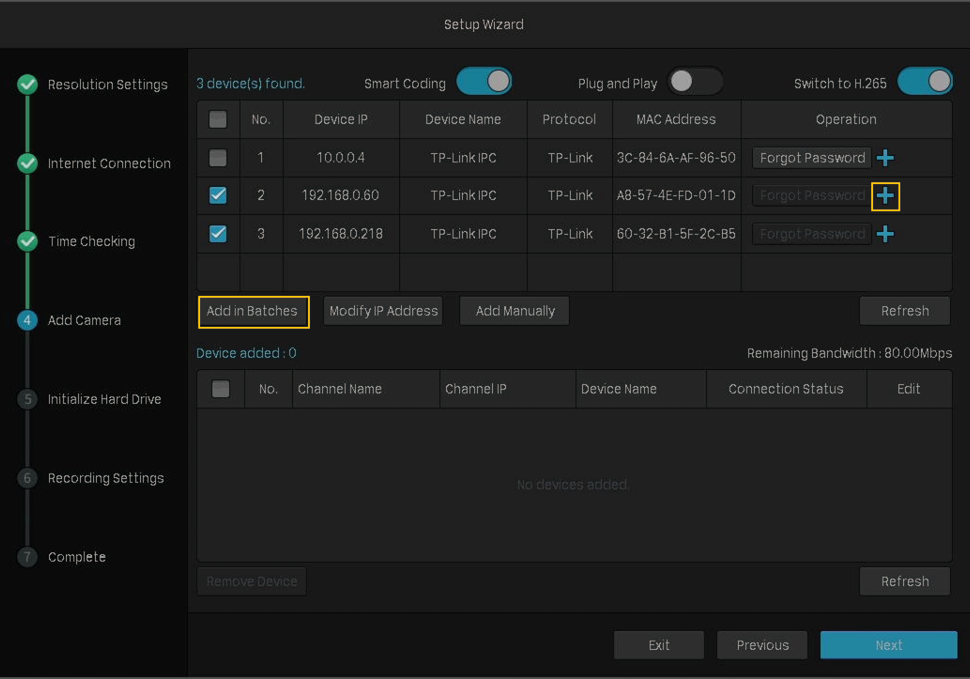
1. 3 Set Up NVR via Quick Setup Wizard

The Quick Setup Wizard guides you through the process to set up your NVR. If you have enabled Plug and Play, refer to Quick Setup When Plug and Play is Enabled ; if not, refer to Quick Setup When Plug and Play is Disabled .

? Quick Setup When Plug and Play is Enabled

1. If your TP-Link security cameras are not in the same subnet as your NVR, the NVR will automatically modify the IP addresses of your cameras. The following window pops up automatically. Click Add to add cameras to the NVR.

2. Set the basic parameters for the NVR. Click Next .

Resolution

Adaptive: The NVR automatically selects the highest resolution supported by the screen.

IP Address

System Time

NTP to automatically get the system time from the Internet, or set the system time manually.

Time Zone

3. (Optional) If your hard drive is abnormal, initialize the hard drive installed in the NVR to ensure the recording function. Click Next . If you click Initialize to format the hard drive, the files stored in it will be lost.

Disk No.

Capacity

Status

Properties

Read-write: The data on the hard drive can be read and written.

Read-only: The data on the hard drive can only be read.

Type

Free Space

4. Set the recording schedule according to your needs. By default, the settings are applied to all cameras managed by the NVR. Click Next .

Turn on 24-Hour Continuous Recording

Turn on 24-Hour Motion Detection Recording

Enable Loop Recording

5. (Optional) Scan the QR code on the left to download the VIGI app, then scan the QR code on the right to add the NVR to the app. You can view live video, manage NVR, and get instant alerts.

6. Click Complete to finish the quick setup. If your cameras have passwords, enter the password to verify the cameras.

? Quick Setup When Plug and Play is Disabled

1. Select the screen resolution according to your need. Click Next . If you select Adaptive , the NVR automatically selects the highest resolution supported by the screen.

2. Select Auto to obtain a dynamic IP address or select Manually to set a static IP address for your NVR. Click Next .

3. Select NTP to automatically get the system time from the Internet, or select Manually to set the system time manually. Select the time zone according to your region. Click Next .

4. Add cameras to your NVR.

Note: Here we take TP-Link Security Cameras as the example. TP-link Security Cameras have no password in default settings.

? Add Cameras Without Passwords

1 ) Click to add a single camera. If you want to add cameras in batches, click the check box of cameras and click Add in Batches .

Smart Coding

Smart Coding to reduce the load on the network and the size of the file.

Plug and Play

Plug and Play to add cameras more conveniently in the future.

Switch to H.265 (Only for NVR1008H)

Switch to H.265 to reduce bandwidth and keep high image quality.

2 ) Set a password for your cameras. You can also click the checkbox to use the preset password settings for cameras. Click Next .

? Add Cameras with Passwords

Click to add a single camera. If you want to add cameras in batches, click the check box of cameras and click Add in Batches . Then enter the password to verify it. Click Next .

5. (Optional) If your hard drive is abnormal, initialize the hard drive installed in the NVR to ensure the recording function. Click Next . If you click Initialize to format the hard drive, the files stored in it will be lost.

Disk No.

Capacity

Status

Properties

Read-write: The data on the hard drive can be read and written.

Read-only: The data on the hard drive can only be read.

Type

Free Space

6. Set the recording schedule according to your need. By default, the settings are applied to all cameras managed by the NVR. Click Next .

Turn on 24-Hour Continuous Recording

Turn on 24-Hour Motion Detection Recording

Enable Loop Recording

7. (Optional) Scan the QR code on the left to download the VIGI app, then scan the QR code on the right to add the NVR to the app. You can view live video, manage NVR, and get instant alerts.

8. Click Complete to finish the quick setup.